Lesson 4 - Creating a Main View
- 6 minutes to read
Step 1 - Creating a new View and adding a RibbonControl
Right-click your project in the Solution Explorer and select Add DevExpress Item | New Item… to invoke the DevExpress Template Gallery, and select the View & View Model template. Specify the name of the View as “MainView” and click Add Item.
Check to make sure that two items have been added to the project: MainView and MainViewModel. The View and ViewModel are linked to each other, so there is no need to set the DataContext property for the created View.
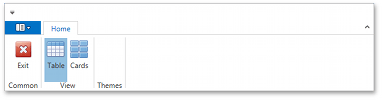
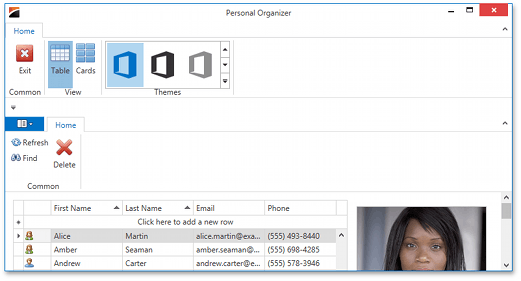
Next, perform the same operations as you did in the previous lessons. Place the RibbonControl on the form and add the following three items: Exit, Table and Cards. The Exit item is a BarButtonItem - an end-user will be able to close the application by clicking this item. The Table and Cards items are related BarCheckItems. By default, this application will show a regular GridControl with records (ContactCollectionTableView); if the user wishes to switch to another View, he or she can click the Cards BarCheckItem, and the CardView will be displayed (ContactCollectionCardView).
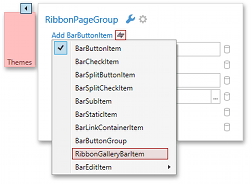
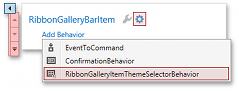
Next, you will add the capability to switch the theme (i.e., the look and feel) of the application. As you may have noticed, there is an empty RibbonPageGroup – Themes. Add the RibbonGalleryBarItem to this group and attach the RibbonGalleryThemeSelectorBehavior to it. The RibbonGalleryThemeSelectorBehavior allows you to enable theme switching behavior for any appropriate BarItem. Like any MVVM components, you can define this behavior using a smart tag menu.
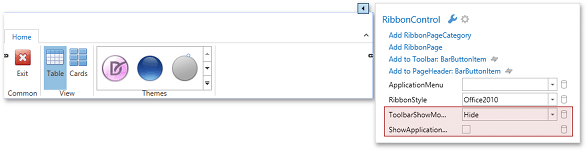
Next, you will customize the main RibbonControl. Previously, two RibbonControls were added to the ContactCollectionTable - Card Views will be merged with this main RibbonControl. So, as a final touch, you will also hide the quick access toolbar and application button.
The generated code is shown below.
<dxb:BarManager>
    <DockPanel>
        <dxr:RibbonControl DockPanel.Dock="Top"
RibbonStyle="Office2010" ToolbarShowMode="Hide" ShowApplicationButton="False">
            <dxr:RibbonDefaultPageCategory>
                <dxr:RibbonPage Caption="Home">
                    <dxr:RibbonPageGroup Caption="Common">
                        <dxb:BarButtonItem x:Name="barButtonItem1" Content="Exit"
Glyph="{dx:DXImage Image=Close_16x16.png}" LargeGlyph="{dx:DXImage Image=Close_32x32.png}"/>
                     </dxr:RibbonPageGroup>
                     <dxr:RibbonPageGroup Caption="View">
                        <dxb:BarCheckItem x:Name="barCheckItem1" Content="Table" IsChecked="True" GroupIndex="1"
Glyph="{dx:DXImage Image=Grid_16x16.png}" LargeGlyph="{dx:DXImage Image=Grid_32x32.png}"/>
                        <dxb:BarCheckItem x:Name="barCheckItem2" Content="Cards" GroupIndex="1"
Glyph="{dx:DXImage Image=Cards_16x16.png}" LargeGlyph="{dx:DXImage Image=Cards_32x32.png}"/>
                     </dxr:RibbonPageGroup>
                     <dxr:RibbonPageGroup Caption="Themes">
                         <dxr:RibbonGalleryBarItem x:Name="ribbonGalleryBarItem1" Content="ribbonGalleryBarItem1">
                             <dxmvvm:Interaction.Behaviors>
                                 <dxr:RibbonGalleryItemThemeSelectorBehavior/>
                             </dxmvvm:Interaction.Behaviors>
                         </dxr:RibbonGalleryBarItem>
                     </dxr:RibbonPageGroup>
                 </dxr:RibbonPage>
            </dxr:RibbonDefaultPageCategory>
        </dxr:RibbonControl>
        <Grid/>
    </DockPanel>
</dxb:BarManager>
Step 3 - Adding child Views to the MainView
Next, place ContactCollectionTableView and ContactCollectionCardView in the MainView.
<dxb:BarManager>
    <DockPanel>
        <dxr:RibbonControl DockPanel.Dock="Top" ...>
                    ...
        </dxr:RibbonControl>
        <Grid>
            <local:ContactCollectionTableView/>
            <local:ContactCollectionCardView/>
        </Grid>
     </DockPanel>
</dxb:BarManager>
The Visibility of these child Views should be bound to the corresponding check items.
<dxr:RibbonControl ...>
    <dxr:RibbonDefaultPageCategory>
        <dxr:RibbonPage Caption="Home">
            ...
            <dxr:RibbonPageGroup Caption="View">
                <dxb:BarCheckItem x:Name="barCheckItem1" Content="Table" IsChecked="True" GroupIndex="1" .../>
                <dxb:BarCheckItem x:Name="barCheckItem2" Content="Cards" GroupIndex="1" .../>
            </dxr:RibbonPageGroup>
           ...
        </dxr:RibbonPage>
   </dxr:RibbonDefaultPageCategory>
</dxr:RibbonControl>
<Grid>
    <local:ContactCollectionTableView
Visibility="{Binding ElementName=barCheckItem1, Path=IsChecked, Converter={StaticResource booleanToVisibilityConverter}}"/>
    <local:ContactCollectionCardView
Visibility="{Binding ElementName=barCheckItem2, Path=IsChecked, Converter={StaticResource booleanToVisibilityConverter}}"/>
</Grid>
Since the BarCheckItem.IsChecked property is a Boolean and the Visibility property is an Enum, a value converter is used. Remember to add it to the app resources.
<Application.Resources>
    <dxmvvm:BooleanToVisibilityConverter x:Key="booleanToVisibilityConverter"/>
    ...
</Application.Resources>
Add the MainView to the MainWindow to see the results.
As you can see, there are two RibbonControls in the personal organizer. To show only one main RibbonControl, you need to merge child RibbonControls with the main one. The RibbonMergingHelper class has the MergeWith attached property. If you set this property for ContactCollectionTableView and ContactCollectionCardView, their RibbonControls will automatically be merged.
<dxb:BarManager>
    <DockPanel>
        <dxr:RibbonControl x:Name="mainRibbon" ...>
            ...
        </dxr:RibbonControl>
        <Grid>
            <local:ContactCollectionTableView
dxr:RibbonMergingHelper.MergeWith="{Binding ElementName=mainRibbon}" .../>
            <local:ContactCollectionCardView
dxr:RibbonMergingHelper.MergeWith="{Binding ElementName=mainRibbon}" .../>
        </Grid>
    </DockPanel>
</dxb:BarManager>
By default, the RibbonControl from the two child Views will always be merged with the main RibbonControl. You will now change this behavior. The child RibbonControl should only be merged with the main RibbonControl when a corresponding child View becomes visible. To do this, set the MDIMergeStyle property to WhenChildActivated for each child RibbonControl.
<UserControl x:Class="PersonalOrganizer.Views.ContactCollectionTableView" ...>
    ...
        <dxr:RibbonControl ... MDIMergeStyle="WhenChildActivated">
        </dxr:RibbonControl>
    ...
</UserControl>
<UserControl x:Class="PersonalOrganizer.Views.ContactCollectionCardView" ...>
    ...
        <dxr:RibbonControl ... MDIMergeStyle="WhenChildActivated">
        </dxr:RibbonControl>
    ...
</UserControl>
Run the application.
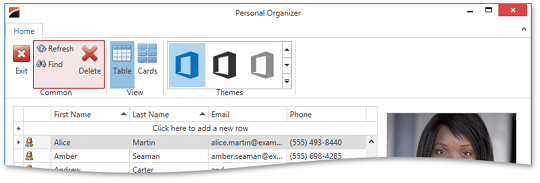
In the above picture, the bar items highlighted in red belong to the child ContactCollectionTableView. This is an example of how Ribbon merging works.
The Exit BarItem appears on the left side of the Common group. We need to show it on the right. To control bar item order when merging, use the BarItem.MergeOrder property. Open the MainView and set this property.
<dxb:BarButtonItem Content="Exit" MergeOrder="100" .../>
Step 3 - Implementing Interaction
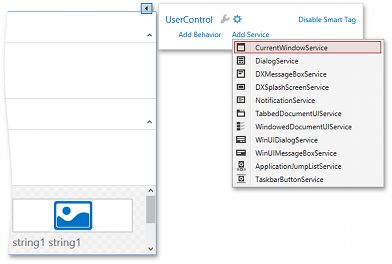
The Exit BarButtonItem is not bound to any command. When an end-user clicks this item, the application should close. Use the Service mechanism to accomplish this task.
Open the MainView designer and define CurrentWindowService at the UserControl level.
Now create a command that closes the application.
[POCOViewModel]
public class MainViewModel {
    protected virtual ICurrentWindowService CurrentWindowService { get { return null; } }
    public void Exit() {
        CurrentWindowService.Close();
    }
}
Bind the Exit BarButtonItem to ExitCommand.
<dxb:BarButtonItem Content="Exit" Command="{Binding ExitCommand}" .../>
All that is left to do is test the application and fix the issue.
If you run the application to modify a cell, and then switch the View, you will notice that the modifications are not saved and the other View shows previous data. This occurs because when you switch views, one of the cells is still in an editing state. To fix this issue, handle the IsVisibleChanged event for each child view. In the event handler, you will call two methods: View.Commands.EndEditFocusedRow (to finish the editing process) and ContactCollectionViewModel.Save (to save changes to the database). To accomplish this task in the MVVM pattern, use EventToCommand.
<UserControl x:Class="PersonalOrganizer.Views.ContactCollectionTableView" ...>
    <Grid>
        <dxmvvm:Interaction.Behaviors>
            <dxmvvm:EventToCommand EventName="IsVisibleChanged" Command="{Binding ElementName=tableView, Path=Commands.EndEditFocusedRow}"/>
            <dxmvvm:EventToCommand EventName="IsVisibleChanged" Command="{Binding SaveCommand}" CommandParameter="{Binding SelectedEntity}"/>
        </dxmvvm:Interaction.Behaviors>
        ...
    </Grid>
</UserControl>

<UserControl x:Class="PersonalOrganizer.Views.ContactCollectionCardView" ...>
    <Grid>
        <dxmvvm:Interaction.Behaviors>
            <dxmvvm:EventToCommand EventName="IsVisibleChanged" Command="{Binding ElementName=cardView, Path=Commands.EndEditFocusedRow}"/>
            <dxmvvm:EventToCommand EventName="IsVisibleChanged" Command="{Binding SaveCommand}" CommandParameter="{Binding SelectedEntity}"/>
        </dxmvvm:Interaction.Behaviors>
        ...
    </Grid>
</UserControl>
Note that EventToCommands should be defined in the Grid panel. If they are defined at the UserControl level, then you will not be able to bind the EventToCommand.Command property using the ElementName binding. This is a limitation of the WPF platform.