Lesson 1 - Scaffolding
- 5 minutes to read
DevExpress UI controls are designed specifically to help you build Microsoft Office-inspired applications quickly and easily.
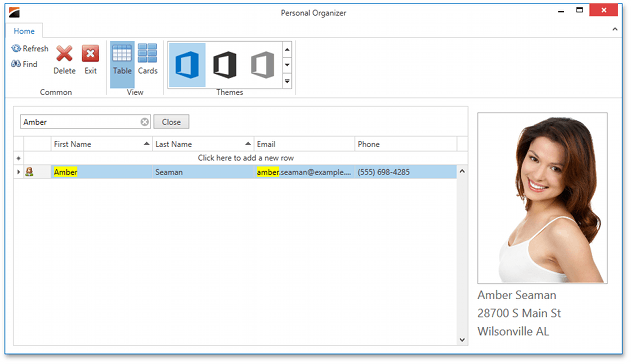
This quick start article will guide you through the process of building an Office-inspired Contact Management application - a Personal Organizer.
Note
The complete project for Visual Studio 2012 or later is available in the T111486: How to: Build an Office-inspired Application example.
Step 1 - Create a Basic Project with the DevExpress Template Gallery
The DevExpress Template Gallery is a Visual Studio project wizard that scaffolds the project structure for the style of app you wish to build.
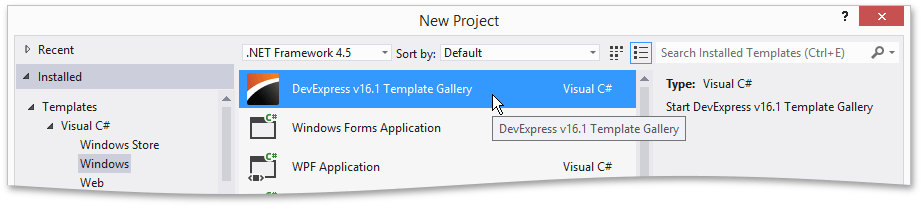
To create a project, select FILE | New | Project… in the main menu of Visual Studio. In the New Project dialog, select DevExpress v18.2 Template Gallery and click OK.
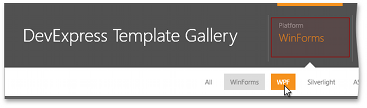
The DevExpress Template Gallery provides project templates for each platform. You can filter templates by platform using the Platform dropdown.
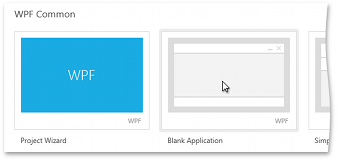
Select the Blank Application template, specify the project name as “PersonalOrganizer” and click Create Project.
Once the application is created, you can customize the main window. DevExpress components provide design-time functionality that allows you to set properties with smart tag menus. The screenshot below highlights the options used to set the application theme or change the window type.

Step 2 - Create a Model Layer
You will use Entity Framework Code First, which automatically generates a database during the application’s initial load. First, add the Entity Framework libraries to the application. The easiest way to do this is by using NuGet. To use NuGet, select PROJECT | Manage NuGet Packages…, locate the Entity Framework package and click the Install button.

Next, copy the data classes (the Model folder) from the completed solution and register ContactContextInitializer to populate the database with initial data.
public partial class App : Application {
    protected override void OnStartup(StartupEventArgs e) {
        Database.SetInitializer<ContactContext>(new ContactContextInitializer());
        base.OnStartup(e);
    }
}
Step 3 - Create a ViewModel Layer
The database contains only one entity – Contact.
namespace PersonalOrganizer.Model {
    public enum Gender { Female = 0, Male = 1 }

    public class Contact {
        [ReadOnly(true), Key, DatabaseGenerated(DatabaseGeneratedOption.Identity)]
        public int Id { get; protected set; }
        public Gender Gender { get; set; }
        [Required]
        public string FirstName { get; set; }
        [Required]
        public string LastName { get; set; }
        [DataType(DataType.EmailAddress), DisplayFormat(NullDisplayText = "<empty>")]
        public string Email { get; set; }
        [DataType(DataType.PhoneNumber), DisplayFormat(NullDisplayText = "<empty>")]
        public string Phone { get; set; }
        [DisplayFormat(NullDisplayText = "<empty>")]
        public string Address { get; set; }
        [DisplayFormat(NullDisplayText = "<empty>")]
        public string City { get; set; }
        [DisplayFormat(NullDisplayText = "<empty>")]
        public string State { get; set; }
        [DisplayFormat(NullDisplayText = "<empty>")]
        public string Zip { get; set; }
        public byte[] Photo { get; set; }

        public Contact() { }
        public Contact(string firstName, string lastName) {
            FirstName = firstName;
            LastName = lastName;
        }
    }
}
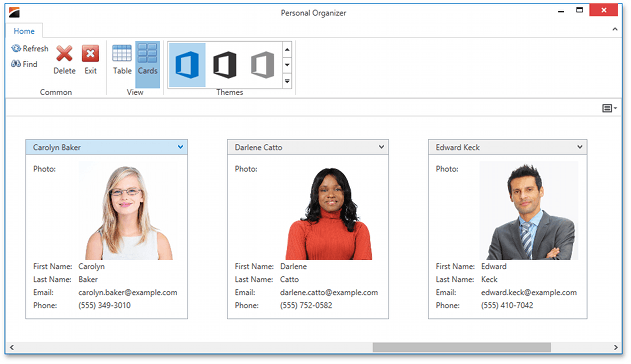
The application will arrange contacts in two Views: a grid and a card view. The DevExpress Scaffolding Wizard, available in the Template Gallery, allows you to easily generate a backing ViewModel with a flexible structure and basic capabilities such as editing and saving. Right-click the PersonalOrganizer project in the Solution Explorer and select Add DevExpress Item | New Item to run the Template Gallery.
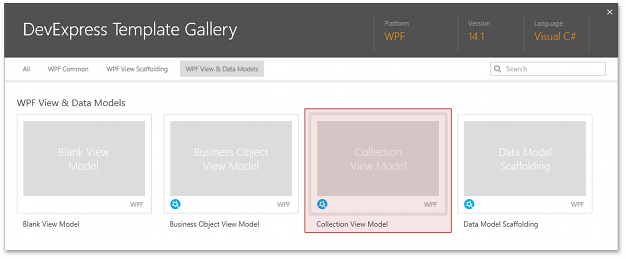
Select the Collection View Model template, click Run Wizard and select the data model.
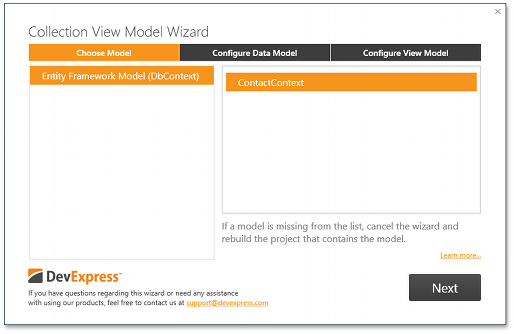
Follow the remaining steps to complete ViewModel generation and get the resulting ContactCollectionViewModel class.
public partial class ContactCollectionViewModel : CollectionViewModel<Contact, int> {
    readonly IUnitOfWorkFactory unitOfWorkFactory;

    public ContactCollectionViewModel()
        : this(UnitOfWorkSource.GetUnitOfWorkFactory()) {
    }
    public ContactCollectionViewModel(IUnitOfWorkFactory unitOfWorkFactory) {
        this.unitOfWorkFactory = unitOfWorkFactory;
    }
    protected override IReadOnlyRepository<Contact> GetRepository() {
        return unitOfWorkFactory.CreateUnitOfWork().Contacts;
    }
}