How to: Bind Scheduler to Data using the Entity Framework Code First Approach
- 4 minutes to read
This example describes how to bind the Scheduler to a data source using the Entity Framework Code First approach.
Perform the following steps to achieve the required result:
- Create New Scheduling Application
- Create a Data Model
- Create a ViewModel
- Specify Data Source and Mappings in XAML
- Run the Application
Create New Scheduling Application
- Create a new WPF Application project and open the MainWindow.xaml file in the Visual Studio Designer.
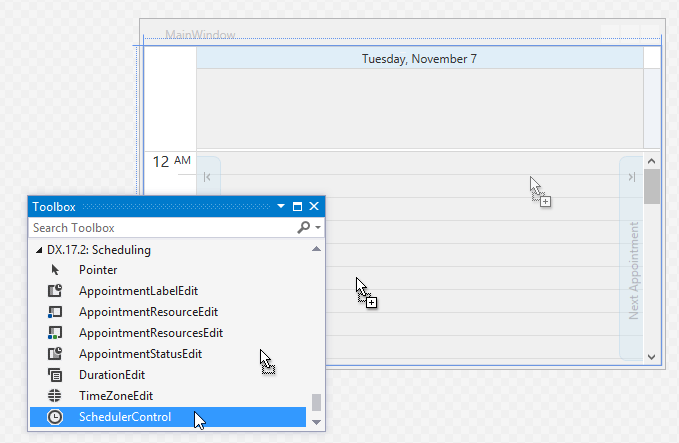
Add the SchedulerControl object to your project. You can do this by dragging the SchedulerControl item from the DX.19.1: Scheduling Toolbox tab to the canvas.
- Right-click the SchedulerControl object and select Layout | Reset All in the context menu to stretch the SchedulerControl so that it fills the entire window.
Create a Data Model
Note
Before creating a Data Model, make sure that the Entity Framework package is added to your Visual Studio. Refer to the Get Entity Framework article for details on how to install the Entity Framework package.
- Right-click on the project name. Select Add | New Item.
- Select Data | ADO .NET Entity Data Model and enter MySchedulerModel for the name.
In the Entity Data Model Wizard, select Code First from database to generate an EF model based on your database.
Click Next and select the database to be used (in this example, we use CarsDB.mdf data source). Then select the desired tables and click Finish.
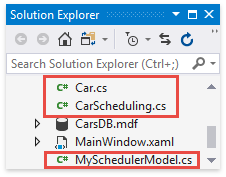
As a result, new classes are added to your solution. The MySchedulerModel class is the DBContext class descendant which allows you to query and save entity class instances. Other classes represent individual database tables.
Create a ViewModel
Add a new folder to your project. Right-click the project’s name in the Solution Explorer, and then select Add | New Folder. Change the folder name to ViewModel.
Add a MainViewModel class. In the Solution Explorer, right-click the ViewModel folder, and then select Add | Class…. In the invoked Add New Item window, assign the MainViewModel name to the class.
Add the following code to handle data interaction:
- Apply the POCOViewModel attribute to your View Model. Refer to the POCO ViewModel topic for details;
The Data Model created in previous section (the MySchedulerModel class instance) is the data source to fill two ObservableCollection type collections which are used for data binding;
Note
A complete sample project is available at https://github.com/DevExpress-Examples/how-to-bind-scheduler-to-data-using-the-entity-framework-code-first-approach-t545436.
Private mySchedulerContext As MySchedulerModel Public Overridable Property Resources() As ObservableCollection(Of Car) Public Overridable Property Appointments() As ObservableCollection(Of CarScheduling)Declare a method that implements the AppointmentsUpdatedCommand. In the method body, call the MySchedulerModel instance’s SaveChanges method to save newly created appointments;
Note
A complete sample project is available at https://github.com/DevExpress-Examples/how-to-bind-scheduler-to-data-using-the-entity-framework-code-first-approach-t545436.
Public Sub AppointmentsUpdated() mySchedulerContext.SaveChanges() End SubCreate a method for the InitNewAppointmentCommand, as shown in the code example below:
Note
A complete sample project is available at https://github.com/DevExpress-Examples/how-to-bind-scheduler-to-data-using-the-entity-framework-code-first-approach-t545436.
Public Sub InitNewAppointment(ByVal args As AppointmentItemEventArgs) args.Appointment.Reminders.Clear() End SubFill the Appointments and Resources collection with data using the Load method.
Note
A complete sample project is available at https://github.com/DevExpress-Examples/how-to-bind-scheduler-to-data-using-the-entity-framework-code-first-approach-t545436.
Protected Sub New()
    mySchedulerContext = New MySchedulerModel()
    mySchedulerContext.Cars.Load()
    Resources = mySchedulerContext.Cars.Local
    mySchedulerContext.CarSchedulings.Load()
    Appointments = mySchedulerContext.CarSchedulings.Local
End Sub
Set Mapping and Binding in XAML
Use the ViewModelSource to set the DataContext property to the ViewModel as follows:
DataContext="{dxmvvm:ViewModelSource local:MainViewModel}"Use the EventToCommand behaviors to bind the AppointmentUpdated and InitNewAppointment events to the related commands:
Note
A complete sample project is available at https://github.com/DevExpress-Examples/how-to-bind-scheduler-to-data-using-the-entity-framework-code-first-approach-t545436.
<dxmvvm:Interaction.Behaviors>
    <dxmvvm:EventToCommand EventName="AppointmentsUpdated" Command="{Binding AppointmentsUpdatedCommand}" />
    <dxmvvm:EventToCommand EventName="InitNewAppointment" Command="{Binding InitNewAppointmentCommand}" PassEventArgsToCommand="True" />
</dxmvvm:Interaction.Behaviors>
Set the required mappings as shown in the code snippet below:
Note
A complete sample project is available at https://github.com/DevExpress-Examples/how-to-bind-scheduler-to-data-using-the-entity-framework-code-first-approach-t545436.
<dxsch:SchedulerControl.DataSource>
    <dxsch:DataSource AppointmentsSource="{Binding Appointments}" ResourcesSource="{Binding Resources}">
        <dxsch:DataSource.AppointmentMappings>
            <dxsch:AppointmentMappings Start="StartTime"
                                       End="EndTime"
                                       AllDay="AllDay"
                                       Subject="Subject"
                                       Id="ID"
                                       Description="Description"
                                       LabelId="Label"
                                       Location="Location"
                                       RecurrenceInfo="RecurrenceInfo"
                                       Reminder="ReminderInfo"
                                       ResourceId="CarId"
                                       StatusId="Status"
                                       Type="EventType" />
        </dxsch:DataSource.AppointmentMappings>
        <dxsch:DataSource.ResourceMappings>
            <dxsch:ResourceMappings Id="ID"
                                    Caption="Model" />
        </dxsch:DataSource.ResourceMappings>
    </dxsch:DataSource>
</dxsch:SchedulerControl.DataSource>
<dxsch:DayView ResourcesPerPage="3" />
<dxsch:MonthView/>
Run the Application
The following image demonstrates the result:
