Client-Side API Overview
- 5 minutes to read
The DashboardControl class allows you to configure the control’s view and capabilities and provides different ways to customize the dashboard control on the client side:
DashboardControl Options
The DashboardControlOptions class contains the DashboardControl‘s configuration options. You can configure the DashboardControl‘s options in the control’s constructor(element). The code snippet below shows how to specify options when creating the DashboardControl:
window.onload = function () {
    var dashboardControl = new DevExpress.Dashboard.DashboardControl(document.getElementById("web-dashboard"), {
        endpoint: "/api/dashboard",
        workingMode: "ViewerOnly",
        initialDashboardId: "dashboard1"
    });
}
You can use the control’s events to customize the Web Dashboard. The following code shows how to handle the DashboardInitializing event:
window.onload = function () {
    var dashboardControl = new DevExpress.Dashboard.DashboardControl(document.getElementById("web-dashboard"), {
        endpoint: "/api/dashboard",
        onDashboardInitializing : function(e) {
            // ...
        }
    });
}
Model
The Dashboard.Model module contains classes and members that comprise the Dashboard object model. This module provides an API to perform the actions available for end-users in a client UI. You can create or update dashboard items and the entire dashboard, manage format rules, change item’s layout, add dashboard parameters, etc.
For example, the Dashboard class contains a complete description of a dashboard, including the collection of dashboard items and groups, data binding information, layout and appearance settings. You can add dashboard parameters (Dashboard.parameters), change dashboard title settings (Dashboard.title), customize a global color scheme (Dashboard.colorScheme), etc.
The DashboardItem descendants allow you to create a dashboard item on the client side, configure it and bind it to data.
The following example shows how to add the tab container with two tab pages (tabPage1 and tabPage2).
After you add the created dashboard item to the Dashboard.items collection, call the Dashboard.rebuildLayout method to rebuild the dashboard layout and display changes.
// Use the line below for a modular approach:
// import * as Model from 'devexpress-dashboard/model'
// Use the line below for an approach with global namespaces:
// var Model = DevExpress.Dashboard.Model;

public createTabs() {
    var tabContainer1 = new Model.TabContainerItem();
    tabContainer1.tabPages()[0].name("Difference");

    var page2 = new Model.DashboardTabPage();
    page2.name("Sales");
    tabContainer1.tabPages.push(page2);

    tabContainer1.tabPages()[0].componentName("tabPage1");
    tabContainer1.tabPages()[1].componentName("tabPage2");

    dashboardControl.dashboard().items.push(tabContainer1);
    // ...
    dashboardControl.dashboard().rebuildLayout();
}
To add a dashboard item to the tab container, assign the tab page’s componentName to the dashboard item’s parentContainer property.
dashboardItem.parentContainer("tabPage1");
Extensions
The DashboardControl allows you to manage the Web Dashboard’s functionality using independent JavaScript modules/classes called extensions. For example, the DashboardExportExtension enables end-users to export the dashboard’s data, the DashboardParameterDialogExtension adds dashboard parameters, and the ToolboxExtension allows you to customize the Toolbox.
You can use the DashboardControlOptions.extensions property to access registered extensions’ settings in the DashboardControl‘s constructor. The code sample below shows how to use the DashboardExportExtensionOptions to specify the control’s export settings:
window.onload = function () {
    var dashboardControl = new DevExpress.Dashboard.DashboardControl(document.getElementById("web-dashboard"), {
        endpoint: "/api/dashboard",
        extensions: {
            'dashboard-export': {
                allowExportDashboard: true,
                allowExportDashboardItems: true
            }
        });
    }
}
The other way to configure the registered extension is the DashboardControl.findExtension method. Use it to get the extension’s instance and pass the IExtension.name property value as a method parameter. The DashboardControl.extensions property provides access to all the enabled extensions. For instance, the code below uses the ToolboxExtension.removeMenuItem method to remove the New… command from the dashboard menu:
window.onload = function () {
    var dashboardControl = new DevExpress.Dashboard.DashboardControl(document.getElementById("web-dashboard"), {
        endpoint: "/api/dashboard",
        // ...
    });
    var toolboxExtension = dashboardControl.findExtension("toolbox");
    toolboxExtension.removeMenuItem("create-dashboard");
}
The ViewerApiExtension class contains events you can use to customize the Web Dashboard’s visual components. For example, you can add a custom button to the dashboard title:
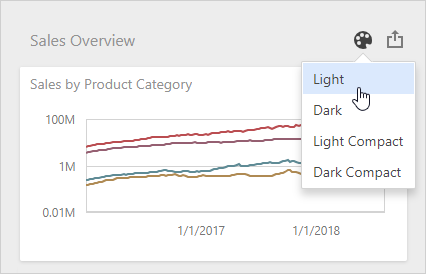
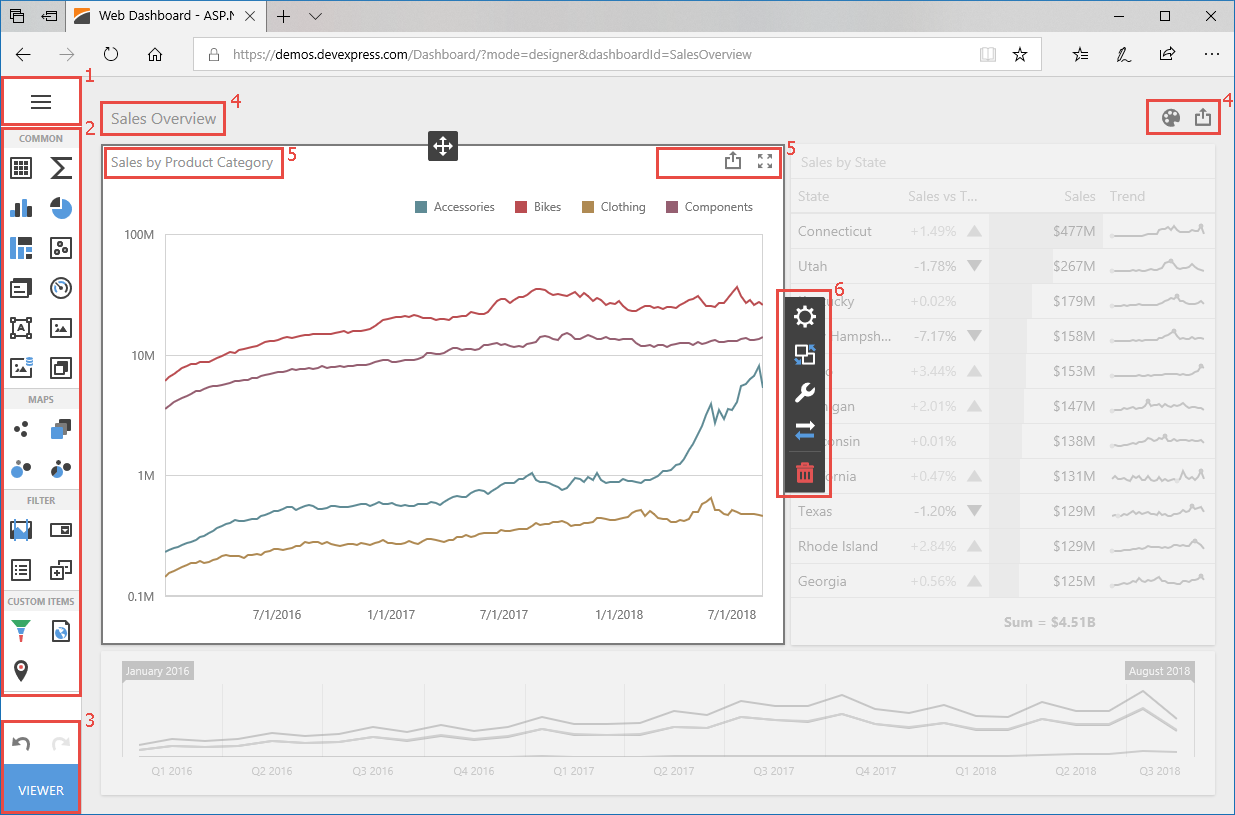
The image below shows the Web Dashboard’s visual components you can modify:
The code sample below shows how to handle the ItemCaptionToolbarUpdated event and add a custom button to the Chart’s dashboard item caption:
window.onload = function () {
    var dashboardControl = new DevExpress.Dashboard.DashboardControl(document.getElementById("web-dashboard"), {
        endpoint: "/api/dashboard",
        onItemBeginUpdate: function(e) {
            // ...
        },
        extensions: {
            'viewer-api': {
                onItemCaptionToolbarUpdated: function (e) {
                    if (e.itemName === "chartDashboardItem1") {
                        e.options.actionItems.push({
                            type: "button",
                            text: "Custom Button",
                            click: function () {
                                // ...
                            }
                        });
                    }
                }
            }
        },
    });
}
See Extend Web Dashboard Functionality to learn how to add, remove or configure the Web Dashboard’s extensions.
Custom Extensions
You can create a separate extension that adds some specific functionality to the Web Dashboard. For instance, the extension can allow you to save a dashboard with a different name, delete the opened dashboard, modify the Dashboard Parameter window, etc.
Use the DashboardControl.registerExtension method to register the created extension in the Web Dashboard.
Refer to Extensions on GitHub to see custom extension examples you can use in your Web Dashboard application.
Custom Items
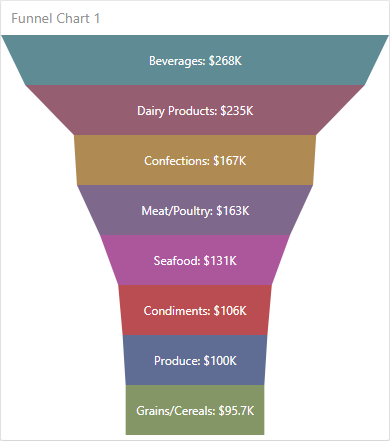
A custom item is a complex extension that acts as a dashboard item. You can use the DevExtreme widgets or third-party JavaScript libraries to create additional dashboard items (for example, the d3-funnel library is used to create the FunnelD3 custom item).
Use the DashboardControl.registerExtension method to add the custom item to the Web Dashboard.
The Create a Custom Item section contains detailed information related to a custom item.