Notifications Module Overview
- 3 minutes to read
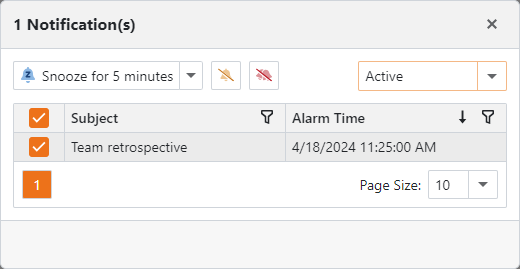
The Notifications module allows you to display reminders for scheduler appointments or any custom business object. At the required time, a popup window appears automatically. In this window, a user can view, cancel, or delay alerts.
Notifications Module Components
| Platform | Module |
|---|---|
| Platform-agnostic | NotificationsModule |
| ASP.NET Core Blazor | NotificationsBlazorModule |
| Windows Forms | NotificationsWindowsFormsModule |
| ASP.NET Web Forms | NotificationsAspNetModule |
Notifications Module Capabilities
The module tracks changes in any business object that supports the ISupportNotifications interface, such as Event objects that ship with the Built-in Business Class Library for Entity Framework Core and XPO. For more information refer to the following topic: How to: Use Notifications with the Scheduler Event.
You can also implement the ISupportNotifications interface in any custom business object as described in the following topic: How to: Use Notifications with a Custom Business Class (Implement ISupportNotifications).
How to Specify the Notification Refresh Frequency
- ASP.NET Core Blazor
- Use the AddNotifications(IModuleBuilder<IBlazorApplicationBuilder>, Action<NotificationsOptions>) method to pass the new value to the NotificationsOptionsBase.NotificationsRefreshInterval property.
- Windows Forms
- Use the AddNotifications(IModuleBuilder<IWinApplicationBuilder>, Action<NotificationsOptions>) method to pass the new value to the NotificationsOptionsBase.NotificationsRefreshInterval property.
- ASP.NET Web Forms
- Change the value of the NotificationsModule.NotificationsRefreshInterval property.
Notifications
XAF invokes the Notifications window automatically at the required time.
Important
The Event business class has the Reminder property that is hidden to preserve the Event Detail View layouts in existing applications. However, this property should be visible if you intend to use event notifications. For more information on how to make the property visible, refer to the following topic: How to: Use Notifications with the Scheduler Event.
To customize notification view parameters and notification list processing, handle the corresponding events:
- NotificationsController.CustomizeNotificationViewParameters
- NotificationsController.CustomProcessNotifications
The module adds the Show Notifications Action in the following locations:
- ASP.NET Core Blazor application’s page header toolbar (top-right corner)
- Windows Forms application’s status bar (bottom-right corner)
- ASP.NET Web Forms application’s page header (top-right corner)
This action allows users to re-invoke the Notifications window to see the active or all notifications. The notifications count is displayed next to this Action or in the tooltip.
- ASP.NET Core Blazor

- Windows Forms:

- ASP.NET Web Forms:

Tip
To place a custom Action near the Show Notifications Action, set the Action’s category to “Notifications”. For more information, refer to the following topics:
Add the Notifications Module to Your Application
Solution Wizard
You can add the Notifications module to your application when you use the Solution Wizard (.NET Framework) to create a new XAF solution. Select the module in the Choose Extra Modules step.
.NET
For step-by-step instructions of how to add the Notifications module to your application, refer to the following topic: How to Add the Notifications Module (.NET).
.NET Framework
Windows Forms
- Invoke the Module Designer and drag the NotificationsModule item from the Toolbox to the RequiredModules panel.
- Drag the NotificationsModuleWin item from the Toolbox to the RequiredModules panel.
- Rebuild your solution.
ASP.NET Web Forms
- Invoke the Module Designer and drag the NotificationsModule item from the Toolbox to the RequiredModules panel.
- Drag the NotificationsModuleWeb item from the Toolbox to the RequiredModules panel.
- Rebuild your solution.