How to: Customize the Export Action Behavior
- 12 minutes to read
Export Action Availability
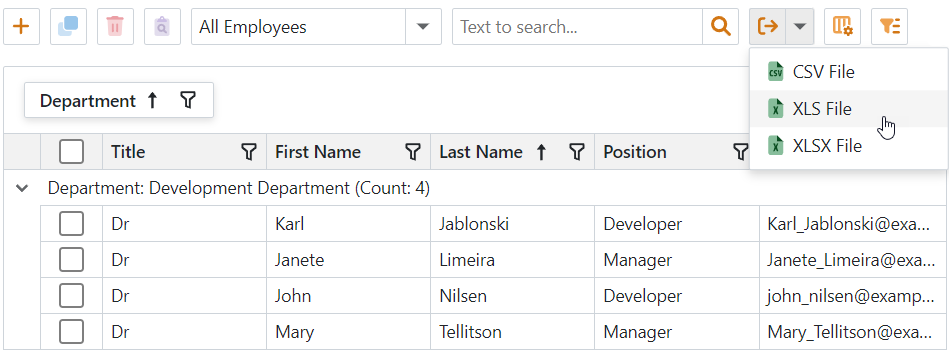
List Views can display the Export Action. Technically, the action’s availability depends on whether a List Editor implements the IExportable interface. If it does, the ExportController enables the Export action in the current List View. This happens for the following editors:
- WinForms: Chart List, Pivot List, Scheduler List, Tree List, Grid List.
- ASP.NET Web Forms: Chart List, Pivot List, Tree List, Grid List.
- Blazor: only the Grid List Editor.
Each List Editor specifies supported export formats (part of the IExportable interface). This format list populates the Export Action’s Items collection - the sub-menu that allows you to select the file type.
Customization Basics
To customize the Export Action’s behavior, first access the Export Controller. Each platform uses its own controller class, derived from a common ancestor - ExportController. You may want to use platform-specific features, or implement cross-platform changes using the base class API.
See the list below for available platforms and Export Controller classes you may want to use:
- WinExportController (WinForms): Exports data to a file stream and invokes a Save File Dialog before the export operation.
- WebExportController (ASP.NET Web Forms): Exports data to a memory stream.
- BlazorExportController (ASP.NET Core Blazor): Exports data to a memory stream. This export option is available only for DxGridListEditor type of property editors. Refer to the following topic for more information: List View Data Access Modes.
- ExportController (base class): Use this class’s API if you want to make changes across multiple platforms.
Once you choose the appropriate controller type, you can assign a handler to one of the following events:
- ExportController.CustomGetDefaultFileName to change the file name.
- ExportController.CustomExport/BlazorExportController.CustomizeGridExport to customize export options or access and adjust the control before the export operation starts.
- ExportController.Exported/BlazorExportController.GridExported to perform any required actions after the export is complete.
Cross-Platform Code: Change the File Name
WinForms applications invoke the Save File Dialog before export. This dialog specifies the default file name that is generated from the caption of the List View used to export data. ASP.NET Web Forms and ASP.NET Core Blazor applications export data to a memory stream that can be saved as a file. The file’s default name is generated the same way as in WinForms applications.
Subscribe to the ExportController.CustomGetDefaultFileName event to change the file name. The base ExportController class contains this event. The following code accesses the ExportController object and handles its event:
using DevExpress.ExpressApp.SystemModule;
//...
public partial class CustomizeExportController : ViewController {
    public CustomizeExportController() {
        InitializeComponent();
        TargetViewType = ViewType.ListView;
    }
    private ExportController exportController;
    protected override void OnActivated() {
         base.OnActivated();
         exportController = Frame.GetController<ExportController>();
         if (exportController != null) {
             exportController.CustomGetDefaultFileName += exportController_CustomGetDefaultFileName;
         }
    }
    void exportController_CustomGetDefaultFileName(
        object sender, CustomGetDefaultFileNameEventArgs e) {
        // Set a custom file name
        e.FileName = e.FileName + "_" + DateTime.Now.ToString("MM.dd.yy");
    }
    protected override void OnDeactivated() {
         if (exportController != null) {
             exportController.CustomGetDefaultFileName -= exportController_CustomGetDefaultFileName;
         }
        base.OnDeactivated();
    }
}
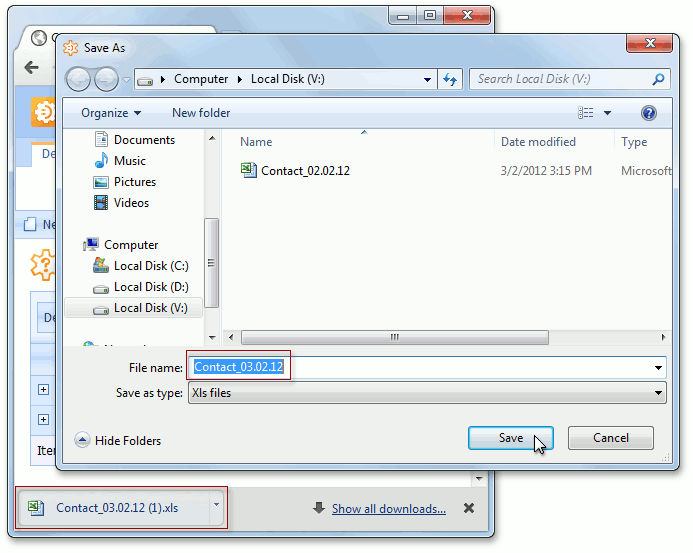
The following image illustrates that the name specified in the CustomGetDefaultFileName event handler is used as the exported file’s default name:
Shared Code for WinForms and ASP.NET: Export Option Customization Basics
To customize export options, subscribe to the ExportController.CustomExport event and use the ExportOptions parameter. This parameter can return different ExportOptionsBase descendants based on the platform and export format. The event’s CustomExportEventArgs.ExportTarget parameter specifies what format the user chose.
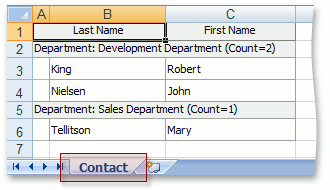
The code below reads the exported View’s caption and assigns it to the sheet title in the exported XLS file:
using DevExpress.ExpressApp.SystemModule;
using DevExpress.XtraPrinting;
// ...
public partial class CustomizeExportController : ViewController {
    public CustomizeExportController() {
        InitializeComponent();
        TargetViewType = ViewType.ListView;
    }
    private ExportController exportController;
    protected override void OnActivated() {
        base.OnActivated();
        exportController = Frame.GetController<ExportController>();
        exportController.CustomExport += CustomExport;
    }
    protected virtual void CustomExport(object sender, CustomExportEventArgs e) {
        //Customize Export Options
        if (e.ExportTarget == ExportTarget.Xls) {
            XlsExportOptions options = e.ExportOptions as XlsExportOptions;
            if (options == null) {
               options = new XlsExportOptions();
            }
            options.SheetName = View.Caption;
            options.ShowGridLines = true;
            e.ExportOptions = options;
        }
    }
    protected override void OnDeactivated() {
        exportController.CustomExport -= new EventHandler<CustomExportEventArgs>(CustomExport);
        base.OnDeactivated();
    }
}
In the code above, the exported View’s caption is used as the sheet’s name in the exported XLS file.
If you need to customize the export options in a WinForms or an ASP.NET Web Forms application only, access the WinExportController or WebExportController, respectively. These Controllers are ExportController descendants, and they expose the CustomExport event as well.
When you customize export for certain List Editor types, you can cast the event’s ExportOptions parameter to XlsExportOptionsEx. This class offers a few additional settings compared to XlsExportOptions.
WinForms: Customize Export Options and Access the List Editor Control
This section demonstrates how to customize export options specific to a List Editor control type. The example below changes settings for the WinForms Grid control.
The example in this section adds user interaction to the export procedure. If a user exports data from a GridListEditor that contains collapsed groups, a message box appears that allows the user to choose whether to expand all groups.
The code handles the CustomExport event of the WinExportController. The handler implements the following functionality:
- Accesses the underlying GridControl and its GridView that displays data.
- Iterates through group rows in the GridView and calls the GridView.GetRowExpanded method to find collapsed rows.
- Shows a message box that allows a user to choose export behavior: expand all groups or keep row state as is.
- Sets the GridView.OptionsPrint property according to the user’s selection.
using DevExpress.XtraGrid.Views.Grid;
using DevExpress.ExpressApp.Win.SystemModule;
using DevExpress.ExpressApp.Win.Editors;
using DevExpress.ExpressApp.Win;
using System.Windows.Forms;
// ...
public partial class CustomizeExportControllerWin : ViewController {
     public CustomizeExportControllerWin() {
        InitializeComponent();
        TargetViewType = ViewType.ListView;
    }
    private WinExportController winExportController;
    protected override void OnActivated() {
        base.OnActivated();
        winExportController = Frame.GetController<WinExportController>();
        winExportController.CustomExport += winExportController_CustomExport;
    }
    void winExportController_CustomExport(object sender, CustomExportEventArgs e) {
        //Show a message before exporting a Grid List Editor
        GridListEditor gridListEditor =
            ((DevExpress.ExpressApp.ListView)View).Editor as GridListEditor;
        if (gridListEditor != null) {
            GridView gridView = gridListEditor.GridView;
            if (HasCollapsedGroups(gridView)) {
                string message =
                   "There are collapsed groups in the grid. " +
                    "Expand all groups in the exported file?";
                gridView.OptionsPrint.ExpandAllGroups =
                   WinApplication.Messaging.GetUserChoice(message, GetMessageBoxCaption(),
                   MessageBoxButtons.YesNo)
                   == DialogResult.Yes;
            }
        }
    }
    private bool HasCollapsedGroups(GridView gridView) {
        if (gridView.GroupCount > 0) {
            int rowHandle = -1;
            while (gridView.IsValidRowHandle(rowHandle)) {
                if (!gridView.GetRowExpanded(rowHandle)) return true;
                rowHandle--;
            }
        }
        return false;
    }
    private string GetMessageBoxCaption() {
        return String.Format(
            "{0} {1}", winExportController.ExportAction.Caption,
                winExportController.ExportAction.SelectedItem);
    }
    protected override void OnDeactivated() {
        winExportController.CustomExport -= winExportController_CustomExport;
        base.OnDeactivated();
    }
}
Users will see the following message box when exporting a List View containing collapsed groups:

Note
Refer to the How to: Localize Custom String Constants topic to see how to make this message text localizable.
If the choice is “Yes”, all grid rows will be exported.
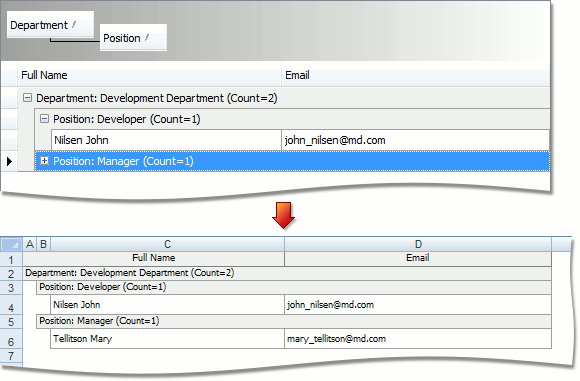
If the choice is “No”, the rows belonging to the collapsed groups will not be included in the exported file.

ASP.NET Web Forms: Customize Export Options
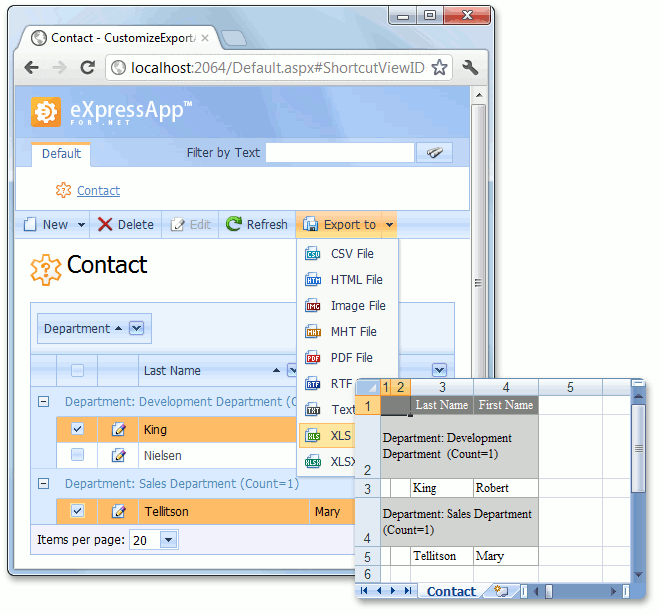
In ASP.NET Web Forms applications, controls that export data from List Editors are called exporters. You can use them to change default export settings. Subscribe to the ExportController.CustomExport event and use the event handler’s CustomExportEventArgs.Printable parameter to access the exporter of the currently exported List Editor. For instance, when you export data from the ASPxGridListEditor, the Printable parameter returns the ASPxGridViewExporter exporter.
The code below demonstrates how to use the ASPxGridViewExporter.ExportSelectedRowsOnly property to customize the export controller:
using DevExpress.ExpressApp.Web.SystemModule;
// Add a reference to the DevExpress.Web.Export assembly
using DevExpress.Web;
// ...
public partial class CustomizeExportControllerWeb : ViewController {
    public CustomizeExportControllerWeb() {
        InitializeComponent();
        TargetViewType = ViewType.ListView;
    }
    private WebExportController webExportController;
    protected override void OnActivated() {
        base.OnActivated();
        webExportController = Frame.GetController<WebExportController>();
        webExportController.CustomExport += webExportController_CustomExport;
    }
    void webExportController_CustomExport(object sender, CustomExportEventArgs e) {
        // Export only selected rows
        ASPxGridViewExporter exporter = e.Printable as ASPxGridViewExporter;
        if (exporter != null) {
            exporter.ExportSelectedRowsOnly = true;
        }
    }
    protected override void OnDeactivated() {
        // Subscribe to the CustomExport event
        webExportController.CustomExport -= webExportController_CustomExport;
        base.OnDeactivated();
    }
}
ASP.NET Core Blazor: Customize Export Options
In ASP.NET Core Blazor applications, you can subscribe to the BlazorExportController.CustomizeGridExport event and use the event handler’s Options parameter to access export options of the ExportTarget. The type of the options depends on export format. For example, when you export data in Excel format, the Options parameter has the GridXlExportOptions type.
The code below demonstrates how to implement a Controller in a Blazor module to use a GridXlExportOptions export option:
using DevExpress.Blazor;
using DevExpress.ExpressApp;
using DevExpress.ExpressApp.Blazor.SystemModule;
using DevExpress.ExpressApp.SystemModule;
// ...
public partial class CustomizeExportControllerBlazor : ViewController {
    public CustomizeExportControllerBlazor() {
        InitializeComponent();
        TargetViewType = ViewType.ListView;
    }
    private BlazorExportController blazorExportController;
    protected override void OnActivated() {
        base.OnActivated();
        blazorExportController = Frame.GetController<BlazorExportController>();
        // Subscribe to CustomizeGridExport event
        blazorExportController.CustomizeGridExport += blazorExportController_CustomizeGridExport;
    }
    void blazorExportController_CustomizeGridExport(object sender, GridExportEventArgs e) {
        // Export only selected rows
        if(e.Options is GridXlExportOptions options) {
            options.ExportSelectedRowsOnly = true;
        }
    }
    protected override void OnDeactivated() {
        blazorExportController.CustomizeGridExport -= blazorExportController_CustomizeGridExport;
        base.OnDeactivated();
    }
}
WinForms: Execute Custom Code After Export
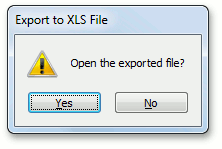
After the export operation has finished, you can ask users whether the saved file should be opened. Handle the ExportController.Exported event to do this. The handler’s CustomExportEventArgs.Stream parameter can be used to determine the exported file name.
using System.IO;
using DevExpress.ExpressApp.Win;
using System.Windows.Forms;
using DevExpress.ExpressApp.Win.SystemModule;
//...
public partial class CustomizeExportControllerWin : ViewController {
    // ...
    private WinExportController winExportController;
    protected override void OnActivated() {
        base.OnActivated();
        // ...
        winExportController.Exported +=
            new EventHandler<CustomExportEventArgs>(winExportController_Exported);
    }
    void winExportController_Exported(object sender,
            DevExpress.ExpressApp.SystemModule.CustomExportEventArgs e) {
        if (e.Stream is FileStream) {
            string fileName = ((FileStream)e.Stream).Name;
            if (File.Exists(fileName)) {
                e.Stream.Close();
                if (WinApplication.Messaging.GetUserChoice("Open the exported file?",
                        GetMessageBoxCaption(), MessageBoxButtons.YesNo) == DialogResult.Yes)
                    Process.Start(fileName);
            }
        }
    }
    protected override void OnDeactivated()  {
        winExportController.Exported -=
            new EventHandler<CustomExportEventArgs>(winExportController_Exported);
        // ...
        base.OnDeactivated();
    }
}
The following image illustrates the message box shown after the export is finished.
Note
Refer to the How to: Localize Custom String Constants topic to see how to localize the message text.
If the user clicks “Yes”, the exported file opens in an application associated with its type.
ASP.NET Core Blazor: Execute Custom Code After Export
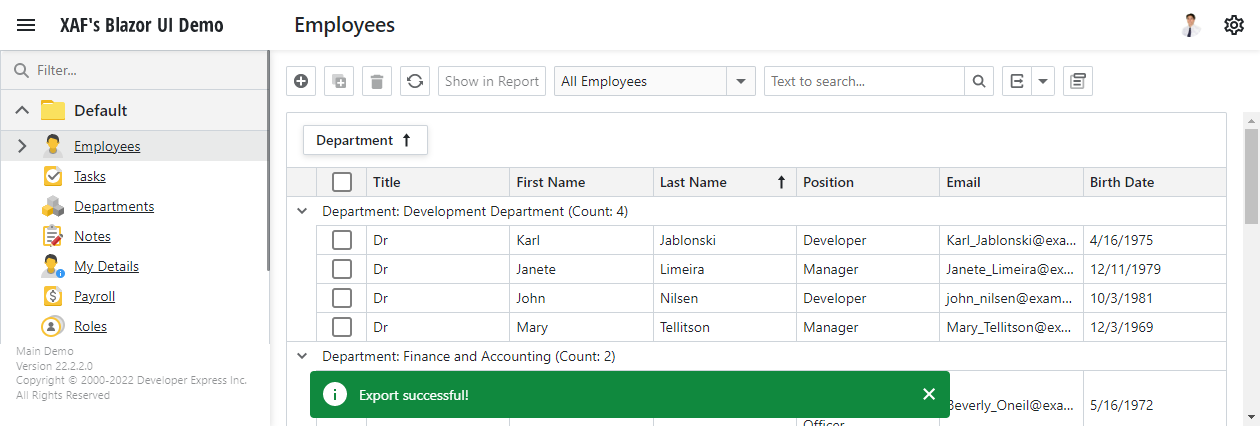
You can notify users about the completion of a data export operation. Handle the BlazorExportController.GridExported event to do this:
using DevExpress.Blazor;
using DevExpress.ExpressApp;
using DevExpress.ExpressApp.Blazor.SystemModule;
using DevExpress.ExpressApp.SystemModule;
// ...
public partial class CustomizeExportControllerBlazor : ViewController {
    public CustomizeExportControllerBlazor() {
        InitializeComponent();
        TargetViewType = ViewType.ListView;
    }
    private BlazorExportController blazorExportController;
    protected override void OnActivated() {
        base.OnActivated();
        blazorExportController = Frame.GetController<BlazorExportController>();
        blazorExportController.GridExported += blazorExportController_GridExported;
    }
    void blazorExportController_GridExported(object sender, GridExportEventArgs e) {
        Application.ShowViewStrategy.ShowMessage("Export successful!");
    }
    protected override void OnDeactivated() {
        blazorExportController.GridExported -= blazorExportController_GridExported;
        base.OnDeactivated();
    }
}
The following image illustrates the message that appears when export is complete.
Refer to the following topic for an example on how to localize the message text: How to: Localize Custom String Constants.