Application Update
- 7 minutes to read
This topic describes how to update an application deployed on a user machine or on an application server.
Update a Windows Forms Application
Update a Database (DBUpdater Tool)
- Install the DBUpdater tool to a workstation or the server you wish to update. For more information, refer to the following help topic: Set Up the Database Connection.
Important
The DBUpdater tool does not support a scenario when an application uses multiple Object Space Providers. The following help topic describes the workarounds for this scenario: Updating the database when multiple persistent Object Space Providers are used.
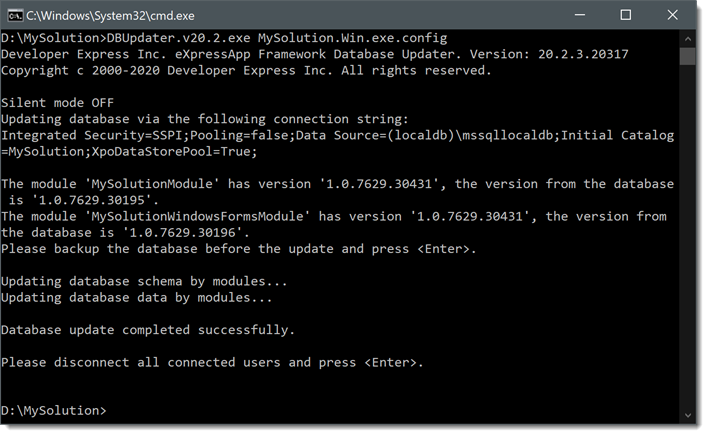
Launch the Command Prompt and run the DBUpdater:
cd %PROGRAMFILES(x86)%\DevExpress 21.2\Components\Tools\eXpressAppFramework\DBUpdater DBUpdater.v21.2.exe ..\MySolution\MySolution.Win.exe.configYou can also use the following DBUpdater parameters:
- -silent (the first parameter)
Initiates a silent update. Does not require direct end-user interaction. - -forceUpdate (the last parameter)
Forces a schema update on each run.
cd %PROGRAMFILES(x86)%\DevExpress 21.2\Components\Tools\eXpressAppFramework\DBUpdater DBUpdater.v21.2.exe -silent ..\MySolution\MySolution.Win.exe.config -forceUpdateThe DBUpdater connects to the Database Server and first compares version information (determines whether the application database is older than the application). Press ENTER to force DBUpdater to update the database.
- -silent (the first parameter)
Optional: To obtain DBUpdater logs, edit its configuration file (DBUpdater.v21.2.exe.config in the .NET Framework projects or DBUpdater.v21.2.dll.config in .NET 5+ projects) and set the eXpressAppFramework switch value to 3 (Info):
<?xml version="1.0" encoding="utf-8"?> <configuration> <startup> <supportedRuntime version="v4.0" sku=".NETFramework,Version=v4.0" /> </startup> <system.diagnostics> <switches> <!-- Use one of the following predefined values: 0-Off, 1-Errors, 2-Warnings, 3-Info, 4-Verbose. The default value is 0. --> <add name="eXpressAppFramework" value="3" /> </switches> </system.diagnostics> </configuration>Logs are written to the eXpressAppFramework.log file.
Run the WinForms application to ensure that the update was successful.
Note
If you encounter issues with your WinForms application update, refer to the following help topic: Deployment Troubleshooting Guide.
Update Application Files
To update an application, you can use the same technique as when you deployed it:
Note
Do not overwrite an end user MySolution.Win.exe.config (in the .NET Framework projects) or MySolution.Win.dll.config (in the .NET 5+ projects) or Model.User.xafml file when updating an application.
Update Application Files Automatically (Application Updater Utility)
Use this technique to automate the update process at multiple workstations.
Prerequisites
Ensure that applications on end-user workstations and the new application you want to deploy meet the following conditions:
- The XafApplication.CheckCompatibilityType property is set to ModulesInfo.
- NonPersistentObjectSpaceProvider is not the first registered Provider in your application. XAF uses the first registered Object Space Provider while an application updates.
Enable Auto Update
- Choose a file server in the end-user network. On this server, create a shared folder that stores newer application versions (for example, the MySolutionUpdateSource folder).
- Ensure that all end users have read permission to this folder and do not have write permission.
On all end-user workstations, open the MySolution.Win.exe.config (for the .NET Framework projects) or MySolution.Win.dll.config (for the .NET 5+ projects) file and set the NewVersionServer key to the UNC path to this folder:
<?xml version="1.0" encoding="utf-8"?>
<configuration>
  <!-- ... -->
  <appSettings>
    <!-- ... -->
    <add key="NewVersionServer" value="\\FILESERVER\MySolutionUpdateSource\" />
  </appSettings>
</configuration>
Copy the WinForms application folder contents from the end-user workstation to the MySolutionUpdateSource shared folder.
The UNC path to the application executable should be “\FILESERVER\MySolutionUpdateSource\MySolition.Win.exe“.- Copy the %PROGRAMFILES(x86)%\DevExpress 21.2\Components\Tools\eXpressAppFramework\Application Updater\DevExpress.ExpressApp.Updater.exe file from the developer workstation to the MySolutionUpdateSource shared folder.
The UNC path to this file should be “\FILESERVER\MySolutionUpdateSource\DevExpress.ExpressApp.Updater.exe“. When you run the WinForms application at an end-user workstation that was not updated, the following Updater progress bar is shown:

If one of the error messages below is displayed instead, ensure the following:
- the UNC path in the configuration file is correct;
- the shared folder is readable;
- the shared folder contains the DevExpress.ExpressApp.Updater.exe file.

The application restarts automatically after updating.
To deploy a new application version, follow the steps below:
- Replace the files located in the MySolutionUpdateSource shared folder with new application files.
- Update the database version as described in the Update Database (DBUpdater Tool) section.
When an end user launches the WinForms application, it is instantly updated. The update process takes as much time as required to copy the MySolutionUpdateSource shared folder contents to the end-user workstation. Note that the update process will not be initiated if the database is not updated, even if the MySolutionUpdateSource folder contains a new version of the application.
Note
- The MySolutionUpdateSource folder should only store new application files. Do not store other files in this folder. Otherwise, they will be copied to each end-user workstation.
- If you want to change the Updater utility behavior, change and recompile its sources. The Updater tool sources are in the following folder: %PROGRAMFILES(x86)%\DevExpress 21.2\Components\Sources\DevExpress.ExpressApp.Tools\DevExpress.ExpressApp.Updater. For example, you can configure this tool to download files of a new version from a remote web server instead of using a shared folder in a local network.
Update an ASP.NET Web Forms Application
Update Application Files
To update an application, you can use the same technique as when you deployed it:
Note
Do not overwrite a custom server-side Web.config file when you update an application.
Update a Database (DBUpdater Tool)
- Install the DBUpdater tool to a workstation or the server you wish to update. For more information, refer to the following help topic: Set Up the Database Connection.
Launch the Command Prompt and run the DbUpdater:
cd %PROGRAMFILES(x86)%\DevExpress 21.2\Components\Tools\eXpressAppFramework\DBUpdater
DBUpdater.v21.2.exe ..\MySolution\Web.config
You can also use the following DBUpdater parameters:
- -silent (the first parameter)
Initiates a silent update. Does not require direct end-user interaction. - -forceUpdate (the last parameter)
Forces a schema update on each run.
cd %PROGRAMFILES(x86)%\DevExpress 21.2\Components\Tools\eXpressAppFramework\DBUpdater
DBUpdater.v21.2.exe -silent ..\MySolution\Web.config -forceUpdate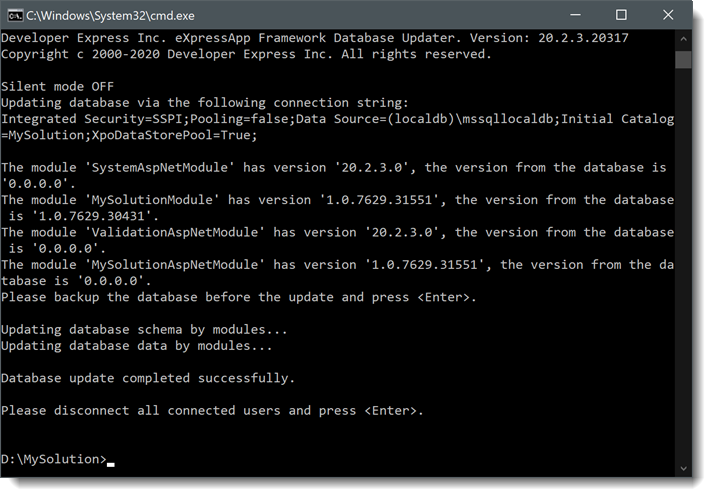
- -silent (the first parameter)
- Run the ASP.NET Web Forms application to ensure that the update was successful.
If you encounter issues with your ASP.NET Web Forms application update, do the following:
- Create a new folder and place all built application assemblies into it.
- Ensure that the assembly that contains your WebApplication descendant is in this folder. The default name of this assembly is the name of your application with the .Web postfix (for example, MySolution.Web).
- Place the Web.config file into this folder.
- Run the DBUpdater.v21.2.exe tool with the fully-qualified path to the Web.config file.
Update an ASP.NET Core Blazor Application
Update Application Files
To update an application, you can use the same technique as when you deployed it: Deploy ASP.NET Core Blazor Server Apps to Azure, Linux with Nginx or Windows with IIS.
Update a Database
Launch the Command Prompt. Type “cd PathToMyBlazorApplication“, where “PathToMyBlazorApplication” is the path to an application on a workstation, and press ENTER. Type “MySolution.Blazor.ServerSide.exe -updateDatabase“, press ENTER, and follow the instructions on the screen.
cd D:\Projects\MySolution\MySolution.Blazor.Server\bin\Debug\MySolution.Blazor.Server.exe -updateDatabaseYou can also use the following -updateDatabase parameters:
- -silent (the first parameter)
Initiates a silent update. Does not require direct end-user interaction. - -forceUpdate (the last parameter)
Forces a schema update on each run.
cd D:\Projects\MySolution\MySolution.Blazor.Server\bin\Debug\MySolution.Blazor.Server.exe -updateDatabase -silent -forceUpdate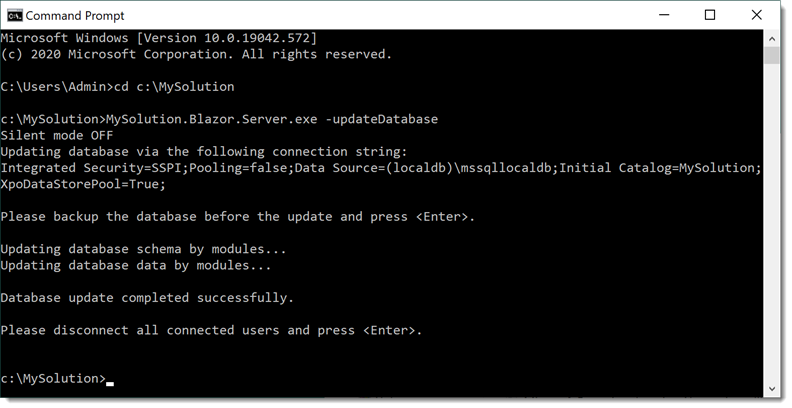
- -silent (the first parameter)
Run the ASP.NET Core Blazor application to ensure that the update was successful.
Update Database on Microsoft Azure
- Install the
DevExpress.ExpressApp.DBUpdaterNuGet package on Azure. This step is not required for XAF Blazor UI Applications. A Blazor application can update its database without external tools. - In Azure CLI, run DBUpdater or a Blazor application with the
-silentkey.
Important Notes
If you encounter issues with your application update, refer to the following help topic: Deployment Troubleshooting Guide.
To prevent a specific module from updating the database, specify a fixed version of this module assembly (for example, 1.0.0.0). It can be required to force version synchronization of your WinForms, ASP.NET Core Blazor and ASP.NET Web Forms modules. The default build and revision numbers are specified with the asterisk (*), and Visual Studio automatically increments these numbers (see AssemblyVersionAttribute). This leads to a database version mismatch on each module update.