Disable and Hide Property Editors Based on a Business Rule
- 3 minutes to read
XAF is shipped with the Conditional Appearance module. One of the features provided by this module is an option to disable/enable and show/hide Property Editors based on business rules. This topic contains step-by-step instructions that demonstrate how the Conditional Appearance module can be used for this purpose. Several appearance rules will be created to dynamically hide and disable Property Editors.
Tip
You can find examples of this functionality in the MainDemo demo included with XAF. The demo illustrates various XAF features (including Conditional Appearance) and is located in the %PUBLIC%\Documents\DevExpress Demos 25.2\Components\XAF\MainDemo.NET.EFCore folder.
Use the Template Kit to create a new XAF Solution. Add the Conditional Appearance module to the module project. To do this, open the MySolution.Module\Module.cs file and add the following code to the Module constructor:
using DevExpress.ExpressApp.ConditionalAppearance;
// ...
namespace MySolution.Module {
    public sealed partial class MySolutionModule : ModuleBase {
        public MySolutionModule() {
            // ...
            RequiredModuleTypes.Add(typeof(ConditionalAppearanceModule));
        }
    }
}
Declare the Contact business class in the solution’s Module Project. You can use the XPO Business Object template for this purpose. Replace the auto-generated class’ code with the following.
[DefaultClassOptions]
[ImageName("BO_Person")]
public class Contact : BaseObject {
    public virtual string Name { get; set; }
    public virtual bool IsMarried { get; set; }
    public virtual string SpouseName { get; set; }
    public virtual string Address1 { get; set; }
    public virtual string Address2 { get; set; }
}

// Make sure that you use options.UseChangeTrackingProxies() in your DbContext settings.
The sample Contact class contains five properties: Name, IsMarried, SpouseName, Address1, Address2.
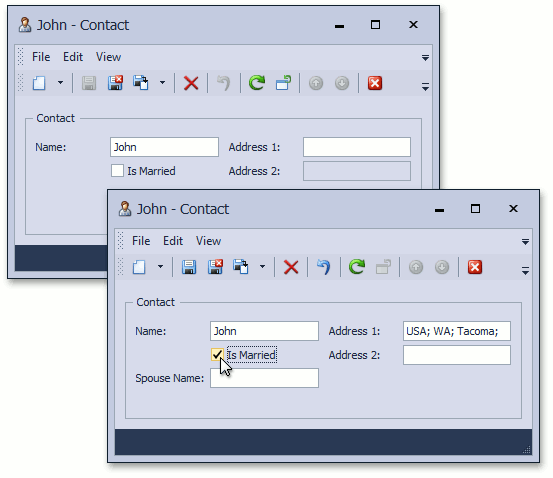
To ensure that the SpouseName Property Editor is only displayed when a contact is married, add the following AppearanceAttribute attribute. The IsMarried property should be decorated by the ImmediatePostDataAttribute attribute to ensure that the SpouseName Property Editor is immediately hidden when a user changes the IsMarried value.
using DevExpress.ExpressApp.ConditionalAppearance;
using DevExpress.ExpressApp.Editors;
//...
[ImmediatePostData]
public bool IsMarried {
    // ...
}
[Appearance("Single", Visibility = ViewItemVisibility.Hide, Criteria = "!IsMarried", Context="DetailView")]
public string SpouseName {
    // ...
}
The appearance rule, declared by the following attribute, ensures that the Address2 Property Editor is enabled only if the Address1 field is filled. Otherwise, the Address2 Property Editor should is disabled.
[ImmediatePostData]
public string Address1 {
    // ...
}
[Appearance("AddressOneIsEmpty", Enabled = false, Criteria = "IsNullOrEmpty(Address1)", Context="DetailView")]
public string Address2 {
    // ...
}