Scheduler Module Overview
- 8 minutes to read
The Scheduler module is designed to display the required List Views via the SchedulerControl from the XtraScheduler library in Windows Forms applications and via the ASPxScheduler from the ASPxScheduler library in ASP.NET Web Forms applications. These controls are appropriate for presenting and managing scheduling information in an efficient manner. Various date-time views, multiple resources display, date navigator, end-user capabilities and other features - everything to make your scheduling application simpler and more convenient to use. To use the Scheduler controls, the eXpressApp Framework‘s Scheduler module supplies the SchedulerListEditor and ASPxSchedulerListEditor for displaying List Views. These List Editors are targeted for objects that implement the IEvent interface from the Business Class Library. In addition, the Scheduler module supplies special Property Editors to display the IEvent‘s properties. This topic details all the basics for using the Scheduler module. To learn more about the SchedulerControl and ASPxScheduler controls and their features, go to the XtraScheduler Overview and ASPxSchedulerDemos links or refer to the XtraScheduler and ASPxScheduler help documentation. Note, not all features are currently supported by the Scheduler module. However, all of them are planned for implementation in the near future.
The Scheduler module is presented by two module projects:
-
Adds references to the DevExpress.ExpressApp.Scheduler.v21.2.dll and DevExpress.ExpressApp.Scheduler.Win.v21.2.dll assemblies.
You can add this module to your Windows Forms module. For this purpose, invoke the Module Designer and drag the SchedulerWindowsFormsModule from the Toolbox to the RequiredModules panel. Alternatively, you can add this module to the Windows Forms application project. To do this, invoke the Application Designer and drag the SchedulerWindowsFormsModule from the Toolbox to the Modules panel. Do not forget to rebuild your solution after making changes in a Designer.
-
Adds references to the DevExpress.ExpressApp.Scheduler.v21.2.dll and DevExpress.ExpressApp.Scheduler.Web.v21.2.dll assemblies.
You can add this module to the ASP.NET Web Forms application project. For this purpose, invoke the Application Designer and drag SchedulerASPNETModule from the Toolbox to the Modules panel. Alternatively, you can add this module to your ASP.NET Web Forms module. To do this, invoke the Module Designer and drag the SchedulerASPNETModule from the Toolbox to the RequiredModules panel. Note that in this instance, you will need to manually add scheduler templates to the application project. The easiest way to do this is to add the SchedulerASPNETModule module to the application project via the Application Designer, and then remove it. This will automatically add all the required templates.
Do not forget to rebuild your solution after making changes in a Designer.
Note
You can add modules to your application when you create a new XAF solution using the Solution Wizard. To do this, select modules in the Choose Extra Modules step.
- To add an extra module in code, add it to the XafApplication.Modules or ModuleBase.RequiredModuleTypes list (adding a reference to the module assembly is insufficient).
Scheduler Module Elements
To use the SchedulerControl (or ASPxScheduler) for displaying a List View, the objects represented by this View must implement the DevExpress.Persistent.Base.General.IEvent interface. You can implement them from scratch or use the ready-to-use DevExpress.Persistent.BaseImpl.Event class from the Business Class Library. To see how this class is implemented, refer to the %PROGRAMFILES(x86)%\DevExpress 21.2\Components\Sources\DevExpress.Persistent\DevExpress.Persistent.BaseImpl.EFCore folder. To add specific members to this class, inherit from it.
To use the DevExpress.Persistent.BaseImpl.Event class as is, add it to the application module. For this purpose, use the Module Designer and rebuild the solution.
The Event business class (built-in or custom) is added to the Application Model, which means that this class will take part in the UI construction process. Invoke the Model Editor for the Windows Forms or ASP.NET Web Forms application project and locate the Views | Event_ListView node. When the Scheduler module (Windows Forms or ASP.NET Web Forms) is referenced, this node’s IModelListView.EditorType property is set to the DevExpress.ExpressApp.Scheduler.Win.SchedulerListEditor (or DevExpress.ExpressApp.Scheduler.Web.ASPxSchedulerListEditor) value. Otherwise, it is set to the GridListEditor (or DevExpress.ExpressApp.Web.Editors.ASPx.ASPxGridListEditor) value, which represents a regular List Editor. Generally, you can set this property to any appropriate value. Moreover, you can add an Action that will allow end-users to switch between different List View variants. For details, refer to the View Variants Module topic.
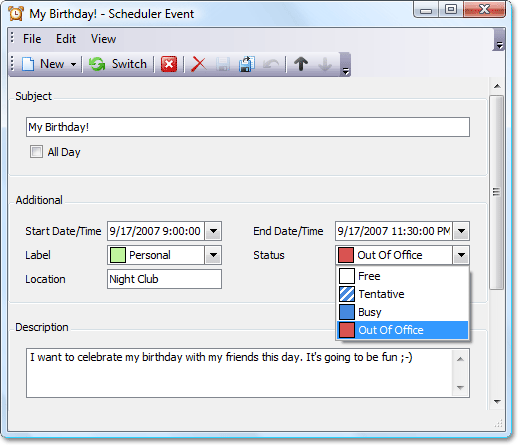
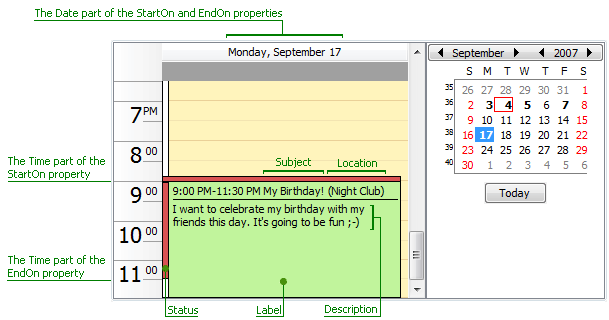
The IEvent interface has the following properties: Subject, Description, StartOn, EndOn, AllDay, Location, Label Status, Type (set by the Scheduler Control) and ResourceId (see Resources in a Schedule). The SchedulerListEditor displays each of these properties in a specific manner (see the image below). The Label and Status property values are shown with a specific color of the List View’s cell associated with the event. This color is bound to every predefined value. For this purpose, the SchedulerWindowsFormsModule module supplies the SchedulerLabelPropertyEditor and SchedulerStatusPropertyEditor Property Editors, and the SchedulerASPNETModule module supplies the ASPxSchedulerLabelPropertyEditor and ASPxSchedulerStatusPropertyEditor Property Editors. They display the IEvent.Label and IEvent.Status properties in a Detail View, respectively. A value that you select for these properties is bound to a specific color. This color represents the property value in the Event List View.
The following image demonstrates the Event Detail View and List View in a Windows Forms application:
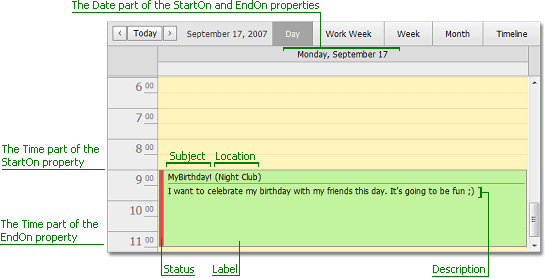
The following image demonstrates the Event Detail View and List View in an ASP.NET Web Forms application:
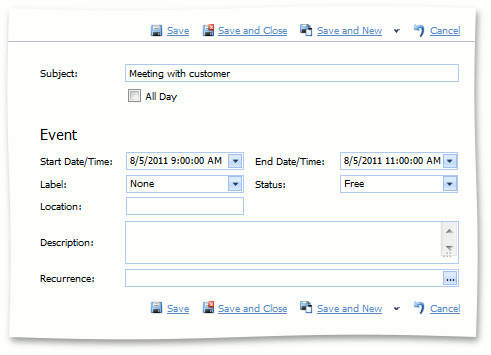
Note that the Edit Appointment dialog is replaced with the Event Detail View in XAF applications.
The Event List View has several view types (the Day View is displayed in the image above). An Event object’s properties are displayed in different ways in each view. To set the required view, use the SchedulerViewType property of the Application Model’s Views | <ListView> node. In ASP.NET Web Forms applications, set the required height of the scroll container that encloses the scheduler. Use the Views | <ListView> node’s IModelListViewSchedulerWeb.ScrollAreaHeight property, for this purpose.
In ASP.NET Web Forms applications, you can set the required count of calendars displayed by the Scheduler List Editor. To do this, use the DateNavigatorRowCount property of the Application Model’s Views | <ListView> node.
The Scheduler module also allows you to specify Resources for Event objects. For instance, in an application that manages data on a car rental firm, an Event represents any time interval when any of the firm’s cars are rented. The cars can be represented as Resources. This means that you schedule the time when a particular Resource (a car) is busy. To learn how to add Resources, and how they are displayed by the Scheduler Windows Forms and ASP.NET Web Forms controls, refer to the Resources in a Schedule topic.
Access the Scheduler Control in Code
You can take advantage of the SchedulerControl and ASPxScheduler controls. To access the required control in code, create a View Controller and override its OnActivated method. This Controller should be activated for List Views only. So, set the Controller’s ViewController.TargetViewType property to the ListView value.
Access SchedulerControl in a WinForms Module Project
using DevExpress.ExpressApp.Scheduler.Win;
using DevExpress.Persistent.Base.General;
using DevExpress.XtraScheduler;
//...
public partial class SchedulerController : ViewController {
   //...
   protected override void OnActivated() {
       base.OnActivated();
       if (View.ObjectTypeInfo.Implements<IEvent>())
          View.ControlsCreated += View_ControlsCreated;
   }
   void View_ControlsCreated(object sender, EventArgs e) {
      ListView view = (ListView)View;
      SchedulerListEditor listEditor = (SchedulerListEditor)view.Editor;
      SchedulerControl scheduler =  listEditor.SchedulerControl;
      // Do what you want with the scheduler
   }
  protected override void OnDeactivated() {
      if(View.ObjectTypeInfo.Implements<IEvent>()) {
          View.ControlsCreated -= new EventHandler(View_ControlsCreated);
      }
   }
}
Note
If the ‘CrossThreadFailure’ error occurs when handling the SchedulerControl events, set the control’s SchedulerOptionsBehavior.UseAsyncMode option to false.
Access ASPxScheduler in an ASP.NET Web Forms Module Project
using DevExpress.ExpressApp.Scheduler.Web;
using DevExpress.Persistent.Base.General;
using DevExpress.Web.ASPxScheduler;
//...
public partial class SchedulerController : ViewController {
   //...
   protected override void OnActivated() {
       base.OnActivated();
       if (View.ObjectTypeInfo.Implements<IEvent>()) {
          View.ControlsCreated += View_ControlsCreated;
       }
   }
   void View_ControlsCreated(object sender, EventArgs e) {
      ListView view = (ListView)View;
      ASPxSchedulerListEditor listEditor = (ASPxSchedulerListEditor)view.Editor;
      ASPxScheduler scheduler =  listEditor.SchedulerControl;
      // Do what you want with the scheduler
   }
   protected override void OnDeactivated() {
      if(View.ObjectTypeInfo.Implements<IEvent>()) {
         View.ControlsCreated -= new EventHandler(View_ControlsCreated);
      }
      base.OnDeactivated();
   }
}