Add a Standalone Report Parameters Panel to a DevExpress Blazor Server Application
- 4 minutes to read
This tutorial describes how to add the Standalone Report Parameters Panel control to a DevExpress Blazor Server application.
Prerequisites
A DevExpress Blazor Server application. For more information about Devexpress Blazor components, review the following help topics:
- System Requirements for DevExptress Blazor Components
- Get Started with DevExpress Blazor Server components
Configure the Blazor Server Project
Install the following NuGet packages:
- DevExpress.Blazor. The package must be already installed if you start with the DevExpress Blazor application.
- DevExpress.Blazor.Reporting.JSBasedControls
- DevExpress.AspNetCore.Reporting
For more information on how to install NuGet packages for DevExpress components, review the following help topic: Choose Between Offline and Online DevExpress NuGet Feeds.
Open Program.cs and add the following code:
using DevExpress.Blazor.Reporting;
//...
var builder = WebApplication.CreateBuilder(args);
// ...
// Add services to the container.
builder.Services.AddDevExpressBlazorReporting();
// ...
var app = builder.Build();
// ...
app.UseRouting();
// Enables controllers for interaction with the component.
app.MapControllers();
// ...
Add Controllers
Like the Document Viewer component, the Standalone Parameter Panel requires a controller to handle requests. Create a Controllers folder, and add the
ReportingControllers.csfile with the following content:using DevExpress.AspNetCore.Reporting.WebDocumentViewer; using DevExpress.AspNetCore.Reporting.WebDocumentViewer.Native.Services; public class CustomWebDocumentViewerController : WebDocumentViewerController { public CustomWebDocumentViewerController(IWebDocumentViewerMvcControllerService controllerService) : base(controllerService) { } }Create a
HomeController.csfile. Define a controller action that supplies the model for the client-side Parameters Panel component. Use the following code example:using DevExpress.AspNetCore.Reporting.WebDocumentViewer; using DevExpress.XtraReports.Web.ParametersPanel; using Microsoft.AspNetCore.Mvc; public class HomeController : Controller { [Route("[controller]")] public IActionResult Index() => View(); [Route("[controller]")] public IActionResult ParametersPanel( [FromQuery] string reportName, [FromServices] IReportParametersPanelClientSideModelGenerator clientSideModelGenerator) { var reportNameToOpen = reportName ?? "TestReport"; ReportParametersPanelModel parametersPanelModel = clientSideModelGenerator.GetModel(reportNameToOpen, WebDocumentViewerController.DefaultUri); return View("Panel", parametersPanelModel); } }
Add a Sample Report
Create a new report with several parameters and save it as
TestReport.repxfile (XML format). Review the following topic for more information: Add a New Report in Visual Studio.Tip
To edit a report without the Microsoft Visual Studio, you can use VS Code with the dedicated extension:
Visual Studio Code (VS Code) Report Designer Extension (CTP)
Create a Reports folder in the project. Paste the
TestReport.repxfile created in the previous step. Specify that the file should be copied to the output directory.
Implement the IReportProvider Service
Create and register a report resolution service that translates report identifiers to report instances. For this purpose, implement the IReportProvider interface in the CustomReportProvider.cs class as follows:
```csharp
using DevExpress.XtraReports.Services;
using DevExpress.XtraReports.UI;

public class CustomReportProvider : DevExpress.XtraReports.Services.IReportProvider {
    public XtraReport GetReport(string id, ReportProviderContext context) {
        var reportNameToOpen = id ?? "TestReport";
        string path = $"Reports\\{reportNameToOpen}.repx";
        if (!System.IO.File.Exists(path)) return new XtraReport();
        return XtraReport.FromXmlFile(path);
    }
}
```
Register the custom service at application startup:
using DevExpress.XtraReports.Services;
// ...
builder.Services.AddScoped<IReportProvider,CustomReportProvider>();
Configure Data Connection
If the report uses data from a database, add a connection string to the appsettings.json file and reference the libraries needed to interact with the database. If a sample report retrieves data from the nwind.db SQLite database (a database file from DevExpress demos), install the System.Data.SQLite.Core NuGet package, copy the nwind.dbfile to the Data folder, specify that the file should be copied to the output directory, and add the following connection string:
"ConnectionStrings": {
    "NWindConnectionString": "XpoProvider=SQLite;Data Source=|DataDirectory|Data/nwind.db"
}
Add a Razor Page with the Standalone Report Parameters Panel Component
Create a new Razor page with the following content as an example:
@page "/panel/"

@using DevExpress.Blazor.Reporting

<DxReportParametersPanel ReportName="TestReport" Height="1000px" Width="650px" >
    <DxReportParametersPanelRequestOptions HandlerUri="DXXRDV"></DxReportParametersPanelRequestOptions>
</DxReportParametersPanel>
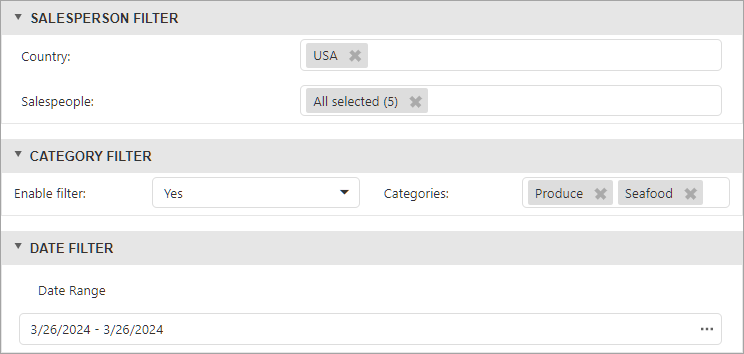
Run the Application
The Panel page contains the Standalone Report Parameters Panel control that displays parameters from the TestReport report:
Next Steps
For information on how to apply parameter values obtained from the Standalone Report Parameters Panel to the report, review the following help topic: Use Parameter Values from the Standalone Report Parameters Panel (Blazor Server App).