Create Blazor Report Viewer (Native) (WebAssembly) Application from Microsoft Template in Visual Studio
- 6 minutes to read
Tip
To create a Blazor Reporting application, use preconfigured DevExpress templates that allow you to create an application with minimal effort and maximum efficiency. For more information, review the following help topics:
Prerequisites
- .NET 6.0 or later SDK.
- Visual Studio 2022 with the ASP.NET and web development workload.
Create a New Project
This section describes how to create a new Blazor project. If you want to add DevExpress Blazor components to an existing application, go to Step 2.
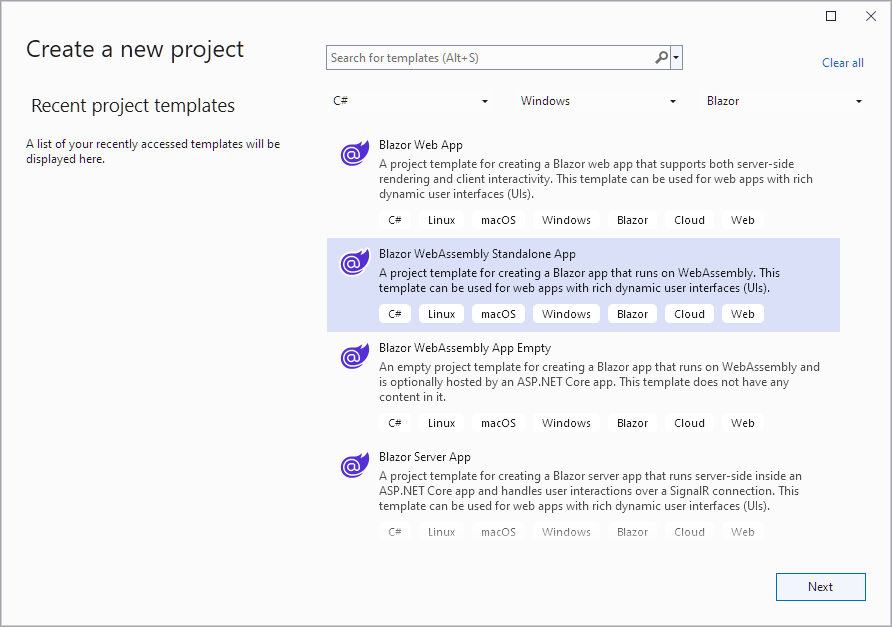
Click Create a new project on Visual Studio’s start page, select the Blazor WebAssembly App template, and click Next.
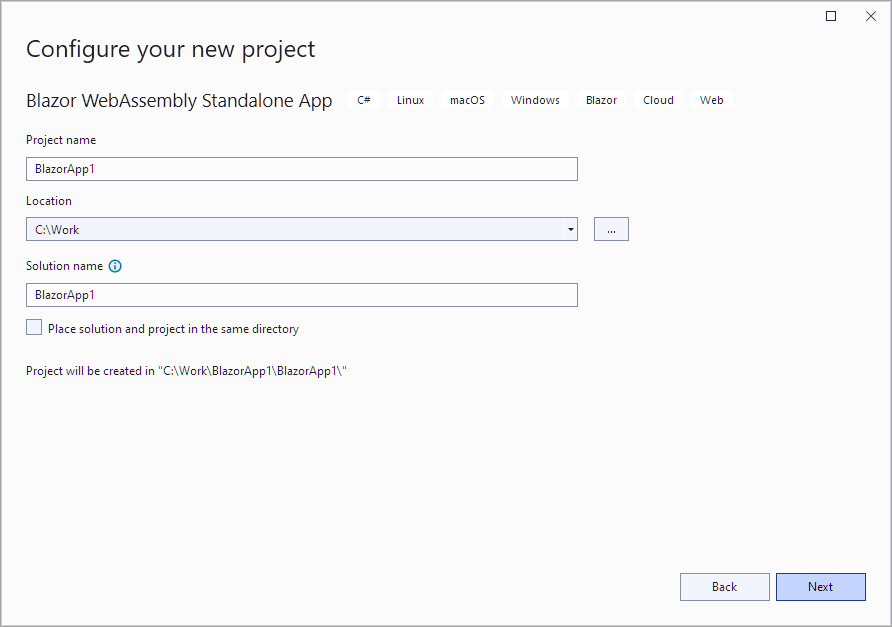
Specify the project name, location, and click Next.
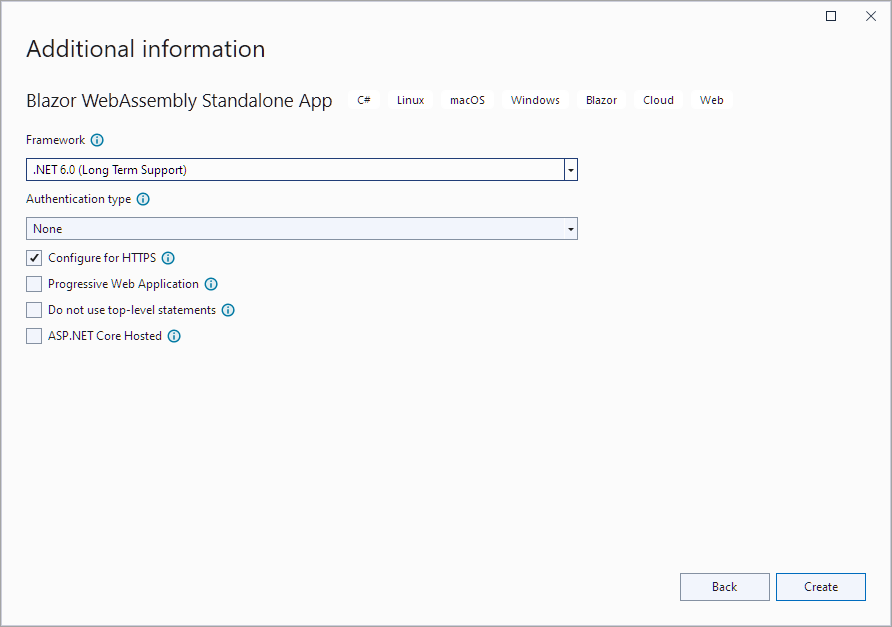
Select the desired framework and click Create.
Obtain Your NuGet Feed Credentials
Make sure your DevExpress account has access to Blazor UI Components. This product line is a part of Universal, DXperience, and ASP.NET subscriptions. Refer to the following page for additional information: DevExpress Subscriptions.
Use your DevExpress credentials to log into nuget.devexpress.com.
Obtain your NuGet feed credentials and copy them to the clipboard.
You can find the same URL on the Download Manager page.
Create a DevExpress NuGet Source
In Visual Studio, select Tools → NuGet Package Manager → Package Manager Settings.

Navigate to NuGet Package Manager → Package Sources. Click the plus sign at the top right corner to add a new NuGet package source. Use the following package settings:
Name:
DevExpressSource: DevExpress NuGet Gallery (
https://nuget.devexpress.com/api) if you use the feed key to authenticate. Otherwise, use the NuGet Feed URL (https://nuget.devexpress.com/{your feed authorization key}/api).
Click OK.

Note
Make sure the
nuget.orgpackage source is also enabled.Select Tools → NuGet Package Manager → Manage NuGet Packages for Solution.
If you registered the DevExpress NuGet feed with an authorization key, the login form is displayed when you invoke the NuGet Package Manager window for the first time. Enter your credentials as follows:
- User name:
DevExpress Password: your authorization key

- User name:
Refer to the following topic for more information: Install NuGet Packages in Visual Studio, VS Code, and Rider.
Install NuGet Packages
In the NuGet Package Manager dialog, open the Browse tab, and install the following NuGet packages:
- DevExpress.Drawing.Skia
- SkiaSharp.Views.Blazor
- SkiaSharp.NativeAssets.WebAssembly
- SkiaSharp.HarfBuzz
- HarfBuzzSharp.NativeAssets.WebAssembly
- DevExpress.Blazor.Reporting.Viewer

Add the following native dependency to the application project file:
<ItemGroup>
<NativeFileReference Include="$(HarfBuzzSharpStaticLibraryPath)\2.0.23\*.a" />
</ItemGroup>
Build the project.
Register DevExpress Resources
Register the DevExpress.Blazor namespace in the _Imports.razor file:
@using DevExpress.Blazor.Reporting
@using DevExpress.Blazor
Register services required for Blazor Reporting by calling the following methods in the Program.cs file:
- AddDevExpressBlazor
- AddDevExpressWebAssemblyBlazorReportViewer
using BlazorApp1;
using Microsoft.AspNetCore.Components.Web;
using Microsoft.AspNetCore.Components.WebAssembly.Hosting;

var builder = WebAssemblyHostBuilder.CreateDefault(args);
builder.RootComponents.Add<App>("#app");
builder.RootComponents.Add<HeadOutlet>("head::after");

builder.Services.AddScoped(sp => new HttpClient { BaseAddress = new Uri(builder.HostEnvironment.BaseAddress) });

builder.Services.AddDevExpressBlazor();
builder.Services.AddDevExpressWebAssemblyBlazorReportViewer();

await builder.Build().RunAsync();
Add a Report Viewer to the Page
Create a new file (ReportViewer.razor) in the Pages folder. Use the following code snippet to generate a page with a Report Viewer component:
@page "/reportviewer/"

@using DevExpress.Blazor.Reporting
@using DevExpress.XtraReports.UI

<h3>Report Viewer</h3>
<link href="_content/DevExpress.Blazor.Themes/blazing-berry.bs5.css" rel="stylesheet" />
<link rel="stylesheet" href="_content/DevExpress.Blazor.Reporting.Viewer/css/dx-blazor-reporting-components.bs5.css">

<DxReportViewer @ref="reportViewer" />

@code {
    [Inject] HttpClient? Http { get; set; }

    DxReportViewer? reportViewer;
}
To learn more about code that applies a DevExpress Blazor theme, review the following help topic: Themes.
Add a navigation link to the Shared\NavMenu.razor page:
<div class="nav-item px-3">
    <NavLink class="nav-link" href="reportviewer">
        <span class="oi oi-plus" aria-hidden="true"></span> Report Viewer (Native)
    </NavLink>
</div>
Add Code to Load Fonts
Before the application can run in a browser, register fonts to ensure that the Skia library can use them to draw report content.
This example implements a custom service that loads fonts: FontLoader.
Add the FontLoader.cs class with the following code to your project:
using DevExpress.Drawing;

public static class FontLoader {
    public async static Task LoadFonts(HttpClient httpClient, List<string> fontNames) {
        foreach (var fontName in fontNames) {
            var fontBytes = await httpClient.GetByteArrayAsync($"fonts/{fontName}");
            DXFontRepository.Instance.AddFont(fontBytes);
        }
    }
}
Add a LoadFonts method call to the page that includes the DxReportViewer control:
// ...

@code {
    // ...
    List<string> RequiredFonts = new() {
        "segoeui.ttf", "segoeuib.ttf", "segoeuii.ttf",
        "segoeuil.ttf", "segoeuisl.ttf", "segoeuiz.ttf"
    };

    protected async override Task OnAfterRenderAsync(bool firstRender) {
        if (firstRender) {
            await FontLoader.LoadFonts(Http, RequiredFonts);
        }
        await base.OnAfterRenderAsync(firstRender);
    }
}
Copy fonts to the wwwroot/fonts folder.
Load a Report
You can create a report class in the application and pass an instance of this class to the viewer. As an alternative, use the XtraReport.FromFile method to load a report from a file in .REPX format, and then pass a report instance to the viewer.
Create a New Report
To ensure that all needed templates are available in Visual Studio prior to proceeding with this section, DevExpress Reporting v24.1 must be installed.
- In Visual Studio, create a new Reports folder.
- Press Ctrl+Shift+A or select PROJECT | Add New Item… in the main menu.
Select the DevExpress Report item and proceed to the Report Wizard to create a
TestReport.csfile.Show Visual Guide


Use the following JSON data string:
[
{
    "date": "2018-05-06",
    "temperatureC": 1,
    "summary": "Freezing"
},
{
    "date": "2018-05-07",
    "temperatureC": 14,
    "summary": "Bracing"
},
{
    "date": "2018-05-08",
    "temperatureC": -13,
    "summary": "Freezing"
},
{
    "date": "2018-05-09",
    "temperatureC": -16,
    "summary": "Balmy"
},
{
    "date": "2018-05-10",
    "temperatureC": -2,
    "summary": "Chilly"
}
]
Upon completion, the wizard generates a TestReport.cs file and adds it to the project. Visual Studio Report Designer opens the newly created report.

Open the ReportViewer.razor page and specify the report that the Report Viewer displays.
@page "/reportviewer/"

@using DevExpress.Blazor.Reporting
@using DevExpress.XtraReports.UI

<h3>Report Viewer</h3>
<link href="_content/DevExpress.Blazor.Themes/blazing-berry.bs5.css" rel="stylesheet" />
<link rel="stylesheet" href="_content/DevExpress.Blazor.Reporting.Viewer/css/dx-blazor-reporting-components.bs5.css">

<DxReportViewer @ref="reportViewer" Report="Report"/>

@code {
    [Inject] HttpClient? Http { get; set; }
    XtraReport Report = new XtraReport1();
    DxReportViewer? reportViewer;

    List<string> RequiredFonts = new() {
        "segoeui.ttf", "segoeuib.ttf", "segoeuii.ttf",
        "segoeuil.ttf", "segoeuisl.ttf", "segoeuiz.ttf"
    };

    protected async override Task OnAfterRenderAsync(bool firstRender) {
        if (firstRender) {
            await FontLoader.LoadFonts(Http, RequiredFonts);
        }
        await base.OnAfterRenderAsync(firstRender);
    }
}
Result
Run the project and see the result. The Report Viewer displays a tabular report with data from the JSON data source:

Troubleshooting
The following article lists common issues that can occur in a Web Reporting application and describes solutions: Troubleshooting
For information on how to identify the cause of an issue, refer to the following topic: Reporting Application Diagnostics.