ASP.NET Core Reporting (.NET Framework)
- 8 minutes to read
This document describes how to use the Report Designer and HTML5 Document Viewer controls in ASP.NET Core applications targeting .NET Framework v 4.6.1 (available as a Community Technology Preview).
Note
Online Example How to use reporting controls in ASP.NET Core applications
This topic consists of the following sections.
- Prerequisites
- Create an ASP.NET Core Web Application
- Install Required Packages
- Add Reporting Controls
- Provide Report Storage
- Register Default Data Connections
- Register Default Data Sources
- Additional Customization
Prerequisites
Consider the following ASP.NET Core application prerequisites.
- Install the .Net Core 2.0.0 SDK or later.
If you are using Visual Studio, install Visual Studio 2017 version 15.3 or later with the following workloads:
- ASP.NET and web development
- .NET Core cross-platform development
Create an ASP.NET Core Web Application
Do the following to create a new ASP.NET Core Web Application in Visual Studio.
Create a new project by selecting File | New | Project in the main menu or pressing CTRL+SHIFT+N.

In the invoked New Project dialog, expand the Installed category, select Visual C#, and then, select the ASP.NET Core Web Application. Specify the application name and click OK.
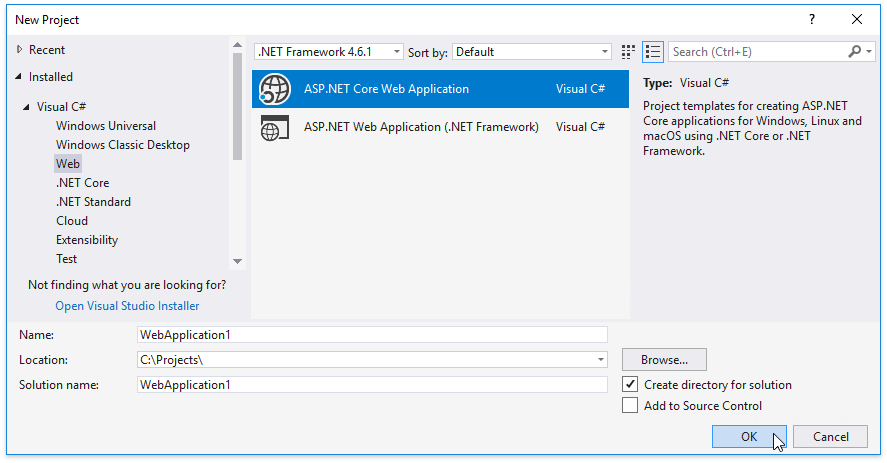
Select .Net Framework and ASP.NET Core 2.0 in the drop-down lists. Choose Web Application (Model-View-Controller) and click OK to create the project.

Install Required Packages
Perform the following steps to install the NuGet and Bower packages required for the Report Designer and Document Viewer.
- In the Visual Studio’s main menu, select Tools | NuGet Package Manager | Package Manager Settings.
In the invoked dialog, select the Package Sources node on the left-hand side. Click the plus button to add a new package source, give it a name (for instance, DevExpress Offline Packages) and specify the following path:
C:\Program Files (x86)\DevExpress 17.2\Components\System\Components\packages

Click Update to apply the changes, and then click OK to close the dialog.
Note
Refer to DevExpress NuGet packages to learn how to install online DevExpress NuGet packages.
Right-click the Dependencies node in the Solution Explorer and select Manage NuGet Packages in the invoked context menu.

Select DevExpress Offline Packages in the Package source drop-down list and go to the Browse page. Enable the Include prerelease check box, find the DevExpress.AspNetCore.Reporting package and install it.

Right-click the application name in the Solution Explorer and select Add | Add New Item. In the invoked Add New Item dialog, select Bower Configuration File and click Add.

This adds the bower.json and .bowerrc files to the project.
Right-click the application name once again and select Manage Bower Packages. In the invoked window, search for the xtrareportsjs package and install it. Ensure that the Save changes to bower.json check box is selected.

Additionally install the ace-builds package if you want to enable intelligent code completion and error validation in the Expression Editor and Filter Editor.
After installation is completed, you can find all the libraries in the wwwroot/lib folder.
Add Reporting Controls
Do the following to integrate the Report Designer and Document Viewer to the created ASP.NET Core project.
Open the Startup file and modify it to configure services as demonstrated below.
using DevExpress.AspNetCore;
using DevExpress.AspNetCore.Reporting;
//...

public class Startup {
//...
    public void ConfigureServices(IServiceCollection services) {
        // Register reporting services in an application's dependency injection container.
        services.AddDevExpressControls();
        // Adds MVC controllers for processing requests with the default routes.
        services.AddMvc().AddDefaultReportingControllers();
    }

    public void Configure(IApplicationBuilder app, IHostingEnvironment env) {
        // ...
        app.UseStaticFiles();
        // Initialize reporting services.
        app.UseDevExpressControls();
        // ...
    }
}
In the _ViewImports.cshtml file, import the DevExpress.AspNetCore namespace to be used by all other Views. Alternatively, you can add this namespace in the Views with reporting controls.
Create a new View file or open the existing one (for example, Index.cshtml file), and link the resources common for reporting controls as shown below.
<link href="~/lib/jquery-ui/themes/base/jquery-ui.css" rel="stylesheet" />
<link href="~/lib/jquery-ui/themes/base/resizable.css" rel="stylesheet" />
<link href="~/lib/jquery-ui/themes/base/draggable.css" rel="stylesheet" />

<script src="~/lib/jquery-ui/jquery-ui.min.js"></script>
<script src="~/lib/knockout/dist/knockout.js"></script>

<script src="~/lib/cldrjs/dist/cldr.js"></script>
<script src="~/lib/cldrjs/dist/cldr/event.js"></script>
<script src="~/lib/cldrjs/dist/cldr/supplemental.js"></script>
<script src="~/lib/cldrjs/dist/cldr/unresolved.js"></script>
<script src="~/lib/globalize/dist/globalize.js"></script>
<script src="~/lib/globalize/dist/globalize/currency.js"></script>
<script src="~/lib/globalize/dist/globalize/message.js"></script>
<script src="~/lib/globalize/dist/globalize/number.js"></script>
<script src="~/lib/globalize/dist/globalize/date.js"></script>

<script src="~/lib/devextreme/js/dx.all.js"></script>
<link href="~/lib/devextreme/css/dx.common.css" rel="stylesheet" />
<link href="~/lib/devextreme/css/dx.light.css" rel="stylesheet" />
In the same file, add the following links depending on the control type.
Report Designer
...
<script src="~/lib/xtrareportsjs/js/dx-designer.js"></script>
<script src="~/lib/xtrareportsjs/js/report-designer.js"></script>
<script src="~/lib/xtrareportsjs/html/report-designer.html" type="text/html" ></script>
<link href="~/lib/xtrareportsjs/css/report-designer-light.css" rel="stylesheet" />

<!-- Optionally -->
<script src="~/lib/ace-builds/src/ace.js"></script>
<script src="~/lib/ace-builds/src/ext-language_tools.js"></script>
<script src="~/lib/ace-builds/src/snippets/text.js"></script>
Document Viewer
...
<script src="~/lib/xtrareportsjs/js/dx-designer.js"></script>
<script src="~/lib/xtrareportsjs/js/web-document-viewer.js"></script>
<script src="~/lib/xtrareportsjs/html/web-document-viewer.html" type="text/html" ></script>
<link href="~/lib/xtrareportsjs/css/web-document-viewer-light.css" rel="stylesheet" />
Make sure that you meet all the requirements for deploying the control on the client. Refer to the following topics for a list of necessary client resources:
In the View file, use the ReportDesigner or WebDocumentViewer wrapper to display the End-User Report Designer or the HTML Document Viewer on your web page.
Open the Program file and modify the BuildWebHost method as shown below to disable scoped services’ validation:
public static IWebHost BuildWebHost(string[] args) =>
    WebHost.CreateDefaultBuilder(args)
        .UseStartup<Startup>()
        .UseDefaultServiceProvider(options => options.ValidateScopes = false)
        .Build();
In the _Layout.cshtml file, jQuery links in the environment containers are inserted after rendering the reporting control and override the scripts required to correctly render the control. You can avoid this by moving the default links from the body to the head section.
<head> ... <environment include="Development"> <script src="~/lib/jquery/dist/jquery.js"></script> <script src="~/lib/bootstrap/dist/js/bootstrap.js"></script> ... </environment> <environment exclude="Development"> ... </environment> </head>- The scripting functionality is available in the Web Report Designer by default. You can maintain script restrictions as described at Scripting Security.
Provide Report Storage
Do the following to implement a server-side report storage.
- Create a new folder under the Services name to store all custom services by right-clicking the application name in the Solution Explorer and selecting Add | New Folder.
Add a new class by inheriting from the abstract ReportStorageWebExtension class and overriding its methods.
See the Implementing a Report Storage topic for detailed information on this class and a custom storage example.
using DevExpress.XtraReports.Web.Extensions;

public class MyReportStorage : ReportStorageWebExtension {
   // ...

    // In this example, a constructor accepts the path to the file directory.
    public ReportStorageExtension(string path) {
        // ...
    }
}
Register the custom report storage in the Startup class using the static ReportStorageWebExtension.RegisterExtensionGlobal method.
The following code shows how to pass the path to the file directory (named Reports).
public void Configure(IApplicationBuilder app, IHostingEnvironment env) {
    // ...
    var reportStorageFileDirectoryPath = System.IO.Path.Combine(env.ContentRootPath, "Reports");
    ReportStorageWebExtension.RegisterExtensionGlobal(new ReportStorageExtension(reportStorageFileDirectoryPath));
}
Register Default Data Connections
The following steps demonstrate how to provide the Report Designer with the predefined data connections to display for end-users in the SQL Data Source Wizard.
Open the appsettings.json file, add the ConnectionStrings section and specify the required connection strings.
"ConnectionStrings": {
    "northwind": "XpoProvider=MSSqlServer;Server=localhost;User Id=;Password=;Database=Northwind;Persist Security Info=true"
}
To use the connection strings from this file, open the Startup file and register the connection strings provider as in the following code snippet.
public void ConfigureServices(IServiceCollection services) {
    services.AddDevExpressControls();
    services.ConfigureReportingServices(configurator => {
        configurator.ConfigureReportDesigner(designerConfigurator => {
            designerConfigurator.RegisterDataSourceWizardConfigFileConnectionStringsProvider();
        });
    });
    // ...
}
Register Default Data Sources
Do the following to provide the Report Designer with a set of default data sources.
Add a new Model for the Report Designer (for instance, the ReportDesignerModel file) to the Models folder and insert the following code.
using DevExpress.XtraReports.UI;

namespace WebApplication1.Models {
    public class ReportDesignerModel {
        public XtraReport Report { get; set; }
        public object DataSource { get; set; }
    }
}
Open the Controller file and initialize model data. Create a new SqlDataSource class instance and use the SelectQueryFluentBuilder class to construct a SELECT statement.
using Microsoft.AspNetCore.Mvc;
using DevExpress.DataAccess.Sql;
using WebApplication1.Models;
// ...

public class HomeController : Controller {
    public IActionResult Index() {
        SqlDataSource dataSource = new SqlDataSource("northwind");
        SelectQuery query = SelectQueryFluentBuilder.AddTable("Products").SelectAllColumnsFromTable().Build("Products");
        dataSource.Queries.Add(query);
        dataSource.RebuildResultSchema();
        var model = new ReportDesignerModel
        {
            DataSource = dataSource,
            // Open your report here.
            Report = new DevExpress.XtraReports.UI.XtraReport()
        };
        return View(model);
    }
    // ...
}
In the View file, modify your code to obtain the data source from the model and add it to the Report Designer’s DataSources collection.
@Html.DevExpress().ReportDesigner("ReportDesigner").Height("1000px").Bind(Model.Report).DataSources(ds=> ds.Add("Northwind", Model.DataSource))
Additional Customization
You can register custom and/or predefined services to provide specific functionality to the Report Designer and Document Viewer.
Refer to the documents below for complete lists of available services and methods used for their registration.
In ASP.NET Core applications, you can register these services using similar methods in the Startup class. The only difference is that these methods are available at the level of the ConfigureServices method’s parameter.
See Introduction to Dependency Injection in ASP.NET Core for more information on registering services.
public void ConfigureServices(IServiceCollection services) {
    // ...
    services.ConfigureReportingServices(configurator => {
        configurator.ConfigureWebDocumentViewer(viewerConfigurator => {
            viewerConfigurator.RegisterWebDocumentViewerDrillThroughProcessor<CustomDrillThroughProcessor>();
        });
    });

    services.AddSingleton<WebDocumentViewerOperationLogger, MyOperationLogger>();
}