Content Editing in Print Preview
- 9 minutes to read
This document provides information about interactive document editing in Print Preview that enables you to customize field values directly in a previewed document before printing or exporting it.
In this document, you will learn how to provide standard or custom editors to report controls, validate the user input and format the edited values.
This document consists of the following sections.
- Content Editing Overview
- Text Editing
- Check Box Editing
- Runtime Specifics
- Format Edited Values
- Register a Custom Field Editor
Content Editing Overview
When content editing is enabled for a report control (either unbound or data-aware), it is possible to customize the corresponding field values in Print Preview.
To enable content editing for a report control, expand its EditOptions property and set the EditOptions.Enabled property to true.
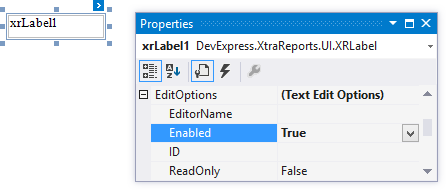
When the EditOptions.Enabled property is set to true and the EditOptions.ReadOnly property is disabled, the control’s content can be edited in Print Preview (clicking a field will invoke the appropriate editor).
The following standard editors can be assigned to a control, depending on the kind of content it displays.
| Memo Edit | Check Box |
|---|---|
 |
 |
To highlight all editing fields available in a document, click the Editing Fields button on the Print Preview toolbar. This button is disabled when there are no such fields in a document.

To navigate between editing fields in Print Preview, use the TAB and SHIFT+TAB keys.
Content Editing Specifics
When enabling content editing in your report, consider the following.
- The changes made to a control’s content in Print Preview have no effect on other parts of the document (e.g., the related summary results, grouping, sorting, bookmarks and other settings that have already been processed before generating the document).
The XRControl.CanGrow setting is ignored for editing fields.
Multi-line values can only be entered when no mask is applied to an editing field. The editing area of a field cannot exceed the original dimensions of a control.
- Values entered into editing fields are reset back to their defaults after refreshing the document (e.g., when submitting report parameter values and expanding or collapsing data in a drill-down report).
- It is impossible to edit content of a control that has its DetailBand.DrillDownControl property specified.
Field values entered in Print Preview for controls placed onto the Top Margin and Bottom Margin bands are not preserved when the report is exported to TXT or CSV, as well as the following formats as a single file.
- HTML
- MHT
- RTF
- XLS
- XLSX
- image
Tip
The created report is platform-agnostic and its interactive features are supported by the Print Preview available for all application platforms.
To learn about the specifics of editing different kinds of content, see the following sections in this document.
Tip
Enable the PdfExportOptions.ExportEditingFieldsToAcroForms option to automatically convert a report’s editing fields to AcroForms on PDF export.
Text Editing
The Label, Table Cell and Character Comb controls can be assigned editors to customize their content in Print Preview.
To enable content editing for these controls, expand their XRLabel.EditOptions property and set the EditOptions.Enabled property to true.
The following editors can be used to customize a field’s content in Print Preview.
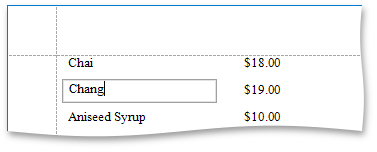
Default Editor
By default, the TextEditOptions.EditorName property is not specified, and a memo edit is used as a standard editor.
Specific Value Editors
You can assign a specific editor to a control using its TextEditOptions.EditorName property.

The standard editors are divided into the following categories.
Numeric
Date-Time
Letters
- Integer
- Integer Positive
- Fixed-Point
- Fixed-Point Positive
- Date
- Only Letters
- Only Uppercase Letters
- Only Lowercase Letters
- Only Latin Letters
Each value editor corresponds to a specific mask that ensures that only appropriate values can be entered and then formats the edited value.
To learn how to implement custom validation of user input, see the Format Editing Field Values section in this document.
- Integer
Custom Editors
You can implement custom editors and add them to an existing or custom category. This is described in the Register a Custom In-Place Editor section of this document.
Note
If a table cell contains other controls, its editing is disabled (but not the editing of the controls contained in this cell), which is illustrated in the following image.

Check Box Editing
The Check Box control’s value can be edited in Print Preview.
To enable content editing for a check box, expand its XRCheckBox.EditOptions property and set the EditOptions.Enabled property to true.

In Print Preview, the control’s behavior depends on the CheckEditOptions.GroupID setting.
When this property is set to null or an empty string value, a check box can be switched either to the “checked” or “unchecked” state (the “intermediate” state is not supported) independently on other available check boxes.
- Otherwise, the field editor behaves like a radio button, and editors with the same GroupID value belong to a single logical group (i.e., only one option can be selected within a group at a time).
Runtime Specifics
The following example illustrates how to specify the editing options in code. To apply these settings to a document, the EnableDocumentEditing method must be invoked before calling the XtraReport.CreateDocument method.
using DevExpress.XtraPrinting;
// ...

private void EnableDocumentEditing(XtraReport1 report) {
    // This label is assigned a default editor (memo edit).
    report.xrLabel1.EditOptions.Enabled = true;

    // This label's editor is disabled in Print Preview.
    report.xrLabel2.EditOptions.Enabled = true;
    report.xrLabel2.EditOptions.ReadOnly = true;

    // This label is assigned a standard date-time editor.
    report.xrLabel3.EditOptions.Enabled = true;
    report.xrLabel3.EditOptions.EditorName = "Date";

    // The value of this check box can be customized in Print Preview.
    report.xrCheckBox1.EditOptions.Enabled = true;

    // These check boxes will behave like radio buttons
    // belonging to the same logical group.
    report.xrCheckBox2.EditOptions.Enabled = true;
    report.xrCheckBox2.EditOptions.GroupID = "Group 1";
    report.xrCheckBox3.EditOptions.Enabled = true;
    report.xrCheckBox3.EditOptions.GroupID = "Group 1";
}
Setting the EditOptions.Enabled property of a control to true results in one or more editing fields being added to the PrintingSystemBase.EditingFields collection. When accessing this collection to manage the editing fields, consider the following.
- The number of created fields depends on whether or not the control is bound to data (if it is bound, this number corresponds to the number of data records displayed for this control in the document).
- A field’s type depends on the control to which the field corresponds (TextEditingField for a label or its descendant, and CheckEditingField for a check box).
Field options correspond to edit options of the control as follows.
Editing Field’s Options Control’s Edit Options EditingField.ID EditOptions.ID EditingField.ReadOnly EditOptions.ReadOnly TextEditingField.EditorName TextEditOptions.EditorName CheckEditingField.GroupID CheckEditOptions.GroupID - A visual brick (a placeholder for a control’s content in the rendered document) to which an editing field corresponds is returned by the EditingField.Brick property.
The current value of a text editing field is returned by the EditingField.EditValue property, while the current state of a check box is specified by the CheckEditingField.CheckState property.
Changing a field’s value in Print Preview updates the corresponding property and each time this value is changed, the PrintingSystemBase.EditingFieldChanged event occurs. You can handle this event to validate the user input or format the edited value.
For a code example, see the next section in this document: Format Edited Values.
When the EditOptions.ReadOnly property is enabled (corresponds to the EditingField.ReadOnly property of a field), a corresponding field cannot be edited in Print Preview and is not highlighted as an editing fields. The following code illustrates how to disable content editing for a specific user in the PrintingSystemBase.AfterBuildPages event handler.
using DevExpress.XtraPrinting;
// ...

private void XtraReport1_BeforePrint(object sender, System.Drawing.Printing.PrintEventArgs e) {
    PrintingSystem.AfterBuildPages += PrintingSystem_AfterBuildPages;
}

private static string userName = System.Environment.UserName;

void PrintingSystem_AfterBuildPages(object sender, System.EventArgs e) {
    if (userName == "fuller.andrew")
        foreach (EditingField field in PrintingSystem.EditingFields)
            field.ReadOnly = true;
}
Format Edited Values
A format for a TextEditingField‘s value is specified differently depending on whether a control’s content is static or is supplied from a data source.
If a control is unbound (i.e., its content is obtained from the XRControl.Text property value), the actual field value is obtained from the TextBrickBase.Text property of a corresponding brick.
In this case, you can assign a required format directly to the Text property of the brick.
If a control is bound to data (i.e., its XRControl.DataBindings property is not null), the actual field value is obtained from the TextBrick.TextValue property of a corresponding brick.
In this case, assign a required format to the TextBrick.TextValueFormatString property and update the TextBrickBase.Text property based on the field’s TextValue.
The following code illustrates how to apply the same currency format to both unbound and data-aware controls in the PrintingSystemBase.EditingFieldChanged event handler. To check whether or not a field corresponds to a data-aware control, use the VisualBrick.TextValue property (it is null when a control’s content is static).
using DevExpress.XtraPrinting;
// ...

private void XtraReport1_BeforePrint(object sender, System.Drawing.Printing.PrintEventArgs e) {
    PrintingSystem.EditingFieldChanged += PrintingSystem_EditingFieldChanged;
}

void PrintingSystem_EditingFieldChanged(object sender, EditingFieldEventArgs e) {
    if (e.EditingField.Brick.TextValue != null) {
        e.EditingField.Brick.TextValueFormatString = "{0:c2}";
        e.EditingField.Brick.Text = string.Format(e.EditingField.Brick.TextValueFormatString, e.EditingField.Brick.TextValue);
    }
    else {
        e.EditingField.Brick.Text = string.Format("{0:c2}", System.Convert.ToDouble(e.EditingField.Brick.Text));
    }
}
Register a Custom Field Editor
To learn how to use custom controls (e.g., a combo box editor) for report editing in Print Preview, view the following examples online.
- WinForms: How to use custom controls for editing report content in Print Preview
- WPF: How to use custom controls for editing report content in Print Preview
- ASP: How to use custom controls for editing report content in Print Preview