Register a Custom Control in the Report Designer Toolbox
- 7 minutes to read
This tutorial describes how to create a custom control by deriving it from an existing one and register this custom control in the Toolbox of the Web End-User Report Designer.
Tip
Online Example: How to register a custom control in the Designer’s toolbox
Create a Web Application
To get started with this tutorial, open an existing Web application or create a new one from scratch. To learn how to create a Web reporting application, see the Add an End-User Report Designer to an ASP.NET WebForms Application or Create an ASP.NET WebForms Application with a Report Designer topic .
Create a Custom Control
To create a custom label control, do the following:
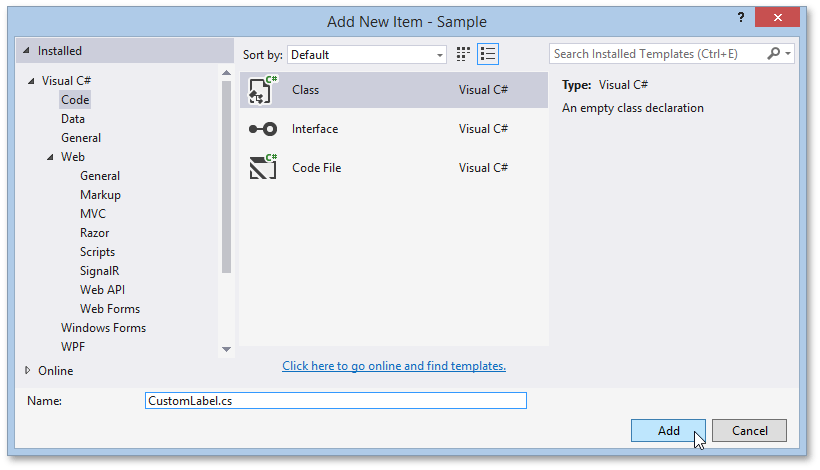
Add a new class that will define a custom control to the project. Press CTRL+SHIFT+A or select Add New Item in the Project menu to invoke the Add New Item dialog. In the dialog, select the Class item, specify the class name and click Add.
Declare a custom control class (the CustomLabel class in this example), derive it from the XRLabel class, and introduce a new property as in the following code sample.
//... using System.ComponentModel; using DevExpress.XtraReports.UI; using DevExpress.Utils.Serializing; namespace Sample { public class CustomLabel : XRLabel { private string _someProperty; [Browsable(true), Bindable(false), Category("Data")] [XtraSerializableProperty] [DefaultValue("")] [DesignerSerializationVisibility(DesignerSerializationVisibility.Visible), EditorBrowsable(EditorBrowsableState.Always)] public string SomeProperty { get { return this._someProperty; } set { this._someProperty = value; } } } }Add a bindable property to the CustomLabel class as shown below. Mark this property with the Bindable attribute set to true. Override the PutStateToBrick protected method to assign the bindable property value to the VisualBrick.Text property.
//...
private string _bindableProperty;

[Browsable(true), Bindable(true), Category("Data")]
[XtraSerializableProperty]
[DefaultValue("")]
[DesignerSerializationVisibility(DesignerSerializationVisibility.Visible),
EditorBrowsable(EditorBrowsableState.Always)]
public string BindableProperty {
    get { return this._bindableProperty; }
    set { this._bindableProperty = value; }
}

protected override void PutStateToBrick(DevExpress.XtraPrinting.VisualBrick brick,
                                        DevExpress.XtraPrinting.PrintingSystemBase ps) {
    base.PutStateToBrick(brick, ps);
    brick.Text = this.BindableProperty;
}
The custom label is now registered in the Toolbox in Visual Studio and is ready to be used in reports.
Add a Custom Control to the Report
To create a new report and add a custom control to it, do the following:
To invoke the Add New Item dialog once again, press CTRL+SHIFT+A or select Add New Item in the PROJECT menu. In this dialog, select the DevExpress v18.2 Report item, specify the report name, and click Add.
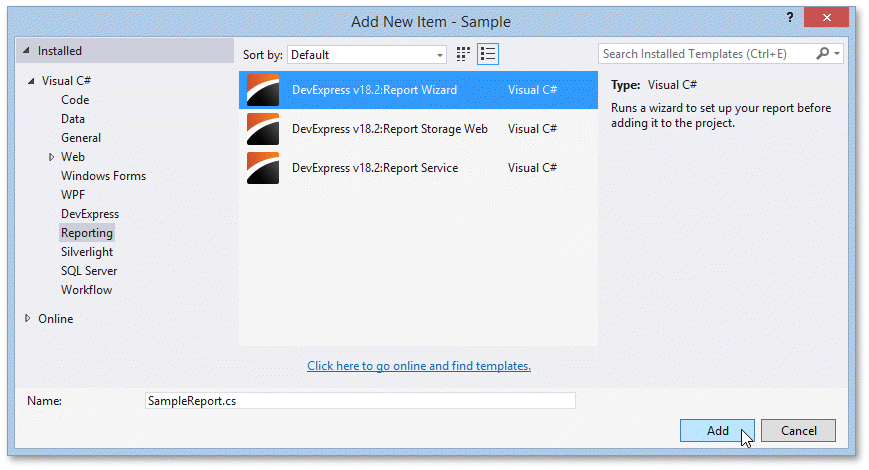
- In the invoked Report Wizard, select Blank and click Finish.
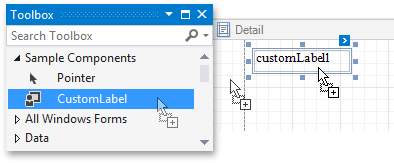
To add a custom control to the report, drag it from the Toolbox tab with the namespace name (the Sample tab), and then drop it onto a band.
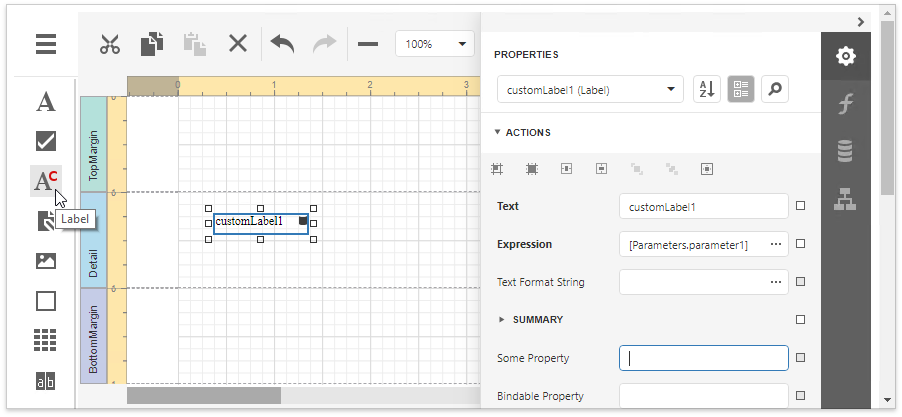
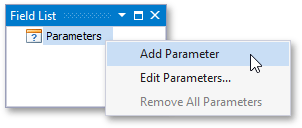
Create a new report parameter and bind the added custom control to it. In the Field List panel, right-click the Parameters item, and in the invoked menu, select Add Parameter.
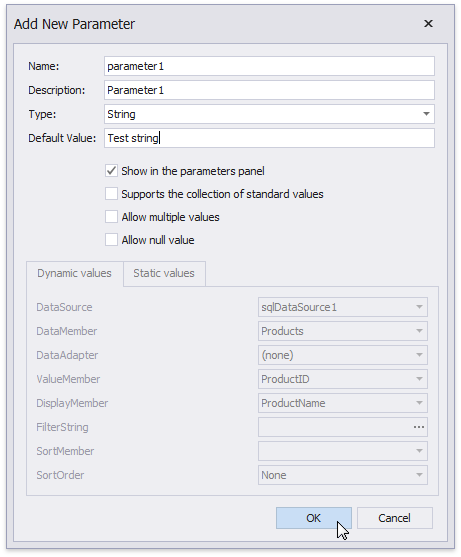
In the Add New Parameter dialog, specify the parameter name and description, set the parameter type to String, and enter the default value as shown in the following image.
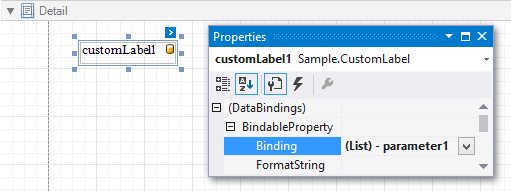
Bind the custom control to the created parameter using the BindableProperty.
Open your report in the Web Report Designer.
Register a Custom Control in the Web End-User Designer
The following steps demonstrate how to register the custom control and add it to the Toolbox of the Web Report Designer.
- Add a new folder named CustomLabel to the project to store files related to the custom control.
- To provide a custom control icon that will be displayed in the Report Designer Toolbox, add the required bitmap file (24x24 pixels) to the CustomLabel folder.
To assign the added icon to the custom control, add a new CSS file named custom-label.css to the same folder. The CSS class name should consist of the standard prefix “.dxrd-image“, the namespace name (“sample“) and the custom control class name (“customlabel“). The namespace name and the custom control class name should be separated by an underscore and both of them should be separated by a dash from the standard prefix. Note that the CSS class name and the custom control icon name should be written in lowercase.
.dxrd-image-sample_customlabel {
    background-image: url(custom-label.png);
    background-repeat: no-repeat;
}
Define a content template for the custom control. To do this, add a new HTML file named custom-label-content.html to the CustomLabel folder and insert the following code into this file.
<script type='text/html' id='custom-label-content'>
    <div data-bind="styleunit: { lineHeight: contentSizes().height / _context.zoom() }" style="box-sizing: border-box;
                                 letter-spacing: normal; width: 100%">
        <div class="dxrd-control-content" data-bind="text: displaySomeProperty, style: contentCss"></div>
    </div>
</script>
Add a new custom-label.js file to the CustomLabel folder and write the following JavaScript code in this file.
The customizeToolbox function will be further used to handle the client-side ASPxClientReportDesigner.CustomizeToolbox event. The ASPxClientReportDesignerCustomizeToolboxEventArgs.ControlsFactory event argument provides information about all controls available in the Report Designer Toolbox.
You can create your custom control by deriving it from an existing one using the ASPxDesignerControlsFactory.inheritControl method. To register the custom control in the Toolbox, use the ASPxDesignerControlsFactory.registerControl method, which accepts the control name and an object that stores information about a custom toolbox item.
function customizeToolbox(s, e, shortTypeName, fullTypeName) {
    // Obtain a standard label's information.
    var controlsFactory = e.ControlsFactory;
    var labelInfo = controlsFactory.getControlInfo("XRLabel");
    var baseSerializationInfo = controlsFactory.getPropertyInfo("XRLabel", "Text");

    // Create serialization information for a custom label's properties.
    var somePropertySerializationInfo = $.extend({}, baseSerializationInfo, {
        propertyName: "someProperty", modelName: "@SomeProperty", displayName: "Some Property", defaultVal: "", localizationId: ""
    });
    var bindablePropertySerializationInfo = $.extend({}, baseSerializationInfo, {
        propertyName: "bindableProperty", modelName: "@BindableProperty", displayName: "Bindable Property", defaultVal: "", localizationId: ""
    });

    // Create the custom label's surface type.
    var CustomLabelSurface = (function (_super) {
        __extends(CustomLabelSurface, _super);
        function CustomLabelSurface(control, context) {
            _super.call(this, control, context);
            this.contenttemplate = "custom-label-content";
            this.displaySomeProperty = ko.computed(function () {
                var text = control["someProperty"] && control["someProperty"]();
                return text ? text : (control["text"] && control["text"]() || "");
            });
        }
        return CustomLabelSurface;
    })(labelInfo.surfaceType);

    // Create an object containing info about a custom label toolbox item.
    var customLabelInfo = controlsFactory.inheritControl("XRLabel", {
        surfaceType: CustomLabelSurface,
        defaultVal: {
            "@ControlType": fullTypeName,
            "@SizeF": "100,23"
        },
        displayName: "My Label",
        toolboxIndex: 1,
        info: [somePropertySerializationInfo, bindablePropertySerializationInfo],
        popularProperties: ["someProperty", "bindableProperty"],
    });

    // Register the custom label in the Report Designer Toolbox.
    controlsFactory.registerControl(shortTypeName, customLabelInfo);

    // Adjust the custom label's bindings depending on a report's data binding mode:
    // - if the report uses expression bindings (DataBindingMode is set to Expressions or ExpressionsAdvanced)
    var defaultExpression = controlsFactory.getPropertyInfo(shortTypeName, "Expression")
    defaultExpression.expressionName = "BindableProperty"
    controlsFactory.setExpressionBinding(shortTypeName, "BindableProperty", controlsFactory._beforePrintPrintOnPage);

    // - if the report uses data bindings (DataBindingMode is set to Bindings)
    ["BindableProperty"].forEach(function (name) {
        DevExpress.Designer.Report.dataBindingsSerializationInfo.push({
            propertyName: name, displayName: name,
            editor: DevExpress.Designer.Report.editorTemplates.dataBinding
        });
    });
    var dataBindings = controlsFactory.getPropertyInfo(shortTypeName, "Data Bindings");
    dataBindings.allDataBindings.push("BindableProperty");
    var defaultBinding = controlsFactory.getPropertyInfo(shortTypeName, "Data Binding");
    defaultBinding.bindingName = "BindableProperty";

    // Add a custom property to the Data category of the Property Grid.
    s.AddToPropertyGrid("Data", somePropertySerializationInfo);
}
Reference the previously created file and handle the client-side ASPxClientReportDesigner.CustomizeToolbox event as demonstrated below.
...
<head runat="server">
    <title></title>
    <link href="CustomLabel\custom-label.css" rel="stylesheet" />
    <!-- #include file = "CustomLabel\custom-label-content.html" -->
</head>

<body>
...
    <script src="CustomLabel/custom-label.js"></script>

    <script type="text/javascript">
        function onCustomizeToolbox(s, e) {
            customizeToolbox(s, e, "<%= typeof(Sample.CustomLabel).ToString() %>",
                "<%= typeof(Sample.CustomLabel).AssemblyQualifiedName %>");
        }
    </script>

    <dx:ASPxReportDesigner ID="reportDesigner1" runat="server" ClientInstanceName="reportDesigner">
        <ClientSideEvents CustomizeToolbox="onCustomizeToolbox" />
    </dx:ASPxReportDesigner>
</body>
Remove an Existing Control from the Toolbox
You can also use the ASPxClientReportDesigner.CustomizeToolbox event to hide an existing control from the Toolbox. Use the ASPxDesignerControlsFactory.getControlInfo method of the event argument’s ASPxClientReportDesignerCustomizeToolboxEventArgs.ControlsFactory property to obtain information on the required control and disable the ASPxDesignerToolboxItem.isToolboxItem option.
function onCustomizeToolbox(s, e) {
    var labelInfo = e.ControlsFactory.getControlInfo("XRLabel");
    labelInfo.isToolboxItem = false;
}
Get the Result
The custom label control is now ready to be used in the Web Report Designer. Run the application to view the result.