Connect the XPO Profiler to an Application via Named Pipes
- 2 minutes to read
Important
The target Operating System and Common Language Runtime should support Named Pipes. This approach is compatible with .NET Framework and .NET Core applications.
To enable the named pipes logger, add the following code to the application entry point:
using DevExpress.Xpo.Logger; using DevExpress.Xpo.Logger.Transport; // ... if(IS_PROFILING_ENABLED) { LogManager.SetTransport(new NamedPipeLogger("XpoProfilerNamedPipe")); }IS_PROFILING_ENABLED - a static field, environment variable, or configuration option that enables or disables the logger. We recommend that you disable the logger in the production environment.
XpoProfilerNamedPipe - a system-wide unique pipe name. XPO Profiler uses the pipe name to connect to the application.
Run the XPO Profiler. Click File | New. In the New Host dialog, specify the following parameters:
Parameter Value Binding type Select “NamedPipes” in the drop-down list. Server name Specify the hostname. If the application runs on a local machine, leave localhost as the field value. If the application runs on a remote machine, configure the remote host to allow access to Named Pipes over the network. Named Pipe Specify the name of the pipe. Use the value you passed to the NamedPipeLogger constructor in the first step. 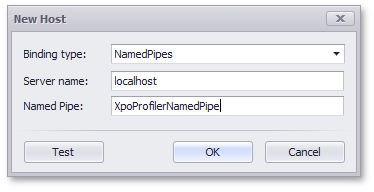
Click Test to test the connection.
See Also