Lesson 3 - Load Vector Data from an External Data Source
- 6 minutes to read
This tutorial describes how to load data to the MapControl from an external source. In this example, you will use an external XML file.
The XML data source contains information about wrecked ships, including ship coordinates.
To bind the map control to an XML data source, follow the instructions below.
- Step 1. Add a Map Control
- Step 2. Add an XML File to the Application
- Step 3. Add an Image for Generated Vector Items
- Step 4. Load Data from External Source
- Result
Step 1. Add a Map Control
Run MS Visual Studio 2017, create a new Universal | Blank App (Windows Universal) project, add the MapControl component to your project as you did in Lesson 1 and connect the MapControl to MS the Bing Maps image tiles data provider (refer to Lesson 1 to learn how to do this).
- Modify the map’s initial view by setting the MapCenterPoint property value to -35, 145. Change the current map zoom level by setting the MapControl.ZoomLevel property to 6. When data is loaded, map items will located at this location.
After this, your XAML should look as follows. If it does not, you can overwrite your code with:
<Page xmlns:Map="using:DevExpress.UI.Xaml.Map"
    x:Class="MapControl_Lesson3.MainPage"
    xmlns="http://schemas.microsoft.com/winfx/2006/xaml/presentation"
    xmlns:x="http://schemas.microsoft.com/winfx/2006/xaml"
    xmlns:local="using:MapControl_Lesson3"
    xmlns:d="http://schemas.microsoft.com/expression/blend/2008"
    xmlns:mc="http://schemas.openxmlformats.org/markup-compatibility/2006"
    mc:Ignorable="d">

    <Grid Background="{ThemeResource ApplicationPageBackgroundThemeBrush}">
        <Map:MapControl ZoomLevel="6">
            <Map:MapControl.CenterPoint>
                <Map:GeoPoint Latitude="-35" Longitude="145"/>
            </Map:MapControl.CenterPoint>
            <Map:ImageTilesLayer>
                <Map:ImageTilesLayer.DataProvider>
                    <Map:BingMapDataProvider BingKey="Your Bing Key"/>
                </Map:ImageTilesLayer.DataProvider>
            </Map:ImageTilesLayer>
        </Map:MapControl>
    </Grid>
</Page>
Step 2. Add an XML File to the Application
In this step, you will add the Ships XML data file to the application. The XML file contains data about wrecked ships. The map control will use this as the data source.
To add an XML data file to the project, do the following.
Right-click the project in the Solution Explorer and choose Add | Existing Item… from the context menu.
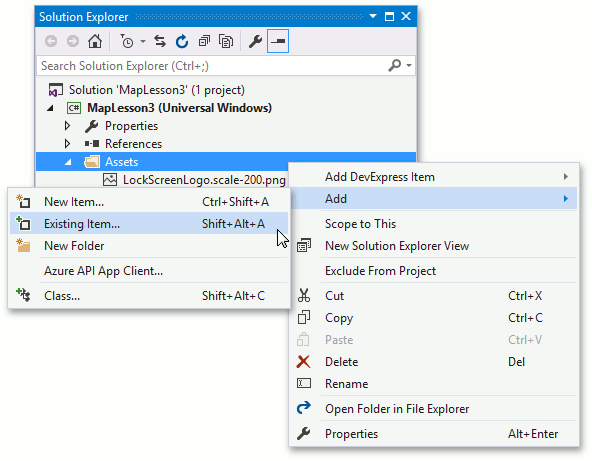
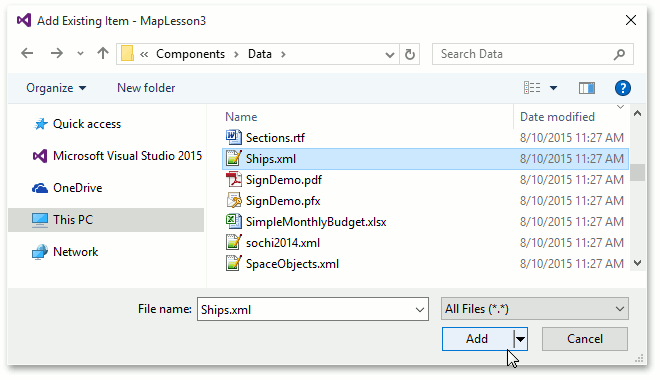
This invokes the Add Existing Item dialog.
In the Add Existing Item dialog, locate the C:\Users\Public\Documents\DevExpress Demos 19.2\Universal App Controls\Data\Ships.xml file and click Add to close the dialog.
Add the XML file to the application resource. To do this, click the XML file in the Solution Explorer and in the Properties window, set the Build Action property to Content.
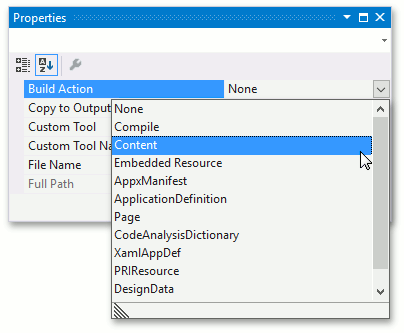
Now, the Ships.xml file is added to the application content.
Step 3. Add an Image for Generated Vector Items
Next, you will need to add an image that will be displayed at the location of each shipwreck.
For this, right-click the image below, select Save picture as… menu item, in the invoked window specify its name as Ship.png, and save it to the disk in the <ApplicationFolder>\Assets folder. Note that you can use any other image.

Now, include the Ship.png image to the project. To do this, execute the following steps.
- Click Show All Files in the Solution Explorer.
Right-click Ship.png and select the Include In Project item in the invoked context menu.
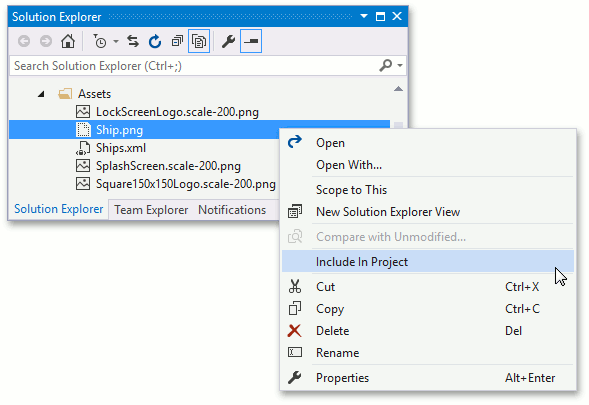
Make sure that the Build Action of the image is set to Content.
Then, create a Data Template for the map item generation based on the XML data. The XAML below shows how this can be done.
<!-- -->
<Page.Resources>
    <DataTemplate x:Key="itemTemplate" x:Name="itemTemplate">
        <Image Width="40" Height="40" Source="Assets/Ship.png" RenderTransformOrigin="0.5,0.5"/>
    </DataTemplate>
</Page.Resources>
<!-- -->
Step 4. Load Data from External Source
Now let us load and display vector items. Here is how to do it.
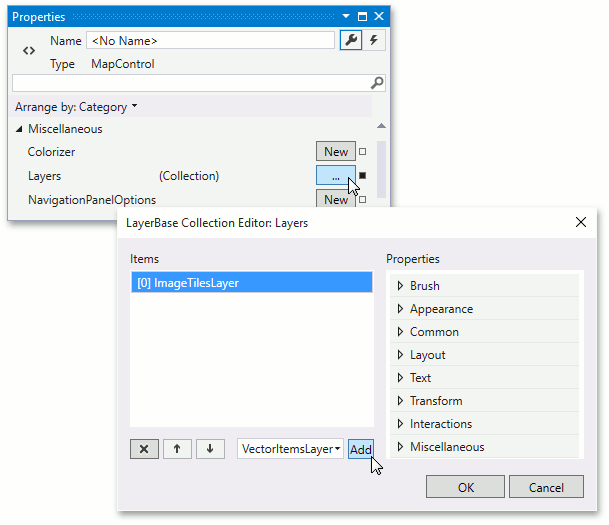
Add a VectorItemsLayer object to the MapControl.Layers collection. To do this, locate the Layers property in the Properites window and click the ellipsis button to invoke the Layer Collection Editor. In the invoked window, select VectorItemsLayer and click Add.
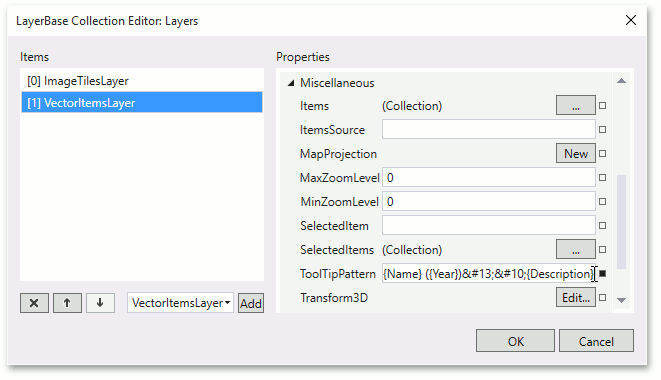
Set the MapItemsLayerBase.ToolTipPattern property to {Name} ({Year}) {Description}.
Click OK to close the window and execute the changes.
Switch to the main page source code and write the following code.
using DevExpress.UI.Xaml.Map;
using System;
using System.Globalization;
using System.Xml.Linq;
using Windows.UI.Xaml;
using Windows.UI.Xaml.Controls;


namespace MapLesson3 {
    public sealed partial class MainPage : Page
    {
        const string filepath = "Assets/ships.xml";

        public MainPage() {
            this.InitializeComponent();
        }

        private void OnLoaded(object sender, RoutedEventArgs e) {
            LoadShipwrecks();
        }

        void LoadShipwrecks() {
            XDocument document = XDocument.Load(filepath);
            foreach (XElement element in document.Element("Ships").Elements()) {
                GeoPoint location = new GeoPoint() {
                    Latitude = Convert.ToDouble(element.Element("Latitude").Value, CultureInfo.InvariantCulture),
                    Longitude = Convert.ToDouble(element.Element("Longitude").Value, CultureInfo.InvariantCulture)
                };
                MapCustomElement e = new MapCustomElement() {
                    Location = location,
                    ContentTemplate = this.Resources["itemTemplate"] as DataTemplate
                };
                e.Attributes.Add(new MapItemAttribute() {
                    Name = "Description",
                    Value = element.Element("Description").Value
                });
                e.Attributes.Add(new MapItemAttribute() {
                    Name = "Name",
                    Value = element.Element("Name").Value
                });
                e.Attributes.Add(new MapItemAttribute() {
                    Name = "Year",
                    Value = element.Element("Year").Value
                });

                itemsLayer.Items.Add(e);
            }
        }
    }

}
Result
The application code should look as follows.
<Page
x:Class="MapLesson3.MainPage"
xmlns="http://schemas.microsoft.com/winfx/2006/xaml/presentation"
xmlns:x="http://schemas.microsoft.com/winfx/2006/xaml"
xmlns:Map="using:DevExpress.UI.Xaml.Map"
Loaded="OnLoaded">
<Page.Resources>
<DataTemplate x:Key="itemTemplate">
<Image Width="40" Height="40" Source="Assets/Ship.png"
RenderTransformOrigin="0.5,0.5">
<Image.RenderTransform>
<CompositeTransform TranslateX="-20" TranslateY="-20"/>
</Image.RenderTransform>
</Image>
</DataTemplate>
</Page.Resources>
<Grid Background="{ThemeResource ApplicationPageBackgroundThemeBrush}">
<Map:MapControl ZoomLevel="4">
<Map:MapControl.CenterPoint>
<Map:GeoPoint Latitude="-37" Longitude="145"/>
</Map:MapControl.CenterPoint>
<Map:ImageTilesLayer>
<Map:ImageTilesLayer.DataProvider>
<Map:BingMapDataProvider BingKey="Your Bing Key Here"/>
</Map:ImageTilesLayer.DataProvider>
</Map:ImageTilesLayer>
<Map:VectorItemsLayer
x:Name="itemsLayer"
ToolTipPattern="{}{Name} ({Year}) {Description}"/>
</Map:MapControl>
</Grid>
</Page>
#region #MapLesson3CodeBehind
using DevExpress.UI.Xaml.Map;
using System;
using System.Globalization;
using System.Xml.Linq;
using Windows.UI.Xaml;
using Windows.UI.Xaml.Controls;


namespace MapLesson3 {
    public sealed partial class MainPage : Page
    {
        const string filepath = "Assets/ships.xml";

        public MainPage() {
            this.InitializeComponent();
        }

        private void OnLoaded(object sender, RoutedEventArgs e) {
            LoadShipwrecks();
        }

        void LoadShipwrecks() {
            XDocument document = XDocument.Load(filepath);
            foreach (XElement element in document.Element("Ships").Elements()) {
                GeoPoint location = new GeoPoint() {
                    Latitude = Convert.ToDouble(element.Element("Latitude").Value, CultureInfo.InvariantCulture),
                    Longitude = Convert.ToDouble(element.Element("Longitude").Value, CultureInfo.InvariantCulture)
                };
                MapCustomElement e = new MapCustomElement() {
                    Location = location,
                    ContentTemplate = this.Resources["itemTemplate"] as DataTemplate
                };
                e.Attributes.Add(new MapItemAttribute() {
                    Name = "Description",
                    Value = element.Element("Description").Value
                });
                e.Attributes.Add(new MapItemAttribute() {
                    Name = "Name",
                    Value = element.Element("Name").Value
                });
                e.Attributes.Add(new MapItemAttribute() {
                    Name = "Year",
                    Value = element.Element("Year").Value
                });

                itemsLayer.Items.Add(e);
            }
        }
    }

}
#endregion #MapLesson3CodeBehind
Run application to see the result.
