Row Validation
- 3 minutes to read
The GridControl allows you to validate new row values.
Use the row validation if the row’s data is interrelated (for example, values in some columns depend on other column values). See the Cell Validation topic to learn how to validate cell values.
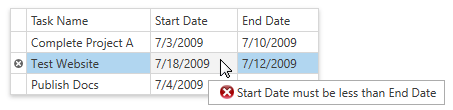
The image below shows a GridControl with an invalid row:
Tip
A complete sample project is available in the DevExpress Code Examples database at WPF Data Grid - How to Validate Data Rows.
Follow the steps below to validate a row:
Step 1. Handle a Validating Event
The GridControl provides the GridViewBase.ValidateRow and TreeListView.ValidateNode events to validate row values manually. These events are raised after a focused row’s data changes.
The code sample below shows how to validate rows:
<dxg:GridControl x:Name="grid">
    <dxg:GridControl.Columns>
        <dxg:GridColumn FieldName="TaskName" />
        <dxg:GridColumn FieldName="StartDate" />
        <dxg:GridColumn FieldName="EndDate" />
    </dxg:GridControl.Columns>
    <dxg:GridControl.View>
        <dxg:TableView ValidateRow="OnValidateRow" />
    </dxg:GridControl.View>
</dxg:GridControl>
void OnValidateRow(object sender, GridRowValidationEventArgs e) { }
You can call the DataViewBase.CommitEditing method to manually force the row validation.
Step 2. Validate a New Value
Use the following GridRowValidationEventArgs‘s properties to get row values:
- The GridRowValidationEventArgs.Row property returns the verifiable row.
- The GridRowValidationEventArgs.RowHandle property returns the verifiable row’s handle.
You can verify row values according to validation rules after obtaining them. If a row fails validation, set the ValidationEventArgs.IsValid property to false.
In the following code sample, the StartDate value cannot be greater than EndDate value:
void OnValidateRow(object sender, GridRowValidationEventArgs e) {
    DateTime startDate = ((Task)e.Row).StartDate;
    DateTime endDate = ((Task)e.Row).EndDate;
    e.IsValid = startDate < endDate;
}
Step 3. Indicate Errors
The GridControl shows the following hints to indicate if a row contains invalid data:
An Error Tooltip
The GridControl shows an error tooltip when the mouse pointer hovers over an invalid row. Specify the ValidationEventArgs.ErrorContent property to set the error tooltip’s description:
void OnValidateRow(object sender, GridRowValidationEventArgs e) {
    // ...
    e.ErrorContent = "Start Date must be less than End Date.";
}
The image below shows the result:
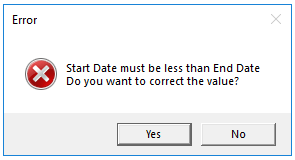
An Error Window
The GridControl displays an error window after an end user enters an incorrect value. This window allows them to perform the following actions:
- Click Yes to return focus to the edited row and correct the row value.
- Click No to discard the changes. In this case, an end-user can move the focus away from the row. The rollback only occurs if objects that represent rows implement the System.ComponentModel.IEditableObject interface.
Handle the GridViewBase.InvalidRowException event, which is raised after the GridViewBase.ValidateRow event, and use the following InvalidRowExceptionEventArgs‘s properties to override the default error presentation:
- The InvalidRowExceptionEventArgs.ExceptionMode property allows you to specify which action to perform when entering an invalid value. You can display a message box with an error description, suppress any action, throw an exception, or discard all changes.
- The InvalidRowExceptionEventArgs.ErrorText property allows you to specify an additional error description that is displayed in the error window before the “Do you want to correct the value?” string.
- The InvalidRowExceptionEventArgs.WindowCaption property allows you to change the error window’s default caption.
The code sample below demonstrates how to disable the error window and display the error tooltip only:
<dxg:GridControl x:Name="grid">
    <!-- -->
    <dxg:GridControl.View>
        <dxg:TableView ValidateRow="OnValidateRow" InvalidRowException="OnInvalidRowException" />
    </dxg:GridControl.View>
</dxg:GridControl>
void OnInvalidRowException(object sender, InvalidRowExceptionEventArgs e) {
    e.ExceptionMode = ExceptionMode.NoAction;
}