Edit Entire Row
- 8 minutes to read
In this data editing mode, when a user activates a cell editor, the entire row becomes editable. Users can edit any number of cells within the row and then submit or cancel all changes at once.
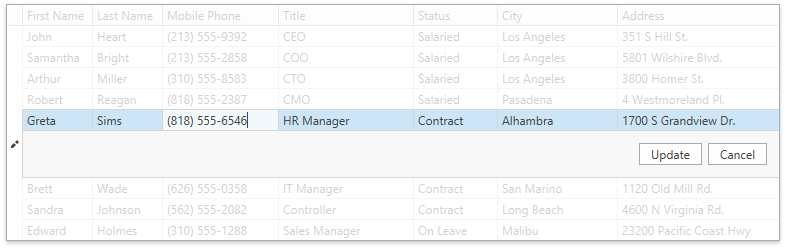
The GridControl shows the Update and Cancel buttons for the row that is being edited. Users change the row’s cell values and then click Update to post chages to the data source. They cannot navigate away from an edited row unless you click the Update / Cancel button or press Esc twice.
To enable the Edit Entire Row mode, specify the TableView.ShowUpdateRowButtons / TreeListView.ShowUpdateRowButtons property:
When the property value is OnCellEditorOpen, the buttons are shown after you open a cell editor:
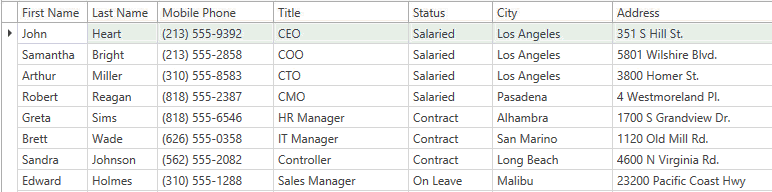
When the property value is OnCellValueChange, the buttons are shown after you change a cell value:
Click the Update button to post the edited row’s changes to the data source. Alternatively, you can call the TableView.UpdateRow / TreeListView.UpdateRow method or the TableViewCommands.UpdateRow / TreeListViewCommands.UpdateRow command.
Click the Cancel button to discard the edited row’s changes. Alternatively, you can call the TableView.CancelRowChanges / TreeListView.CancelRowChanges method or the TableViewCommands.CancelRowChanges / TreeListViewCommands.CancelRowChanges command.
Use the TableView.UpdateRowButtonsTemplate / TreeListView.UpdateRowButtonsTemplate property to change the appearance of the Update and Cancel buttons.
Post Changes Synchronously
To post changes to an underlying data source (database), handle the GridViewBase.ValidateRow event and explicitly save the changes. For example, if you bind the GridControl to an Entity Framework source, call the SaveChanges method of the DataContext:
<dxg:TableView ShowUpdateRowButtons="OnCellEditorOpen" ValidateRow="TableView_ValidateRow"/>
void TableView_ValidateRow(object sender, GridRowValidationEventArgs e) {
    var issue = (Issue)e.Row;
    using(var context = new IssuesContext()) {
        var result = context.Issues.SingleOrDefault(b => b.Id == issue.Id);
        if(result != null) {
            result.Subject = issue.Subject;
            result.Priority = issue.Priority;
            result.Votes = issue.Votes;
            result.Priority = issue.Priority;
            context.SaveChanges();
        }
    }
}
If an underlying data source (database) cannot accept the changes, the GridControl allows users to correct the values or click the Cancel button to return the previous values.
Post Changes Asynchronously
To post changes to an underlying data source (database) asynchronously, handle the GridViewBase.ValidateRow event and set the GridRowValidationEventArgs.UpdateRowResult property to a task that saves the changes.
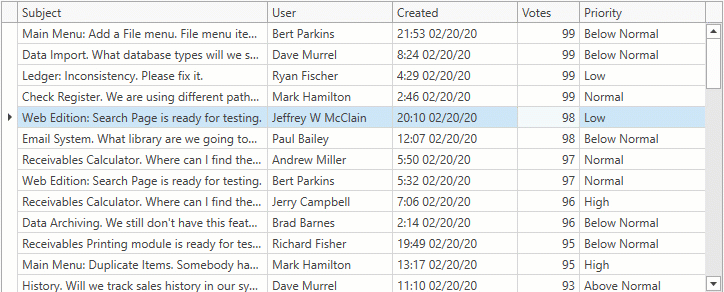
For example, the following code sample shows how save changes that are made in the GridControl bound to a virtual source:
<dxg:GridControl x:Name="grid">
    <dxg:GridControl.Columns>
        <dxg:GridColumn FieldName="Subject" IsSmart="True" AllowEditing="true"/>
        <dxg:GridColumn FieldName="User" IsSmart="True" AllowEditing="true"/>
        <dxg:GridColumn FieldName="Created" IsSmart="True" AllowEditing="true"/>
        <dxg:GridColumn FieldName="Votes" IsSmart="True" AllowEditing="true"/>
        <dxg:GridColumn FieldName="Priority" IsSmart="True" AllowEditing="true"/>
    </dxg:GridControl.Columns>
    <dxg:GridControl.View>
        <dxg:TableView ValidateRow="TableView_ValidateRow" ShowUpdateRowButtons="OnCellValueChange" />
    </dxg:GridControl.View>
</dxg:GridControl>
private void TableView_ValidateRow(object sender, GridRowValidationEventArgs e) {
    e.UpdateRowResult = Task.Run(() => {
        IssuesService.UpdateRow(e.Row as IssueData);
    });
}
Use the ValidationEventArgs.IsValid property to specify whether a row’s values are valid. Use the ValidationEventArgs.ErrorType and ValidationEventArgs.ErrorContent properties to display an error message.
private void TableView_ValidateRow(object sender, GridRowValidationEventArgs e) {
    e.UpdateRowResult = Task.Run(() => {
        if (!IssuesService.ServerIsConnected) {
            e.IsValid = false;
            e.ErrorContent = "Server is disconnected.";
            e.ErrorType = DevExpress.XtraEditors.DXErrorProvider.ErrorType.Critical;
            return;
        }
        IssuesService.UpdateRow(e.Row as IssueData);
    });
}
To allow users to cancel the Update operation, set the GridRowValidationEventArgs.UseCancellationToken property to true and use the GridRowValidationEventArgs.CancellationToken in a cancel function.
Limitations
- Edit Entire Row mode is available in optimized mode only.
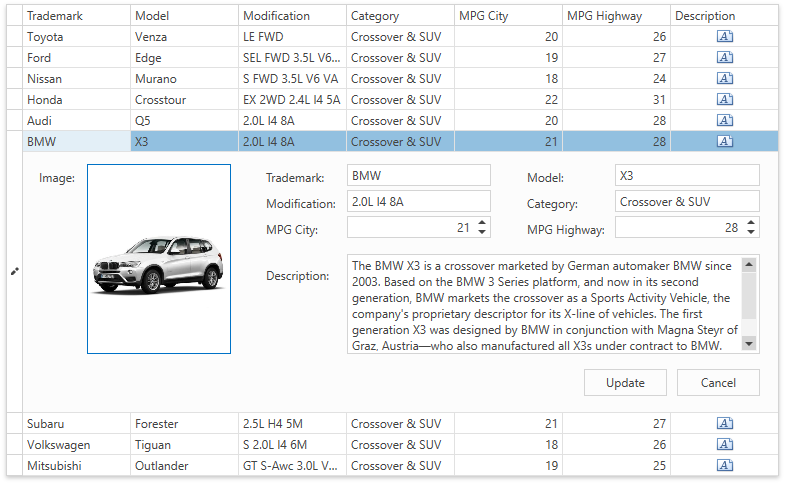
Edit Form
The Edit Form allows users to edit the grid’s cell values. It is available in the Table View and TreeList View.
Note
The Edit Form is available in optimized mode only.
Users should double-click a grid row to invoke the Edit Form:
Availability
Data editing is allowed if the DataViewBase.AllowEditing property is set to true and the DataViewBase.NavigationStyle property is set to GridViewNavigationStyle.Cell.
Use the ColumnBase.AllowEditing property to control data editing availability for individual columns. The property’s default value is Default - the View controls the column’s behavior. Set this property to true or false to override the default behavior. For example, you can set the column’s ColumnBase.AllowEditing property to false to prevent users from changing its values.
Edit Form Overview
Use the TableView.EditFormShowMode / TreeListView.EditFormShowMode property to control the Edit Form‘s availability and location. The following table lists the enumeration values:
| The EditFormShowMode property value | Description |
|---|---|
| EditFormShowMode.None | The Edit Form is disabled. |
| EditFormShowMode.Inline | The Edit Form is shown below the row that is being edited. |
| EditFormShowMode.InlineHideRow | The Edit Form replaces the row that is being edited. |
| EditFormShowMode.Dialog | The Edit Form is shown as a pop-up dialog window. |
To apply changes made in the Edit Form, users should click Update or press Ctrl+Enter. To discard unsaved changes, they should click Cancel or press Esc.
Set the TableView.EditFormPostMode / TreeListView.EditFormPostMode property to EditFormPostMode.Immediate to apply changes users make in the Edit Form to grid cells. If this property is set to EditFormPostMode.Cached, the changes are applied only after they were saved.
If the Edit Form contains unsaved changes and loses focus, you can display an optional confirmation dialog. To configure the confirmation dialog, use the TableView.EditFormPostConfirmation or TreeListView.EditFormPostConfirmation property.
Note
If you enabled the Edit Form, you cannot edit cell values with Inplace Editors. The following events are not raised:
Edit Form Customization
Editors within the Edit Form are arranged in rows from left to right. The Edit Form contains editors for all columns within the View. Each editor displays a caption to the left of the edit field. The caption contains the associated grid column’s display name. The following table describes the Edit Form customization tasks:
| Task | Approach |
|---|---|
| Change the number of editors displayed in the Edit Form‘s row | Specify the TableView.EditFormColumnCount/TreeListView.EditFormColumnCount property. |
| Exclude a specific column’s editor from the Edit Form | Set the corresponding column’s ColumnBase.EditFormVisible property to false. |
| Specify a custom editor caption | Use the ColumnBase.EditFormCaption property. |
| Adjust the column editor’s sizes within the Edit Form | Use the ColumnBase.EditFormColumnSpan and ColumnBase.EditFormRowSpan properties. |
Note
When the Edit Form is in dialogue mode, you can use the TableView.EditFormCaptionBinding or TreeListView.EditFormCaptionBinding property to specify its title.
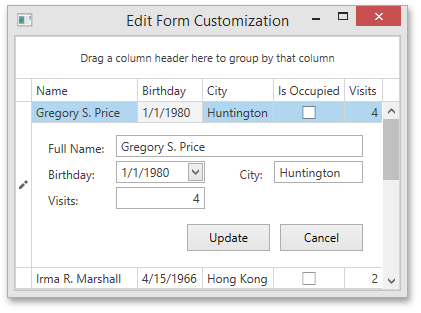
The following example demonstrates the GridControl with a custom Edit Form:
<dxg:GridControl ItemsSource="{Binding Data}">
    <dxg:GridControl.View>
        <dxg:TableView EditFormColumnCount="2" EditFormShowMode="Inline" />
    </dxg:GridControl.View>
    <dxg:GridColumn FieldName="Name" EditFormCaption="Full Name:" EditFormColumnSpan="2" />
    <dxg:GridColumn FieldName="Birthday" />
    <dxg:GridColumn FieldName="City" />
    <dxg:GridColumn FieldName="IsOccupied" EditFormVisible="False" />
    <dxg:GridColumn FieldName="Visits" />
</dxg:GridControl>
The image below shows the result:
Editors Arrangement
Editors have the same order in the Edit Form as their corresponding grid columns. To change the order of editors in the Edit Form, use the ColumnBase.EditFormVisibleIndex property.
The following table describes how the ColumnBase.EditFormVisibleIndex property affects the editor’s position in the Edit Form:
The ColumnBase.EditFormVisibleIndex property value | The editor’s position in the Edit Form |
|---|---|
0 (default) | The editor’s position is determined by the BaseColumn.VisibleIndex property value. |
Greater than 0 | The editor’s position is determined by the ColumnBase.EditFormVisibleIndex property value. |
To place an editor on a new edit form row, set the corresponding column’s ColumnBase.EditFormStartNewRow property to true.
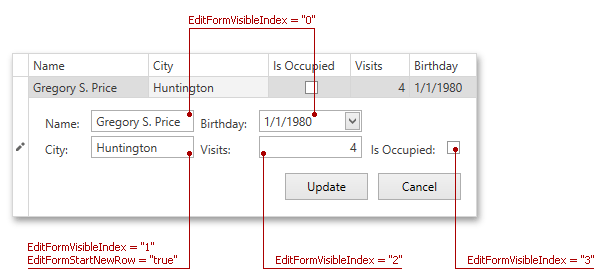
The following example shows how to configure the Edit Form to display editors in a custom order:
<dxg:GridControl ItemsSource="{Binding Data}">
    <dxg:GridControl.View>
        <dxg:TableView EditFormShowMode="Inline" />
    </dxg:GridControl.View>
    <!-- Position of the corresponding editor is determined based on the visual index of the "Name" column -->
    <dxg:GridColumn FieldName="Name" />
    <!-- "City" editor is placed on a new row -->
    <dxg:GridColumn FieldName="City" EditFormVisibleIndex="1" EditFormStartNewRow="True" />
    <dxg:GridColumn FieldName="IsOccupied" EditFormVisibleIndex="3"/>
    <dxg:GridColumn FieldName="Visits" EditFormVisibleIndex="2" />
    <!-- Position of the corresponding editor is determined based on the visual index of the "Birthday" column -->
    <dxg:GridColumn FieldName="Birthday" />
</dxg:GridControl>
The following image demonstrates the resulting order of the editors. The order of the Name and Birthday editors matches the order of the corresponding grid columns:
Appearance Customization
You can customize the Edit Form and editors nested in it. The following table lists template properties that affect the Edit Form‘s appearance and functionality:
Property | Description |
|---|---|
Specifies the Edit Form‘s appearance. | |
Specifies the appearance of the column’s editor in the Edit Form. |
The following example shows how to configure the Edit Form to use the SpinEdit editor for the Visits field:
<dxg:GridControl ItemsSource="{Binding Data}">
    <dxg:GridControl.View>
        <dxg:TableView EditFormShowMode="Inline">
            <!-- Edit form displays Name, City and Visits properties. -->
            <dxg:TableView.EditFormTemplate>
                <DataTemplate>
                    <GroupBox Header="Custom Inline Edit Form" Margin="10" Padding="10">
                        <Grid>
                            <Grid.RowDefinitions>
                                <RowDefinition />
                                <RowDefinition />
                                <RowDefinition />
                                <RowDefinition />
                            </Grid.RowDefinitions>
                            <Grid.ColumnDefinitions>
                                <ColumnDefinition Width="0.3*" />
                                <ColumnDefinition />
                            </Grid.ColumnDefinitions>
                            <TextBlock Text="Full Name: " Grid.Row="0" Grid.Column="0" />
                            <dxg:EditFormEditor FieldName="Name" Grid.Row="0" Grid.Column="1" Margin="2" />
                            <TextBlock Text="City: " Grid.Row="1" Grid.Column="0" />
                            <dxg:EditFormEditor FieldName="City" Grid.Row="1" Grid.Column="1" Margin="2"/>
                            <TextBlock Text="Visits: " Grid.Row="2" Grid.Column="0" />
                            <dxg:EditFormEditor FieldName="Visits" Grid.Row="2" Grid.Column="1" Margin="2"/>
                            <StackPanel  Grid.Row="3" Grid.Column="1" Orientation="Horizontal">
                                <dx:SimpleButton Content="Apply" Command="{Binding CommitCommand}" Margin="2"/>
                                <dx:SimpleButton Content="Cancel" Command="{Binding CancelCommand}" Margin="2"/>
                            </StackPanel>
                        </Grid>
                    </GroupBox>
                </DataTemplate>
            </dxg:TableView.EditFormTemplate>
        </dxg:TableView>
    </dxg:GridControl.View>
    <dxg:GridColumn FieldName="Name" />
    <dxg:GridColumn FieldName="City" />
    <dxg:GridColumn FieldName="IsOccupied" />
    <dxg:GridColumn FieldName="Visits">
        <!-- Edit form displays a spin editor for the Visits field -->
        <dxg:GridColumn.EditFormTemplate>
            <DataTemplate>
                <dxe:SpinEdit Name="PART_Editor"/>
            </DataTemplate>
        </dxg:GridColumn.EditFormTemplate>
    </dxg:GridColumn>
    <dxg:GridColumn FieldName="Birthday" />
</dxg:GridControl>
The following image demonstrates the result:
