How to: Configure Cell Font Settings
- 8 minutes to read
To set different font attributes for a cell, use the properties of the XlFont object. This object provides the following properties inherited form the XlFontBase class to change cell font characteristics.
- XlFontBase.Name - sets cell font.
- XlFontBase.Size - sets cell font size.
- XlFontBase.Bold and XlFontBase.Italic - sets whether cell font should be bold or italic.
- XlFontBase.Script - sets whether cell text should be formatted as superscript or subscript.
- XlFontBase.StrikeThrough - sets whether or not cell text should be displayed with a horizontal line through the text.
- XlFontBase.Underline - sets the type of underline applied to the font.
- XlFont.Color - sets cell font color.
- XlFont.FontFamily - sets the font family.
To change font settings of cell content, perform the steps below:
Initialize an instance of the XlFont class. Do one of the following:
- Use the XlFont default constructor.
- Call the static XlFont.BodyFont and XlFont.HeadingsFont methods to apply the default theme body and heading fonts to a cell. To set a custom non-theme font of the specified name, size or color, use the XlFont.CustomFont method overloads. All these methods return the XlFont object, so you can use its properties to specify additional font attributes (font style, underline type, etc.) as described in the next step.
- Set the required properties of the XlFont object. For example, to make cell text bold, set the XlFontBase.Bold property to true.
To apply font characteristics to a cell, use one of the following approaches:
- Call the IXlCell.ApplyFormatting method and pass the specified XlFont object as a parameter.
- Assign the specified XlFont object to the IXlCell.Formatting property.
Tip
To share font settings with multiple cells in a row at once, use the IXlRow.BulkCells method.
To specify font settings for the entire row or column, use the IXlRow.ApplyFormatting and IXlColumn.ApplyFormatting methods, or IXlRow.Formatting and IXlColumn.Formatting properties, respectively.
Note
A complete sample project is available at https://github.com/DevExpress-Examples/xl-export-api-examples-t253492
// Create a new worksheet.
using (IXlSheet sheet = document.CreateSheet())
{
    // Create five successive columns and set their widths.
    for (int i = 0; i < 5; i++)
    {
        using (IXlColumn column = sheet.CreateColumn())
        {
            column.WidthInPixels = 100;
        }
    }

    // Create the first row.
    using (IXlRow row = sheet.CreateRow())
    {
        // Create the cell A1.
        using (IXlCell cell = row.CreateCell())
        {
            // Set the cell value.
            cell.Value = "Body font";
            // Apply the theme body font to the cell content.
            cell.ApplyFormatting(XlFont.BodyFont());
        }

        // Create the cell B1.
        using (IXlCell cell = row.CreateCell())
        {
            // Set the cell value.
            cell.Value = "Headings font";
            // Apply the theme heading font to the cell content.
            cell.ApplyFormatting(XlFont.HeadingsFont());
        }

        // Create the cell C1.
        using (IXlCell cell = row.CreateCell())
        {
            // Set the cell value.
            cell.Value = "Custom font";
            // Specify the custom font attributes.
            XlFont font = new XlFont();
            font.Name = "Century Gothic";
            font.SchemeStyle = XlFontSchemeStyles.None;
            // Apply the custom font to the cell content.
            cell.ApplyFormatting(font);
        }
    }

    // Create an array that stores different values of font size.
    int[] fontSizes = new int[] { 11, 14, 18, 24, 36 };
    // Skip one row in the worksheet.
    sheet.SkipRows(1);

    // Create the third row.
    using (IXlRow row = sheet.CreateRow())
    {
        // Create five successive cells (A3:E3) with different font sizes.
        for (int i = 0; i < 5; i++)
        {
            using (IXlCell cell = row.CreateCell())
            {
                // Set the cell value that displays the applied font size.
                cell.Value = string.Format("{0}pt", fontSizes[i]);
                // Create a font instance of the specified size.
                XlFont font = new XlFont();
                font.Size = fontSizes[i];
                // Apply font settings to the cell content.
                cell.ApplyFormatting(font);
            }
        }
    }

    // Skip one row in the worksheet.
    sheet.SkipRows(1);

    // Create the fifth row.
    using (IXlRow row = sheet.CreateRow())
    {
        // Create the cell A5.
        using (IXlCell cell = row.CreateCell())
        {
            // Set the cell value.
            cell.Value = "Red";
            // Create a font instance and set its color.
            XlFont font = new XlFont() { Color = Color.Red };
            // Apply the font color to the cell content.
            cell.ApplyFormatting(font);
        }

        // Create the cell B5.
        using (IXlCell cell = row.CreateCell())
        {
            // Set the cell value.
            cell.Value = "Bold";
            // Create a font instance and set its style to bold.
            XlFont font = new XlFont() { Bold = true };
            // Apply the font style to the cell content.
            cell.ApplyFormatting(font);
        }

        // Create the cell C5.
        using (IXlCell cell = row.CreateCell())
        {
            // Set the cell value.
            cell.Value = "Italic";
            // Create a font instance and set its style to italic.
            XlFont font = new XlFont() { Italic = true };
            // Italicize the cell text.
            cell.ApplyFormatting(font);
        }

        // Create the cell D5.
        using (IXlCell cell = row.CreateCell())
        {
            // Set the cell value.
            cell.Value = "Underline";
            // Create a font instance and set the underline type to double.
            XlFont font = new XlFont() { Underline = XlUnderlineType.Double };
            // Underline the cell text.
            cell.ApplyFormatting(font);
        }

        // Create the cell E5.
        using (IXlCell cell = row.CreateCell())
        {
            // Set the cell value.
            cell.Value = "StrikeThrough";
            // Create a font instance and turn the strikethrough formatting on.
            XlFont font = new XlFont() { StrikeThrough = true };
            // Strike the cell text through.
            cell.ApplyFormatting(font);
        }
    }
}
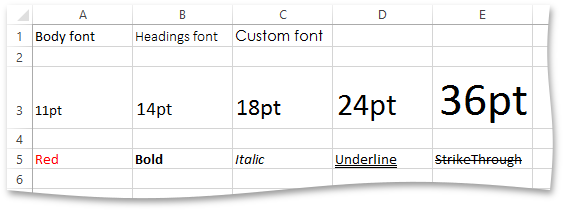
The image below shows the result (the workbook is opened in Microsoft® Excel®).