DevExpress Documentation MCP Server: Configure an AI-powered Assistant
- 8 minutes to read
To meet growing demand for AI-assisted coding, we developed an MCP server that connects GitHub Copilot and other MCP-compatible AI tools directly to our documentation database.
Why Use a DevExpress MCP Server
Once you configure our MCP Server in your IDE, an AI Assistant in Agent mode can help you with the following tasks:
- Get answers to your DevExpress-related questions.
- Generate code that implements scenarios described in DevExpress documentation.
When you submit DevExpress-related queries, add a reference to the configured MCP server at the end of your prompt.
Important
Always conduct thorough reviews of AI-generated output: check for architectural problems, security vulnerabilities, and adherence to your project standards. AI-generated output may vary greatly depending on the prompt, AI model used, code clarity in your project, and many other factors.
Prerequisites
Supported IDEs:
- Visual Studio 2022 (version 17.14 or later)
- Visual Studio Code
- Cursor IDE
- JetBrains Rider 2025.1+
Coding Assistants:
- GitHub Copilot
- JetBrains AI Assistant
- Other MCP-compatible AI Assistants (such as Claude or Claude Code)
We strongly recommend that you update to the latest versions of your IDE and plugins, as the technology evolves rapidly and newer releases often include important fixes.
Integration Basics
When you setup a documentation MCP server, the endpoint URL without parameters accesses documentation for the latest publicly-available version. You can also specify a previous version as the parameter (no earlier than v24.2).
The MCP server offers two tools listed below. You can refer to these tools by name when you fine-tune your AI Assistant with custom instructions (setup examples available later in this article):
devexpress_docs_search- Performs semantic searches through the documentation database and returns the top 5 matches for a user query.devexpress_docs_get_content- Allows agents to download complete help topics by URL.
The server operates exclusively over the Streamable HTTP protocol. If you are familiar with this technology, simply add the following endpoints to your AI assistant’s configuration and give it a try:
{
  "servers": {
    "dxdocs": {
      "url": "https://api.devexpress.com/mcp/docs",
      "type": "http"
    },
    "dxdocs24_2": {
      "url": "https://api.devexpress.com/mcp/docs?v=24.2",
      "type": "http"
    }
  }
}
If you need step-by-step configuration instructions, refer to the following IDE-specific sections:
Setup Guide - Visual Studio 2022
Step 1: Enable Agent Mode in Your IDE
Go to Tools > Options > GitHub > Copilot and turn on the following options:
- Enable MCP server integration in agent mode
- Enable Agent mode in the chat pane
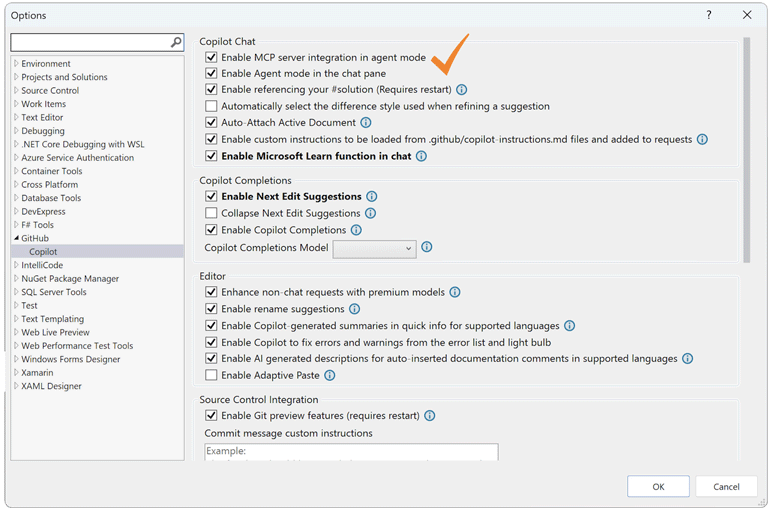
Please refer to the following help topic for more information: Microsoft’s Agent Mode documentation
Step 2: Configure the DevExpress MCP Server
Create the MCP configuration file:
- Navigate to your user profile directory:
%USERPROFILE%. - Paste the following MCP server configuration code to a new file named
.mcp.json.
{
    "servers": {
        "dxdocs": {
            "url": "https://api.devexpress.com/mcp/docs",
            "type": "http"
        }
    },
    "inputs": []
}
Refer to the following help topic for additional information: Use MCP servers.
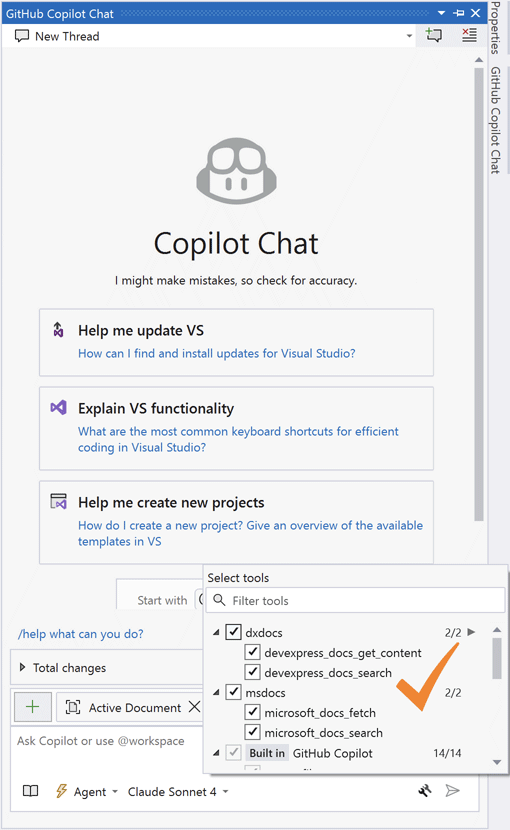
Step 3: Verify DevExpress MCP Server Connection
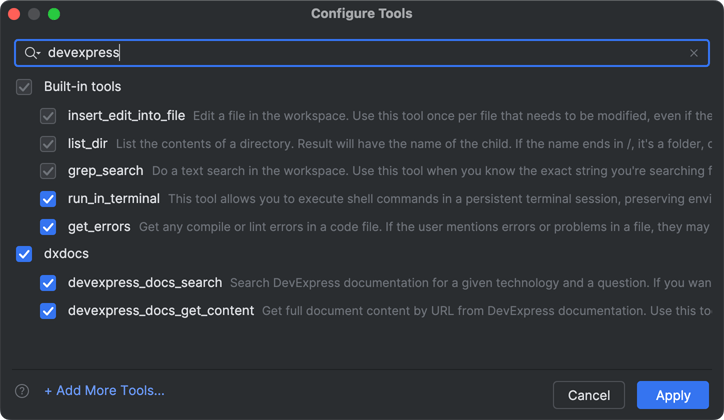
To verify the connection in Visual Studio, open the GitHub Copilot Chat pane and click the Tools icon (🛠️) to view available MCP servers. Verify that the list contains DevExpress tools.
Step 4: Optimize Your AI Assistant with Custom Instructions
For best results when using the DevExpress documentation MCP server, define custom instructions that guide your AI assistant on how to use our tools effectively.
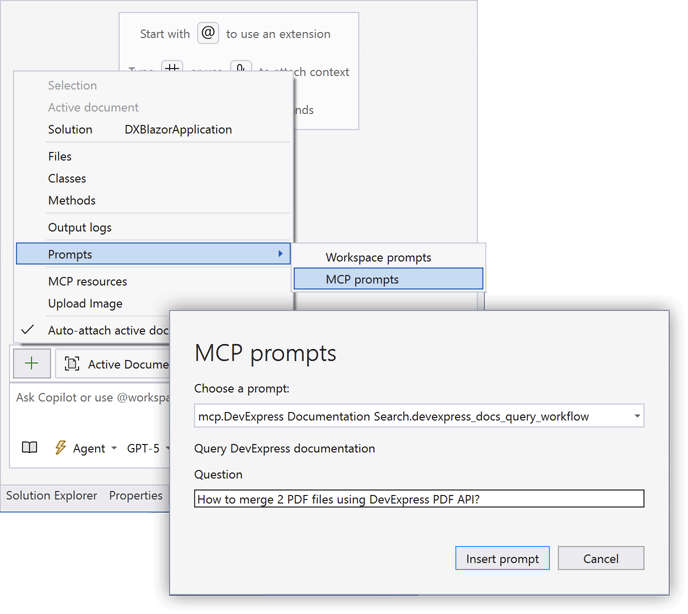
You can use the predefined DevExpress prompt (mcp.dxdocs.devexpress_docs_query_workflow):
- Select Prompts | MCP Prompts
- In the MCP Prompts dialog, specify the DevExpress prompt and enter your question. Press Insert.
- Submit the request.
If you want to use a different prompt, paste custom intructions into the following file: <solution>/.github/copilot-instructions.md.
Learn more about custom instructions: Custom Instructions for GitHub Copilot.
Setup Guide - Visual Studio Code
Step 1: Enable Agent Mode in Your IDE
The DevExpress documentation MCP server works with AI Assistants that support agent mode. In this mode, AI Assistants use the MCP server to connect to external tools and data sources.
This guide lists setup steps for GitHub Copilot.
Install or update the GitHub Copilot extension. Agent mode is active by default in recent VS Code versions, so you do not need to configure this setting. To access agent mode, open the Chat view and sign in to your GitHub account. Select Agent from the Chat mode dropdown.

For detailed setup instructions, refer to the VS Code Agent Mode Guide.
Step 2: Configure the DevExpress MCP Server
Use the following link for a one-click installation:
![]()
If you prefer manual setup, you can use either a personal or shared configuration.
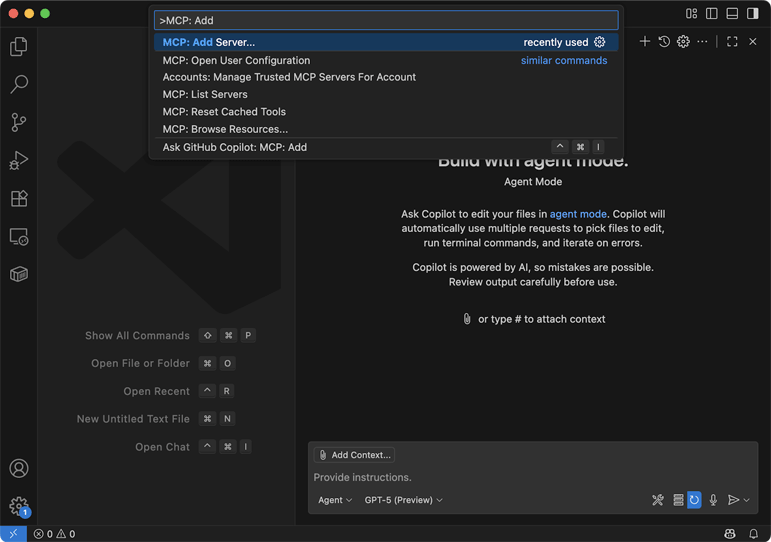
For personal configuration, open the Command Palette using Ctrl+Shift+P on Windows/Linux or ⌘+Shift+P on Mac. Run the “MCP: Add Server“ command and follow the setup wizard to add the DevExpress server.
You can also configure the server at the workspace level (share the configuration with your team). To do so, paste the following code into a new file: <project>/.vscode/mcp.json.
{
  "servers": {
    "dxdocs": {
      "url": "https://api.devexpress.com/mcp/docs",
      "type": "http"
    }
  },
  "inputs": []
}
For additional information about setting up MCP servers in VS Code, refer to the following help topic: Use MCP servers in VS Code.
Step 3: Verify DevExpress MCP Server Connection
Open the GitHub Copilot Chat pane using the icon in the title bar. Use the mode selector to activate Agent Mode. Click the Tools icon (🛠️) to view available MCP servers and confirm that the server list contains “dxdocs” and its tools.
Step 4: Optimize Your AI Assistant with Custom Instructions (GitHub Copilot)
For best results when using the DevExpress documentation MCP server, define custom instructions that guide your AI assistant on how to use our tools effectively.
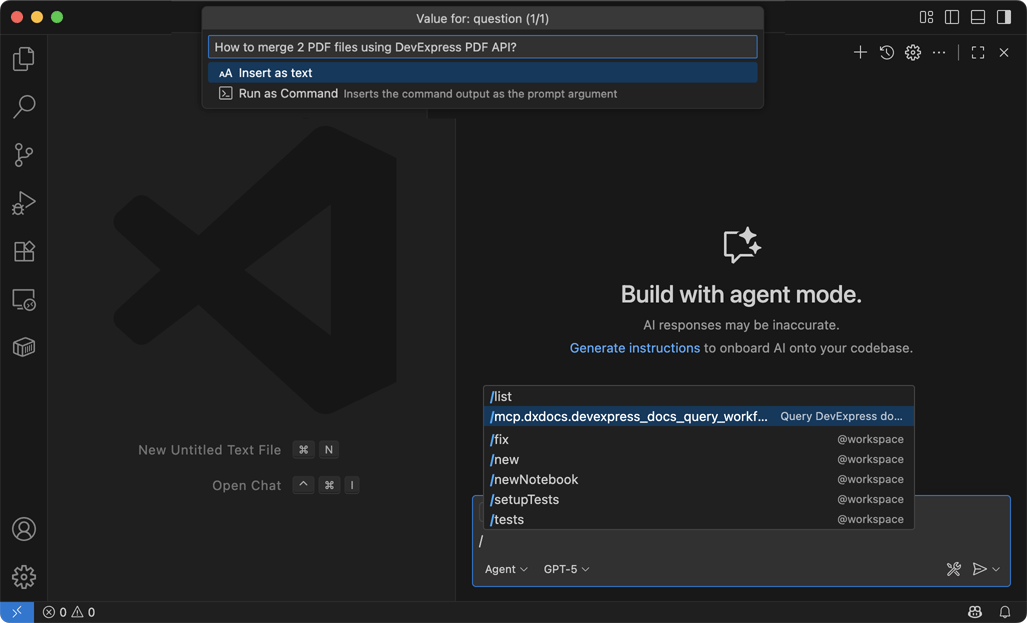
You can use the predefined DevExpress prompt:
- Run the following command to activate the prompt:
/mcp.dxdocs.devexpress_docs_query_workflow. - Specify your question and submit the request.
If you want to use a different prompt, paste custom intructions into the following file: <solution>/.github/copilot-instructions.md.
Learn more about custom instructions: Custom Instructions for GitHub Copilot.
Setup Guide - Cursor
In most recent versions of Cursor IDE, you don’t need to activate the agent mode. Simply access the chat interface that includes agent capabilities.
For additional information, refer to Cursor’s Agent documentation.
Step 1: Configure the DevExpress MCP Server
You can use our pre-configured script or set up the MCP Server manually.
To apply the pre-configured script, use the following one-click installation link:
![]()
For manual configuration, first create a new file in your preferred configuration location:
<project>/.cursor/mcp.jsonfor project-specific configuration.<home directory>/.cursor/mcp.jsonfor global configuration.
Paste the following code into the configuration file:
{
  "mcpServers": {
    "dxdocs": {
      "url": "https://api.devexpress.com/mcp/docs",
      "type": "sse"
    }
  }
}
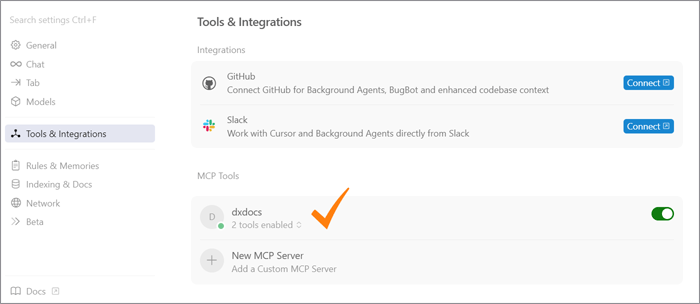
Alternatively, use the Cursor’s MCP Settings UI. Navigate to the Tools & Integrations section, click New MCP Server, and enter server details.
Refer to the following help topic for additional information: Model Context Protocol (MCP).
Step 2: Verify DevExpress MCP Server Connection
Open Settings and navigate to Tools & Integration. Check the “dxdocs” MCP server status: the slider next to the server name should be green (indicates a successful connection).
Step 3: Optimize Your AI Assistant with Custom Instructions
For best results when using the DevExpress documentation MCP server, define custom instructions that guide your AI assistant on how to use our tools effectively.
Navigate to Settings > Rules & Memories. Run the Add Rule command. Specify a custom rule.
For additional information about Rules in Cursor IDE, refer to the following help topic: Rules.
Setup Guide - JetBrains Rider
Step 1: Enable Agent Mode in Your IDE
Check that the AI Assistant plugin is already installed. Install, if necessary. For detailed guidance, see AI Assistant Installation instructions in JetBrains Rider Documentation.
Alternatively, you can install the GitHub Copilot Plugin from the JetBrains Marketplace.
Step 2: Configure the DevExpress MCP Server
Add a new MCP server as described in JetBrains documentation: Model Context Protocol.
Note that JetBrains Rider can only use the stdio protocol with MCP servers. To set up a DevExpress MCP server, follow a documented workaround for remote servers.
If you use the GitHub Copilot Plugin, change the chat mode to Agent. Add new tools as described in GitHub documentation: Extend Copilot Chat with MCP.
Step 3: Verify DevExpress MCP Server Connection
In JetBrains Rider, open the AI Assistant and type / to see available commands. Verify that DevExpress MCP tools appear in the command list.
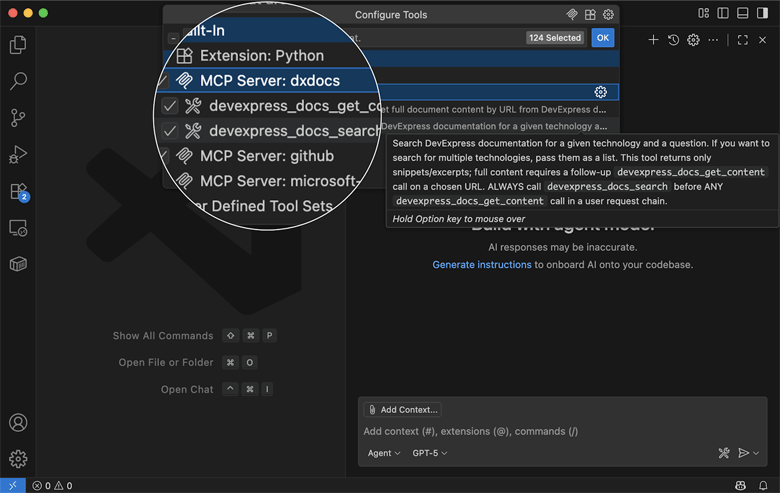
If you use the GitHub Copilot Plugin, change the chat mode to Agent, click the Tools icon (🛠️), and ensure that DevExpress MCP tools are selected:
Step 4: Optimize Your AI Assistant with Custom Instructions
For best results when using the DevExpress documentation MCP server, define custom instructions that guide your AI assistant on how to use our tools effectively.
AI Assistant
Create a custom prompt as described in the following help topic: JetBrains Rider - Add and customize prompts.
GitHub Copilot
Create a new file: <solution>/.github/copilot-instructions.md.
Paste your custom instructions into the file you created.
For additional information, refer to the following help topic: Learn more about custom instructions: Custom Instructions for GitHub Copilot.