Calculated Fields
- 4 minutes to read
The Dashboard Designer provides the capability to create calculated fields that allow you to apply complex expressions to data fields that are obtained from the dashboard’s data source. You can use these fields in data visualizations as regular data source fields.
Note
Note that calculated fields are not supported for the OLAP data source.
Creating a Calculated Field
After you have created a data source, you can add a new calculated field based on the existing data source fields.
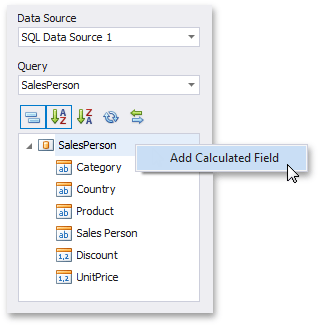
To create a calculated field, select the required data source (and the required query/data member, if applicable) in the Data Source Browser and click the Add Calculated Field button in the Ribbon’s Data Source tab…

…or right-click the Field List and select Add Calculated Field in the context menu.
This invokes the Expression Editor dialog, which allows you to specify an expression that will be used to obtain calculated field values. Here, you can construct the required expression.

You can use the following elements in expressions.
- Functions
Note
To learn how to use Aggregate functions, see Aggregations. The Expression Operators, Functions, and Constants topic lists common functions (DateTime, Math, String, etc.) supported by expressions.
- Operators
- Columns
- Constants
- Parameters
You can add a comment to your expression to explain it and make the expression more readable. Comments are multi-line and begin with /* and end with */.
After the expression has been specified, click OK. This displays a new calculated field in the data source structure.
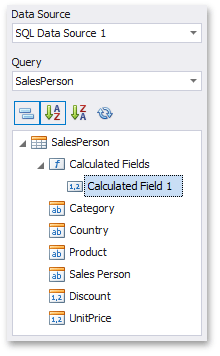
Now you can specify the required calculated field type, change its default name, etc.
Editing a Calculated Field
To edit a calculated field, use its context menu.
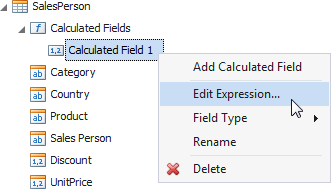
This menu contains the following items.
Item | Description |
|---|---|
Edit Expression… | Invokes the Expression Editor dialog, which allows you to change an expression for an existing calculated field. |
Field Type | Specifies the type of the calculated field. Note Note that the type of a newly created calculated field is detected automatically based on the type of values returned by the specified expression. If you change this type, the expression will be wrapped to a corresponding conversion function (such as ToStr, ToDecimal, ToInt, etc.). |
Rename | Changes the calculated field name. |
Delete | Removes the existing calculated field from the data source. |
Creating a Calculated Field in Code
A calculated field is represented by the CalculatedField class. To create a new calculated field, pass the required settings to the CalculatedField constructor or use the following properties.
- Specify the data member of the calculated field using the CalculatedField.DataMember property (for DashboardSqlDataSource and DashboardEFDataSource).
- Specify the expression of the calculated field using the CalculatedField.Expression property.
Note
To specify the type of the calculated field, insert the required conversion function (such as ToStr, ToDecimal, ToInt, etc.) into the calculated field’s expression (the CalculatedField.Expression property). For instance, the following expression contains the ToDecimal conversion function that is used to change the default field type:
ToDecimal([UnitPrice] * (1 - [Discount])) - Specify the name of the calculated field using the CalculatedField.Name property.
After the calculated field has been created, add it to the IDashboardDataSource.CalculatedFields collection of the data source’s calculated fields.
The following code snippet shows how to create a new calculated field based on the values of the ‘UnitPrice’ and ‘Discount’ data fields, and add it to the existing DashboardSqlDataSource.
using DevExpress.DashboardCommon;
//...

            CalculatedField priceWithDiscount = new CalculatedField("[UnitPrice] * (1 - [Discount])");
            priceWithDiscount.DataMember = "SalesPerson";
            priceWithDiscount.Name = "Price with discount";
            sqlDataSource.CalculatedFields.Add(priceWithDiscount);