Add an Action with Option Selection (.NET 6)
- 4 minutes to read
This lesson explains how to create an Action that supports option selection.
In this lesson, you will implement a new View Controller with a SingleChoiceAction. This action will allow users to select values for the Task.Priority and Task.Status properties.
Note
Before you proceed, take a moment to review the following lessons:
Step-by-Step Instructions
- Add a new View Controller to the MySolution.Module project. Name it TaskActionsController.
In the TaskActionsController.cs file, set the controller’s
TargetObjectType:using DevExpress.ExpressApp; // ... public partial class TaskActionsController : ViewController { public TaskActionsController() { InitializeComponent(); TargetObjectType = typeof(DemoTask); } // ... }Add a
SingleChoiceActionand specify its properties:public partial class TaskActionsController : ViewController { public TaskActionsController() { InitializeComponent(); TargetObjectType = typeof(DemoTask); SingleChoiceAction SetTaskAction = new SingleChoiceAction(this, "SetTaskAction", PredefinedCategory.Edit) { Caption = "Set Task", //Specify the display mode for the Action's items. Here the items are operations that you perform against selected records. ItemType = SingleChoiceActionItemType.ItemIsOperation, //Set the Action to become available in the Task List View when a user selects one or more objects. SelectionDependencyType = SelectionDependencyType.RequireMultipleObjects }; } // ... }To populate the Action with items, fill the Action’s ChoiceActionBase.Items collection in the Controller’s constructor:
public partial class TaskActionsController : ViewController {
   private ChoiceActionItem setPriorityItem;
   private ChoiceActionItem setStatusItem;
   public TaskActionsController() {
      // ...
      setPriorityItem =
         new ChoiceActionItem(CaptionHelper.GetMemberCaption(typeof(DemoTask), "Priority"), null);
      SetTaskAction.Items.Add(setPriorityItem);
      FillItemWithEnumValues(setPriorityItem, typeof(Priority));

      setStatusItem =
         new ChoiceActionItem(CaptionHelper.GetMemberCaption(typeof(DemoTask), "Status"), null);
      SetTaskAction.Items.Add(setStatusItem);
      FillItemWithEnumValues(setStatusItem, typeof(DevExpress.Persistent.Base.General.TaskStatus));

   }
   private void FillItemWithEnumValues(ChoiceActionItem parentItem, Type enumType) {
        EnumDescriptor ed = new EnumDescriptor(enumType);
        foreach(object current in ed.Values) {
            ChoiceActionItem item = new ChoiceActionItem(ed.GetCaption(current), current);
            item.ImageName = ImageLoader.Instance.GetEnumValueImageName(current);
            parentItem.Items.Add(item);
        }
    }
}
The code sample above organizes items from the Action’s
Itemscollection as a tree:- The root level contains items whose captions correspond to the
DemoTask.PriorityandDemoTask.Statusproperty names. The CaptionHelper object returns item captions. - The nested level contains the
PriorityandStatusenumeration values. The EnumDescriptor object returns item captions.

When you populate the ChoiceActionBase.Items collection in a Controller constructor as shown in the code above, you can use the Model Editor‘s ActionDesign | Actions | <Action> | ChoiceActionItems node to set an image name, a shortcut, and a localized caption for the added items.
If you populate the
Itemscollection in a Controller.Activated event handler, the Model Editor does not load items.- The root level contains items whose captions correspond to the
Open the Task.cs file and assign images to the
Priorityenumeration value as in the code sample below:public enum Priority { [ImageName("State_Priority_Low")] Low, [ImageName("State_Priority_Normal")] Normal, [ImageName("State_Priority_High")] High }In this tutorial, the enumeration values have the ImageNameAttribute attributes to set images for these values in the UI.
XAF ships with the standard image library. The library includes the
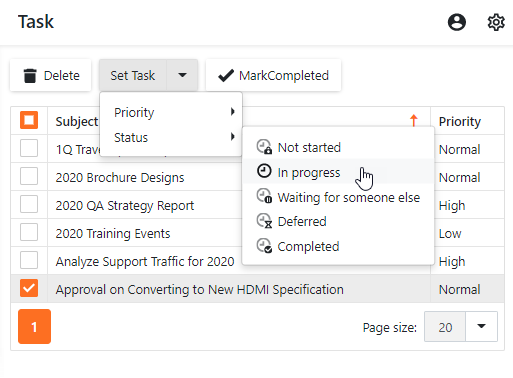
State_Priority_Low,State_Priority_NormalandState_Priority_Highimages used in this lesson.Handle the SingleChoiceAction.Execute event that occurs when a user chooses the Action’s item:
public partial class TaskActionsController : ViewController {
    // ...
    public TaskActionsController() {
        // ...
        SetTaskAction.Execute += SetTaskAction_Execute;
    }
    private void SetTaskAction_Execute(object sender, SingleChoiceActionExecuteEventArgs e) {
        /*Create a new ObjectSpace if the Action is used in List View
          Use this ObjectSpace to manipulate the View's selected objects.*/
        IObjectSpace objectSpace = View is ListView ?
            Application.CreateObjectSpace(typeof(DemoTask)) : View.ObjectSpace;
        ArrayList objectsToProcess = new ArrayList(e.SelectedObjects);
        if(e.SelectedChoiceActionItem.ParentItem == setPriorityItem) {
            foreach(Object obj in objectsToProcess) {
                DemoTask objInNewObjectSpace = (DemoTask)objectSpace.GetObject(obj);
                objInNewObjectSpace.Priority = (Priority)e.SelectedChoiceActionItem.Data;
            }
        } else
            if(e.SelectedChoiceActionItem.ParentItem == setStatusItem) {
            foreach(Object obj in objectsToProcess) {
                DemoTask objInNewObjectSpace = (DemoTask)objectSpace.GetObject(obj);
                objInNewObjectSpace.Status = (DevExpress.Persistent.Base.General.TaskStatus)e.SelectedChoiceActionItem.Data;
            }
        }
        objectSpace.CommitChanges();
        View.ObjectSpace.Refresh();
    }
}
To access a selected action item, use the event handler’s e.SelectedChoiceActionItem parameter.
Create a separate
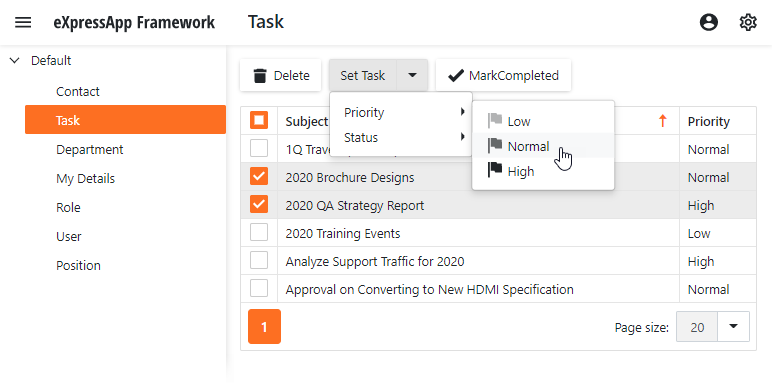
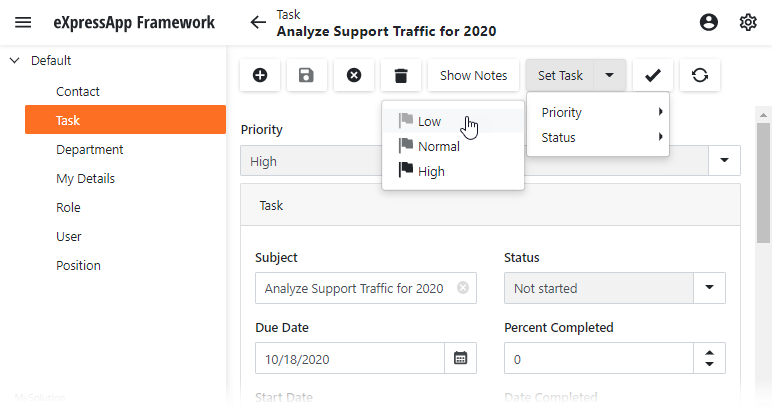
ObjectSpaceto edit multiple objects that are currently displayed. This approach improves performance, as each object change does not trigger the grid control’s events.Run the application. Select the Task item in the navigation control. After that, the Set Task Action becomes active.
To change the Priority or Status property of the selected Task objects, select an item in the Action’s drop-down list:
Next Lesson
Add a Simple Action using an Attribute