Declare Conditional Appearance Rules in the Application Model
- 4 minutes to read
The Conditional Appearance module allows you to change the appearance and visibility of different UI elements, as well as make them disabled/enabled. These elements include properties in List Views, built-in Property Editors and Static Text in Detail Views, Layout Items and Groups. In addition, you can make Actions visible/invisible or enabled/disabled. The required appearance can be applied under specified conditions. To apply a particular appearance to the target UI element, define a conditional appearance rule. In this topic, you will learn how to define a conditional appearance rule in the Application Model. To learn more about the Conditional Appearance module and appearance rules, refer to the Conditional Appearance Module Overview topic. To learn how to define appearance rules in code, refer to the Declare Conditional Appearance Rules in Code topic.
Prerequisites
Make sure that the following conditions are met:
- Your project contains the DevExpress.ExpressApp.ConditionalAppearance NuGet package.
The MySolution.Blazor.Server\Startup.cs or MySolution.Win\Startup.cs files contain the following line:
builder.Modules
    // ...
    .AddConditionalAppearance()
// ...
For more information on how to add the Conditional Appearance Module, see: Conditional Appearance (Manage UI State).
General Information
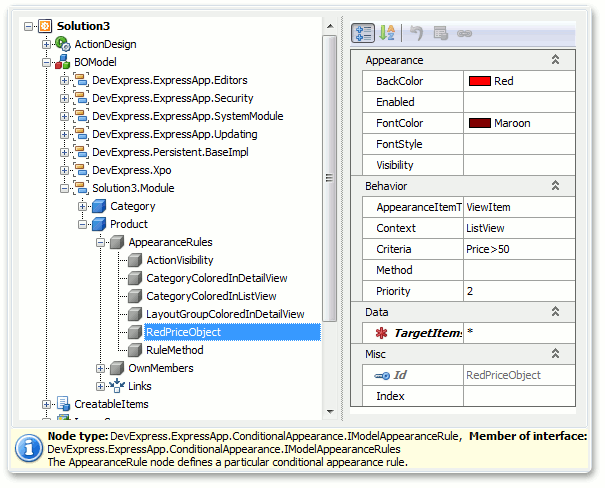
When the Conditional Appearance module is used by an application, it adds the IModelAppearanceRules child node to the Application Model’s BOModel | <Class> nodes. The IModelAppearanceRules node’s child nodes define conditional appearance rules declared in the application for the current class. When the Application Model is loaded, the IModelAppearanceRule nodes are generated within the appropriate BOModel | <Class> | AppearanceRules nodes for each rule declared in code. In addition, you can add an IModelAppearanceRule node that defines a conditional appearance rule in the Model Editor directly.

To add a conditional appearance rule via the Model Editor, invoke the context menu for a Class | AppearanceRules node and select Add | AppearanceRule.
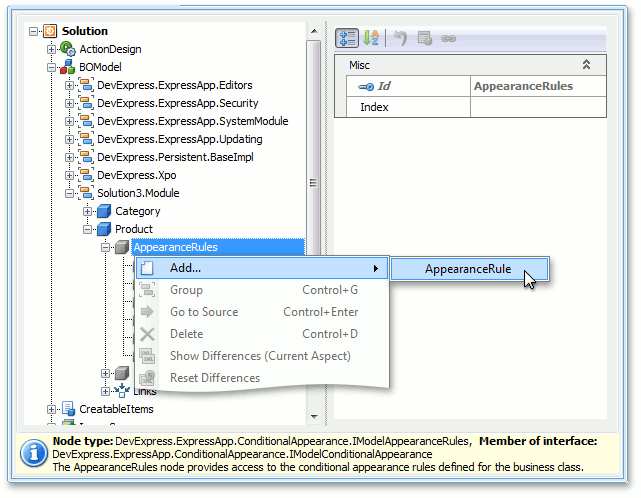
This will create an AppearanceRule node that represents the rule. Then, you can customize the created node’s properties as required. These properties are analogous to the AppearanceAttribute properties.
First, set the rule’s identifier using the Id property. Then, specify which UI elements you are going to affect via the appearance rule: set the IAppearanceRuleProperties.AppearanceItemType and IAppearanceRuleProperties.TargetItems properties. The following table illustrates several use cases.
| Element to be affected | AppearanceItemType Property | TargetItems Property |
|---|---|---|
| Business class property | ViewItem | Property name |
| An entire business object | ViewItem | * |
| Several properties - Approach 1 | ViewItem | A semicolon-separated list of property names |
| Several properties - Approach 2 | ViewItem | The * wildcard, followed by a semicolon-separated list of excluded properties. |
| Actions | Action | A semicolon-separated list of Action identifiers |
| Property’s Layout Item | LayoutItem | Layout Item identifier |
| Layout Group(simple or tabbed group) | LayoutItem | Layout Group identifier |
Then, specify the rule’s activity scope. For this purpose, use the following node properties.
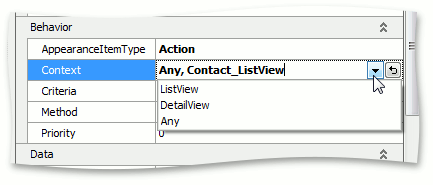
IAppearanceRuleProperties.Context - Specify in which Views to activate the rule.
| Context | Appearance Rule’s Activity Scope | Example |
|---|---|---|
| A predefined context - “DetailView”, “ListView” or “Any”. | Detail Views, List Views or all Views, respectively. | Any |
| A semicolon-separated list of View identifiers. | Specified Views only. | MyClass_ListView;MyClass_DetailView |
| The “Any” predefined context, followed by a semicolon-separated list of View identifiers. | All Views except the Views specified via View identifiers. | Any;MyClass_ListView;MyClass_LookupListView |
| The “DetailView” or “ListView” predefined context, followed by a semicolon-separated list of View identifiers. | All Detail Views or List Views, respectively, in addition to Views specified via View identifiers. | DetailView;MyClass_ListView |
You can type the required values manually, or use drop-down lists to select a predefined value.
IAppearanceRuleProperties.Criteria - Specify which criteria must be satisfied by the target object.
You can type the required value manually, or use the Filter Builder invoked when clicking the ellipsis button.
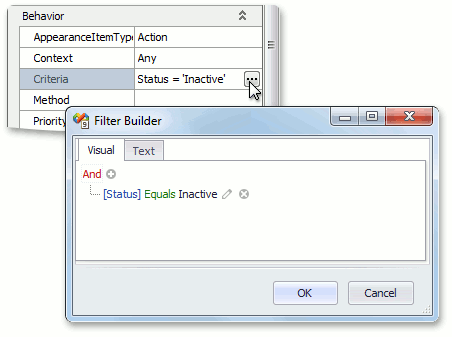
To learn how to write string criteria, refer to the Ways to Build Criteria topic. Note that you can use Function Criteria Operators.
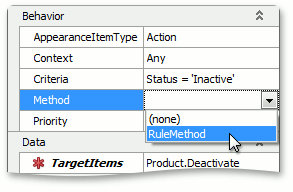
IAppearanceRuleProperties.Method - When you need to create a complex rule that can not be specified via the Criteria property, you can implement a business class method that takes no parameters, and returns a Boolean value specifying whether the rule is currently active.
[Appearance("DisableSampleProperty", TargetItems = "SampleProperty", Enabled = false)]
private static bool DisablePropertyByStaticMethod() {
    return true;
}
public string SampleProperty { get; set; }
When specifying the Method property, use a drop-down list to select the required method.
IAppearance.Priority - Specify the current rule’s priority when several rules affect the same UI element. Rules with higher priority may override changes made by rules with lower priority.
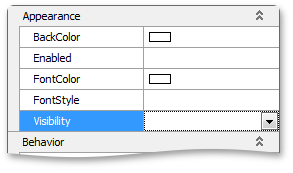
The last step in the appearance rule definition is specifying the required appearance customizations. For this purpose, use the following properties from the Appearance section.
Example
According to the rule demonstrated in the example below, the Product objects whose Price is more than 50 will be displayed in a Red background using the Maroon font color in List Views.