Bind a Report to a Data Source Schema
- 4 minutes to read
This tutorial demonstrates how to bind a report to a data source schema and supply data at runtime. This approach is useful when the report’s data source is not available at design time.
To bind a report to a data source schema, do the following.
- Create a Data Source Schema
- Assign the Data Source Schema to a Report
- Obtain the Data and View the Result
Create a Data Source Schema
You can create an XSD file containing a schema of a data source, using the WriteXmlSchema method. For example:
The created XSD file now may be used as a data source schema for new reports. For example, if a data source contains the Products table from the sample Northwind database (nwind.mdb file, which is shipped with XtraReports installation), the XML schema will look as follows:
XSD |
|---|
<?xml version=”1.0” standalone=”yes”?> <xs:schema id=”nwindDataSet” targetNamespace=”http://tempuri.org/nwindDataSet.xsd“ xmlns:mstns=”http://tempuri.org/nwindDataSet.xsd“ xmlns=”http://tempuri.org/nwindDataSet.xsd“ xmlns:xs=”http://www.w3.org/2001/XMLSchema“ xmlns:msdata=”urn:schemas-microsoft-com:xml-msdata” attributeFormDefault=”qualified” elementFormDefault=”qualified”> <xs:element name=”nwindDataSet” msdata:IsDataSet=”true” msdata:UseCurrentLocale=”true”> <xs:complexType> <xs:choice minOccurs=”0” maxOccurs=”unbounded”> <xs:element name=”Products”> <xs:complexType> <xs:sequence> <xs:element name=”ProductID” msdata:AutoIncrement=”true” type=”xs:int” /> <xs:element name=”ProductName” minOccurs=”0”> <xs:simpleType> <xs:restriction base=”xs:string”> <xs:maxLength value=”40” /> </xs:restriction> </xs:simpleType> </xs:element> <xs:element name=”SupplierID” type=”xs:int” minOccurs=”0” /> <xs:element name=”CategoryID” type=”xs:int” minOccurs=”0” /> <xs:element name=”QuantityPerUnit” minOccurs=”0”> <xs:simpleType> <xs:restriction base=”xs:string”> <xs:maxLength value=”20” /> </xs:restriction> </xs:simpleType> </xs:element> <xs:element name=”UnitPrice” type=”xs:decimal” minOccurs=”0” /> <xs:element name=”UnitsInStock” type=”xs:short” minOccurs=”0” /> <xs:element name=”UnitsOnOrder” type=”xs:short” minOccurs=”0” /> <xs:element name=”ReorderLevel” type=”xs:short” minOccurs=”0” /> <xs:element name=”Discontinued” type=”xs:boolean” minOccurs=”0” /> <xs:element name=”EAN13” minOccurs=”0”> <xs:simpleType> <xs:restriction base=”xs:string”> <xs:maxLength value=”12” /> </xs:restriction> </xs:simpleType> </xs:element> </xs:sequence> </xs:complexType> </xs:element> </xs:choice> </xs:complexType> <xs:unique name=”Constraint1” msdata:PrimaryKey=”true”> <xs:selector xpath=”.//mstns:Products” /> <xs:field xpath=”mstns:ProductID” /> </xs:unique> </xs:element> </xs:schema> |
Assign the Data Source Schema to a Report
- Start Microsoft Visual Studio 2010, 2012, 2013, 2015 or 2017 and create a new application under any of the supported platforms, or open an existing one.
- Add a new blank report to it.
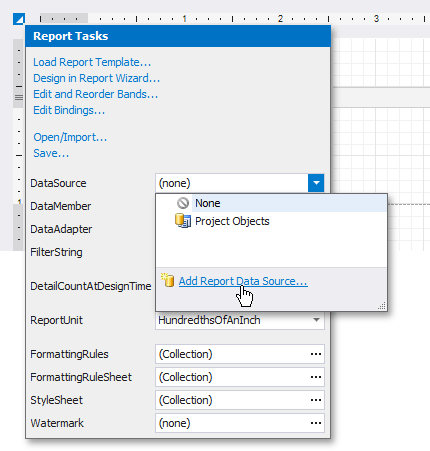
Click the report’s smart tag. In the invoked actions list, expand the drop-down menu for the DataSource property and click Add Report Data Source…
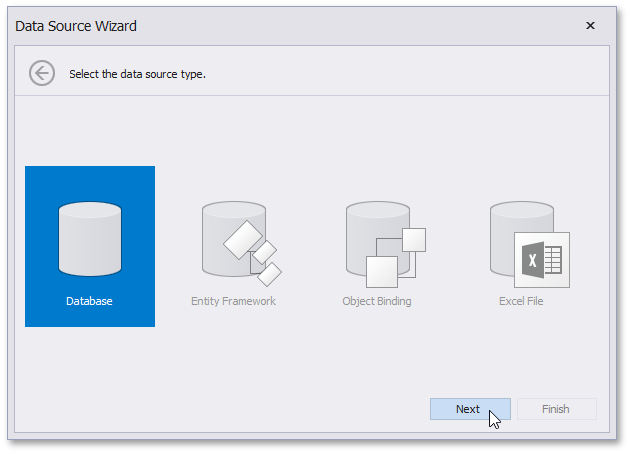
On the first page of the invoked Data Source Wizard, select Database and click Next.
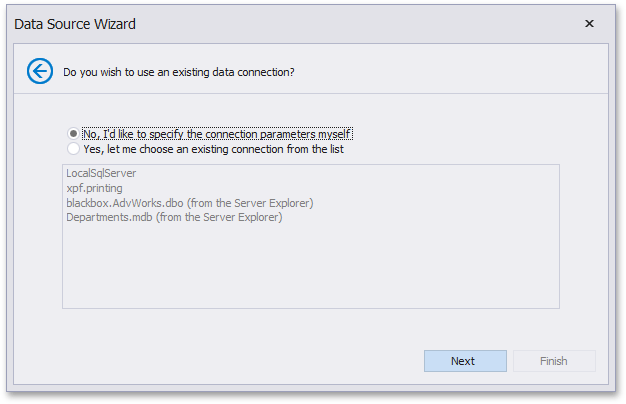
The next page allows you to specify whether you want to use an existing data connection or create a new data connection. Select “No, I’d like to specify the connection parameters myself“ and click Next.
On the next page, specify the data provider (XML file) and the path to the database schema file.

To proceed to the next wizard page, click Next.
- Click Next on the following page to save the created connection string to the configuration file.
On the next page, you can select a table, view or stored procedure or construct a custom query using the Query Builder.

Note
Some of the data shaping capabilities available to SQL data sources (such as sorting, grouping and filtering data, as well as using aggregate functions) are not supported for XML files.
Click Finish in the Data Source Wizard to exit the wizard.
The newly created SQL data source will be displayed in the Components node of the Report Explorer.

You can see the data source structure in the Field List window.
Drop the required fields onto the report’s Detail band from the Field List, to create report controls bound to these fields.

Obtain the Data and View the Result
At runtime create (or get) an instance of the data source of the same type which was used in the data source schema at design time.
private void button1_Click(object sender, EventArgs e) {
    // Obtain a dataset or create a new one.
    // For example:
    nwindDataSet ds = new nwindDataSet();
    new nwindDataSetTableAdapters.ProductsTableAdapter().Fill(ds.Products);

    // Create a report and bind it to a dataset.
    XtraReport1 report = new XtraReport1();
    report.DataSource = ds;

    // Show the print preview.
    ReportPrintTool pt = new ReportPrintTool(report);
    pt.ShowPreview();
}
The report (along with its controls) is now bound to data. Run the print preview form, and view the result.
