Document Viewer Server-Side Application (ASP.NET MVC)
- 3 minutes to read
This document describes how to create and configure an ASP.NET MVC application as a server-side solution to use the HTML5 Document Viewer in JavaScript:
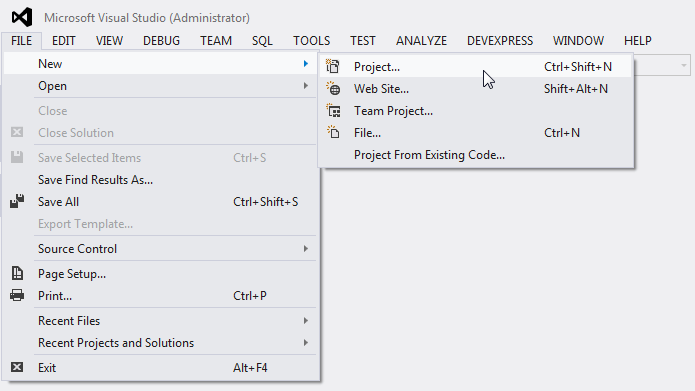
Select FILE | New | Project in the main menu or press CTRL+SHIFT+N to create a new project.
Expand the Installed category in the invoked New Project dialog, select a programming language (Visual C# or Visual Basic), and select the DevExpress v20.2 Template Gallery.
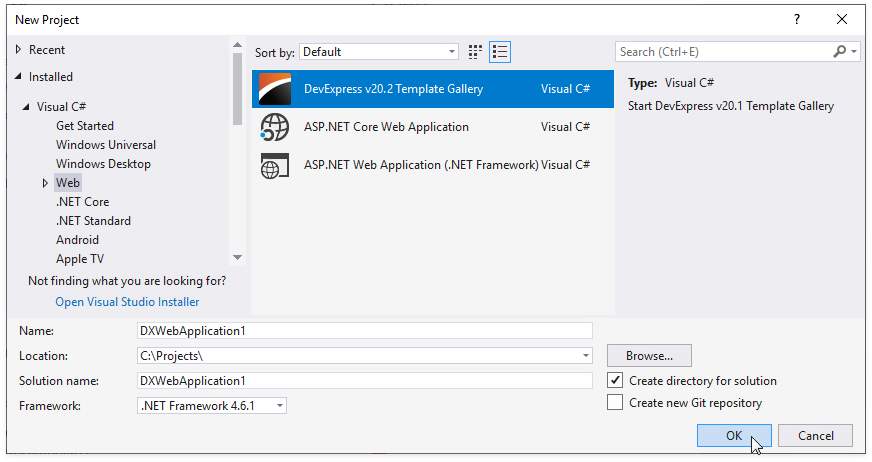
Specify the application name (“ServerSide“ in this example) and click OK.
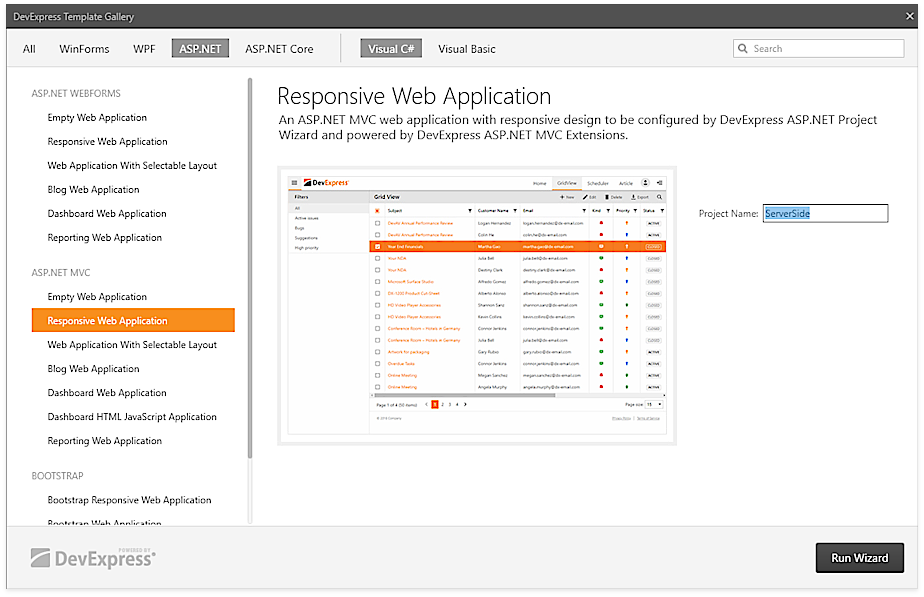
Select Reporting Web Application from the ASP.NET MVC category in the invoked DevExpress Template Gallery and click Run Wizard.
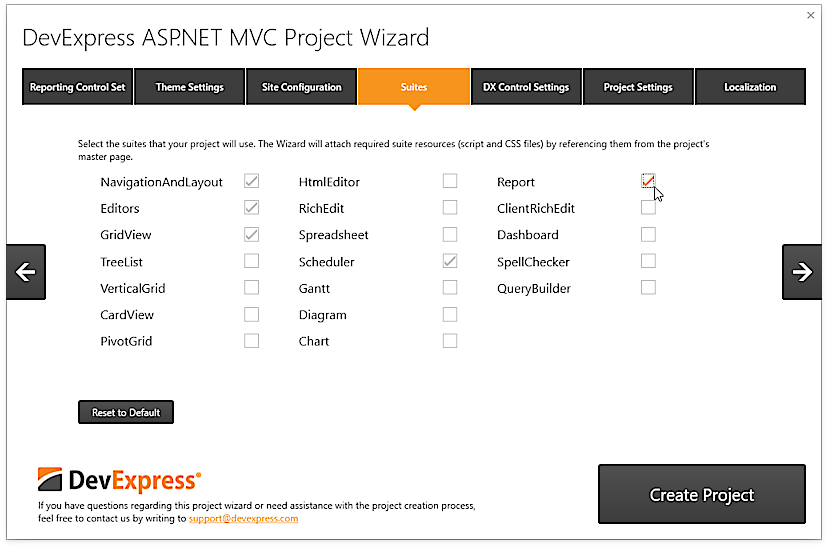
Enable the Report Suite to include Reporting resources.
Tip
You can provide reporting functionality to an existing MVC application. Refer to the How to Integrate ASP.NET MVC Reporting Extensions Into an Existing Project document for more information.
Right-click the Controllers folder in the Solution Explorer and select Add | Controller…. Create the WebDocumentViewerController controller inherited from the WebDocumentViewerApiControllerBase class. Set up cross-origin resource sharing (CORS) on your back-end to configure permissions to access resources from a server with a different origin. Implement the WebDocumentViewerApiController.Invoke action to allow CORS requests from all origins as shown below.
using DevExpress.Web.Mvc.Controllers;
using System.Web.Mvc;

namespace ServerSide.Controllers
{
    public class WebDocumentViewerController : WebDocumentViewerApiController {
        public override ActionResult Invoke() {
            var result = base.Invoke();
            // Allow cross-domain requests.
            Response.AppendHeader("Access-Control-Allow-Origin", "*");
            return result;
        }
    }
}
Right-click the project tree in the Soluton Explorer and select Add | New Item… to open the Add New Item dialog. Click the Reporting section in the tree on the left, select the DevExpress v20.2 Report Storage Web item, specify the storage name ( MyReportStorage.cs), and click Add. It creates the ReportStorageWebExtension class descendant. You can use the following code to implement report storage:
using System.Collections.Generic;
using System.IO;
using System.Linq;
using DevExpress.XtraReports.UI;
using DevExpress.XtraReports.Web.Extensions;

namespace ServerSide {
    public class MyReportStorage : ReportStorageWebExtension {
        public Dictionary<string, XtraReport> Reports = new Dictionary<string, XtraReport>();

        public MyReportStorage() {
            Reports.Add("Products", new XtraReport1());
            Reports.Add("Categories", new XtraReport2());
        }
        public override bool CanSetData(string url) {
            return true;
        }
        public override byte[] GetData(string url) {
            var report = Reports[url];
            using(MemoryStream stream = new MemoryStream()) {
                report.SaveLayoutToXml(stream);
                return stream.ToArray();
            }
        }
        public override Dictionary<string, string> GetUrls() {
            return Reports.ToDictionary(x => x.Key, y => y.Key);
        }
        public override void SetData(XtraReport report, string url) {
            if(Reports.ContainsKey(url)) {
                Reports[url] = report;
            }
            else {
                Reports.Add(url, report);
            }
        }
        public override string SetNewData(XtraReport report, string defaultUrl) {
            SetData(report, defaultUrl);
            return defaultUrl;
        }
        public override bool IsValidUrl(string url) {
            return true;
        }
    }
}
The storage is used for the Products and Categories reports. For more information and another storage example, review the Add a Report Storage article.
Use the project Properties | Web section to specify the server port number.
Run the project.