Edit Content in Print Preview
- 8 minutes to read
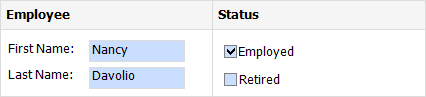
This document describes how to allow end users to customize field values in a previewed document.
Overview
Set a report control’s EditOptions | Enabled property to true and leave the EditOptions | ReadOnly property disabled to make the control’s content editable in Print Preview.
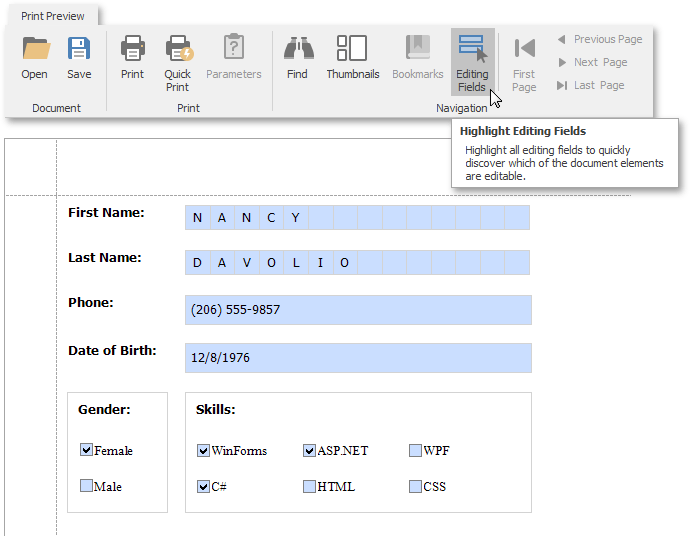
Print Preview displays the Editing Fields toolbar button if content editing is enabled for at least one control in the displayed report. Click this button to highlight all editable fields available in the document.
Use the TAB and SHIFT+TAB keys to navigate between editable fields forward and back.
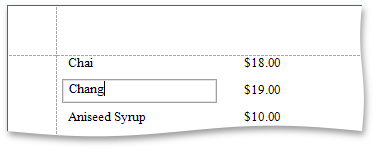
Click an editable field to invoke an editor and specify a value.
You can enable content editing for data-aware and unbound report controls.
The following report controls support content editing in Print Preview:
Text | Boolean | Image |
|---|---|---|
The sections below describe the options these controls expose. You can use these options to set up content editing.
Tip
Refer to the Create an Interactive E-Form topic for information on how to enable content editing for these controls.
Limitations
- Changes made to a control’s content in Print Preview do not affect the document’s other parts (for example, summary results, grouping, sorting, bookmarks and other settings that were processed before the document was generated).
- The XRControl.CanGrow setting is ignored for editable fields. The editable area cannot exceed the control’s original dimensions.
- Multi-line values can only be entered when a mask is not applied to an editable field.
- Values entered into editable fields are reset after the document is refreshed (for example, when end users submit report parameter values or expand/collapse data in a drill-down report).
- You cannot edit content in a band if its DrillDownControl property is specified.
When values are entered in a Top Margin or Bottom Margin band, they are not preserved when exported as a single file to the following formats:
- TXT
- CSV
- HTML
- MHT
- RTF
- XLS
- XLSX
- image
Text Editors
Text editors are used to customize the Label, Table Cell and Character Comb report control content in Print Preview.
The default text editor is a memo edit.
Specify the TextEditOptions.EditorName property to use one of the following text editors:

Numeric | Date-Time | Letters |
|---|---|---|
|
|
|
Each editor has a specific mask.
You can implement custom editors and add them to an existing or custom category. The following online examples demonstrate how to do this:
- WinForms: How to use custom controls to edit report content in Print Preview
- WPF: How to use custom controls to edit report content in Print Preview
- ASP: How to use custom controls to edit report content in Print Preview
Note
If a table cell contains other controls, end users cannot edit this cell (they can edit the cell’s controls). The following image illustrates this:
Character Comb Editors
The Character Comb control displays text so that each character is printed in an individual cell.

Specify the Character Comb’s TextEditOptions.EditorName property to use a text editor, as described in the Text Editors section above.
Check Box Editor
The check box editor is used to customize the Check Box report control’s content in Print Preview.
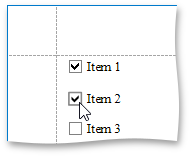
You can combine several check box editors into a radio group so that end users can select only one option within a group at a time. For this, set the Check Box report controls’ CheckEditOptions.GroupID property to the same value.
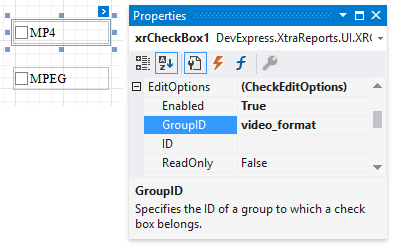
Image Editors
Image editors are used to customize the XRPictureBox report control’s content in Print Preview.
Use the control’s ImageEditOptions.EditorName property to assign one of the following image editors.
“Image” Editor
Allows end users to load an image and specify the image’s size options.
“Signature” Editor
Allows end users to specify brush options and draw a signature.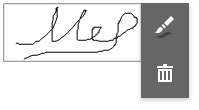
“Image and Signature” Editor (default)
Allows end users to load an image and draw a signature. The image’s size options and brush options are available.
Custom Editor
You can register an editor with a custom set of menu items. The following table lists the methods you can use in different platforms.Platform
Methods
WinForms
WPF
RegisterImageEditorInfo(String, ImageEditorOptions, String)
Web
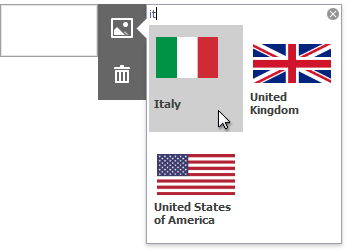
The following image demonstrates a custom editor that allows end users to load one of the predefined images and remove the selected image.
All the image editors listed above include the  menu item when the Picture Box control has an original image. This item restores the original image editor value.
Specify Edit Options in Code
The following example illustrates how to specify a report control’s edit options in code:
using DevExpress.XtraPrinting;
// ...
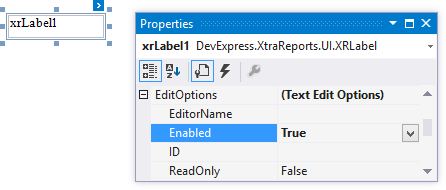
private void EnableDocumentEditing(XtraReport1 report) {
// A default editor (memo edit) is used for this label
report.xrLabel1.EditOptions.Enabled = true;
// This label's editor is disabled in Print Preview
report.xrLabel2.EditOptions.Enabled = true;
report.xrLabel2.EditOptions.ReadOnly = true;
// A date-time editor is used for this label
report.xrLabel3.EditOptions.Enabled = true;
report.xrLabel3.EditOptions.EditorName = "Date";
// This check box can be customized in Print Preview.
report.xrCheckBox1.EditOptions.Enabled = true;
// These check boxes behave like radio buttons
// belonging to the same logical group
report.xrCheckBox2.EditOptions.Enabled = true;
report.xrCheckBox2.EditOptions.GroupID = "Group 1";
report.xrCheckBox3.EditOptions.Enabled = true;
report.xrCheckBox3.EditOptions.GroupID = "Group 1";
// A signature can be drawn in this picture box
report.xrPictureBox.EditOptions.Enabled = true;
report.xrPictureBox.EditOptions.EditorName = "Signature";
}
After you call the method that sets edit options (like the EnableDocumentEditing method in the code above), call the XtraReport.CreateDocument method to apply these options to the document.
Access Editable Fields in Code
When you set a report control’s EditOptions.Enabled property to true, one or more editable fields are added to the PrintingSystem’s EditingFields collection. If the control is bound to data, an editable field is created for each data record the control displays within a document.
The following classes define editable fields:
TextEditingField
Used for text editors.CheckEditingField
Used for check boxes.ImageEditingField
Used for image editors.
An editable field’s options correspond to the control’s edit options as follows:
| Editable Field’s Options | Control’s Edit Options |
|---|---|
| EditingField.ID | EditOptions.ID |
| EditingField.ReadOnly | EditOptions.ReadOnly |
| TextEditingField.EditorName | TextEditOptions.EditorName |
| ImageEditingField.EditorName | ImageEditOptions.EditorName |
| CheckEditingField.GroupID | CheckEditOptions.GroupID |
You can access editable fields after a document is generated. The following code illustrates how to disable content editing for a specific user in the PrintingSystemBase.AfterBuildPages event handler.
using DevExpress.XtraPrinting;
// ...

private void XtraReport1_BeforePrint(object sender, System.Drawing.Printing.PrintEventArgs e) {
    PrintingSystem.AfterBuildPages += PrintingSystem_AfterBuildPages;
}

private static string userName = System.Environment.UserName;

void PrintingSystem_AfterBuildPages(object sender, System.EventArgs e) {
    if (userName == "fuller.andrew")
        foreach (EditingField field in PrintingSystem.EditingFields)
            field.ReadOnly = true;
}
Access an Editable Field’s Value
Use the following properties to access an editable field’s value:
| Editable Field Type | Field Value |
|---|---|
| TextEditingField | EditValue |
| CheckEditingField | CheckState |
| ImageEditingField | ImageSource and InitialImageSource |
Each time an editable field value changes, the PrintingSystemBase.EditingFieldChanged event occurs. Handle this event to validate or format user input.
Format Edit Values
Handle the EditingFieldChanged event to apply a format to an editable field value. In the event handler, access the visual brick (a placeholder for the control’s content in a rendered document) and specify its TextBrick.TextValueFormatString and TextBrick.Text properties:
Tip
Specify both the TextBrick.Text and TextBrick.TextValueFormatString properties so that users can export the editable field value to Excel in any TextExport mode.
Note
If a report control is unbound, its content is obtained from the XRControl.Text property value and the brick’s TextValue property is set to null. You can only specify the brick’s Text property.
The following code illustrates how to apply a currency format to unbound and data-aware controls in the EditingFieldChanged event handler.
using DevExpress.XtraPrinting;
// ...

private void XtraReport1_BeforePrint(object sender, System.Drawing.Printing.PrintEventArgs e) {
    PrintingSystem.EditingFieldChanged += PrintingSystem_EditingFieldChanged;
}

void PrintingSystem_EditingFieldChanged(object sender, EditingFieldEventArgs e) {
    var brick = e.EditingField.Brick;

    if(brick.TextValue == null)
        brick.TextValue = Convert.ToDouble(brick.Text);
    brick.TextValueFormatString = "{0:c2}";
    brick.Text = string.Format(brick.TextValueFormatString, brick.TextValue);
}
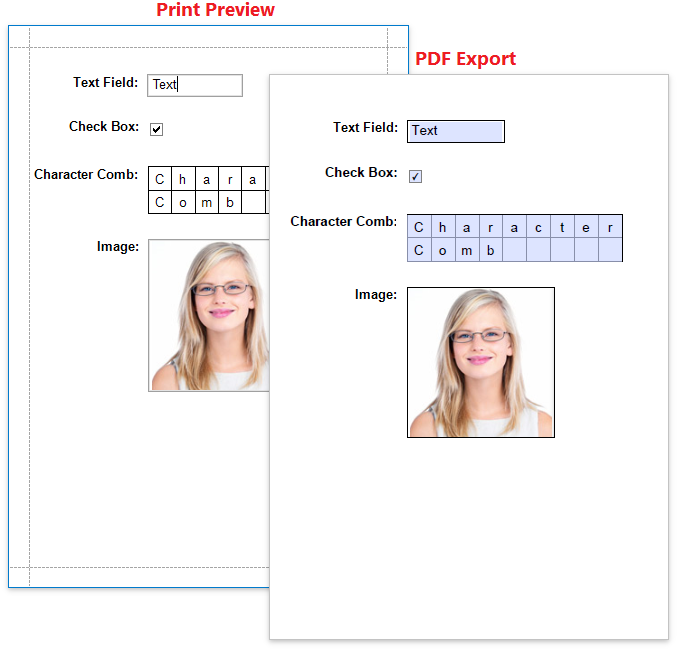
Export Editable Fields to PDF AcroForms
Enable the report’s PdfExportOptions.ExportEditingFieldsToAcroForms property to export text fields, check boxes, character combs, and image editors to PDF as editable form fields (AcroForms).