Custom Report Gallery
- 4 minutes to read
This topic describes how you can implement a custom report gallery in your End-User Report Designer for WinForms:
This enables your end-users to select a predefined report layout in the Report Gallery and use it to create a new report.
Tip
This is a legacy feature that is no longer available in the Visual Studio Report Designer.
Latest versions of DevExpress Reports provide a different Report Gallery implementation that is available in all Report Designers by default.
Prepare Your Report Templates
To prepare custom templates, you can open your reporting application in Visual Studio, and then either save your reports layouts, or compile the application into a DLL.
The installation of DevExpress Reports adds the Report Template Editor to the following directory: “C:\Program Files (x86)\DevExpress 18.1\Components\Tools\XtraReportsDesign”.
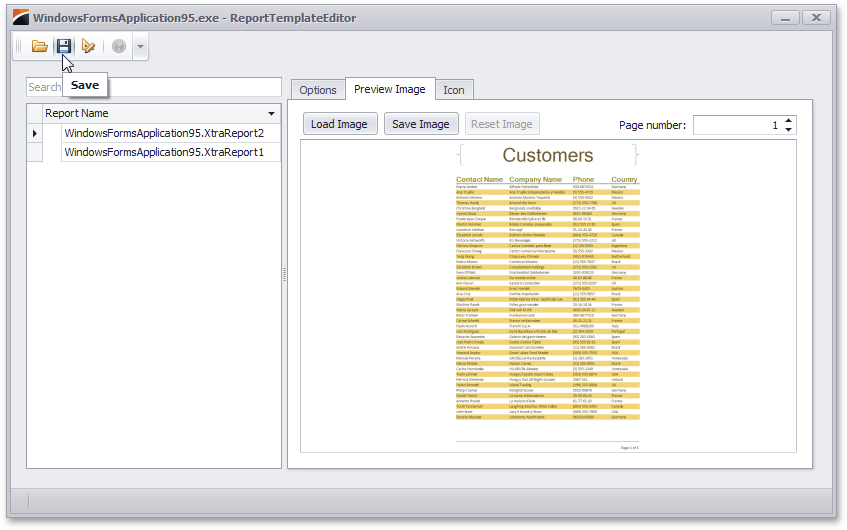
This editor allows you to load a report layout or a DLL containing multiple reports and generate a preview image and icon for every report:
The editor allows you to save your templates to ZIP files that are ready to be added to your gallery. You can also open an existing ZIP file that contains report templates, to preview and modify its templates.
Manage Your Templates
The Open button invokes the dialog box with the following options.
- Assembly Files (.dll;.exe): This option will scan the assembly or executable file for any existing report and load these reports into the application.
- Report Definition Files (*.repx): This option loads the report layout defined in the report definition file.
- Report template packages (*.zip): This option opens a previously created template package.
The Save button will create a new report template package (*.zip) with the specified name.
The Edit Layout button launches the End-User Report Designer that can be used to modify the selected template.
Loaded reports are listed in the Report Name tab. Select a report from this list to customize its options.
The Options Tab
This tab contains the Author, Name, and Description fields that describe a template.
These values are assigned to the Template.Author, Template.Name, Template.Description properties of a Template.
The Preview Image Tab
This tab shows the image that is used to display a facsimile of the rendered report. Here, you can choose a page that is used to create a preview image for your report, load a new image from a file, as well as save an existing one.
In code, you can access this image using the Template.Preview property.
The Icon Tab
This tab shows the icon that is seen in the listed templates of the template gallery. The options provided in this tab are similar to that of the Preview Image tab.
In code, you can access this icon using the Template.Icon property.
Provide a Custom Report Gallery
To provide a custom report gallery to an End-User Designer for Windows Forms, add a reference to the DevExpress.XtraReports.v18.1.Extensions assembly in your project and write the following code into the project’s app.config file.
In this code, the path attribute of the directory section specifies a folder where ZIP files containing your report templates are stored.
<?xml version="1.0"?>
<configuration>
    <configSections>
        <sectionGroup name="devExpress" type="System.Configuration.ConfigurationSectionGroup, System.Configuration,
                  Version=4.0.0.0, Culture=neutral, PublicKeyToken=b03f5f7f11d50a3a">
            <section name="xtraReports" type="DevExpress.XtraReports.Configuration.XtraReportsConfigurationSection,
               DevExpress.XtraReports.v17.1.Extensions, Version=17.1.3.0, Culture=neutral, PublicKeyToken=b88d1754d700e49a" />
        </sectionGroup>
    </configSections>
    <devExpress>
        <xtraReports>
            <reportGallery>
                <directory path="..\..\Templates" />
            </reportGallery>
        </xtraReports>
    </devExpress>
</configuration>
A sample application illustrating this feature is available online, at How to deploy a custom report template gallery for an End-User Designer.
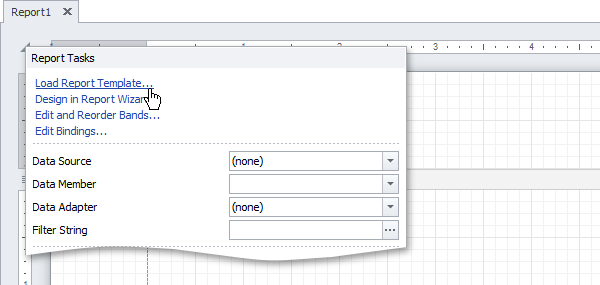
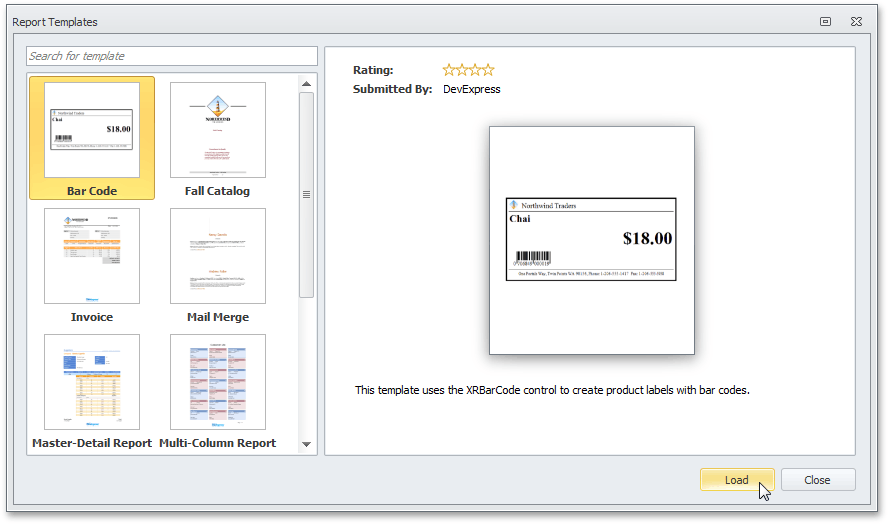
In this application, when you click a report’s smart tag, you can see the Load Report Template… link that launches the Report Templates dialog.
In this dialog, pick a template and click Load, to apply it to the current report.
Use the Bindings Updater
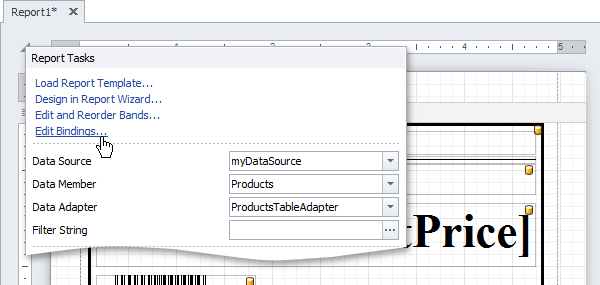
After you have downloaded a template, bind your report to a data source and update the report controls’ bindings appropriately.
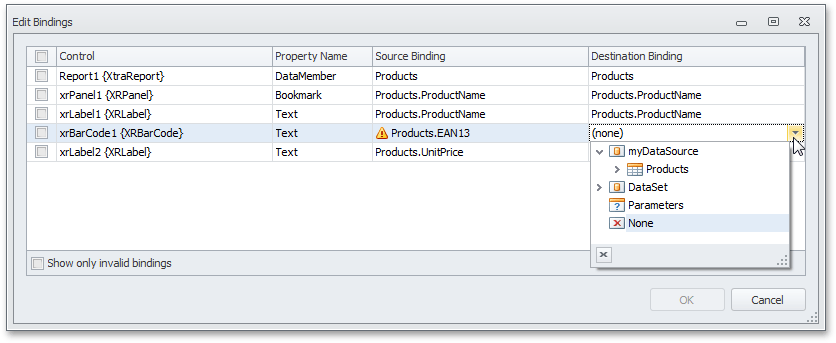
To do this, click the report’s smart tag, and in its actions list, click the Edit Bindings… link.
In the invoked Edit Bindings dialog, you can view the bindings that are currently assigned to every report control (in the Control, Property Name and Source Bindings columns).
To exclude properly bound controls from this list, enable the Show only invalid bindings option.
To update a control’s data bindings, enable the corresponding check box in the first column and assign the required bindings from the report’s data source (in the Destination Bindings column).
After you have finished updating the bindings, click OK to close the dialog and apply the changes.