Getting Started - WinForms Scheduler
- 10 minutes to read
Create a Sample Application
In Visual Studio, create a new WinForms project and drag the SchedulerControl from the Toolbox onto the form. Set the Scheduler’s
Dockproperty to Fill.Tip
Use the DevExpress Template Kit to quickly create DevExpress-powered apps that target .NET 8+ based on pre-built project templates. The Scheduling Application template creates a WinForms application with an integrated calendar/scheduler, navigation bar, and Ribbon UI.
Refer to the following help topic for information on how to download and install the DevExpress Template Kit: Install DevExpress Template Kit.
Note
Use the DevExpress Project Template Gallery to create applications based on templates that target the .NET Framework.
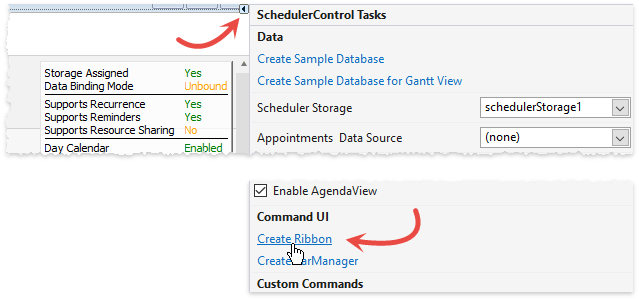
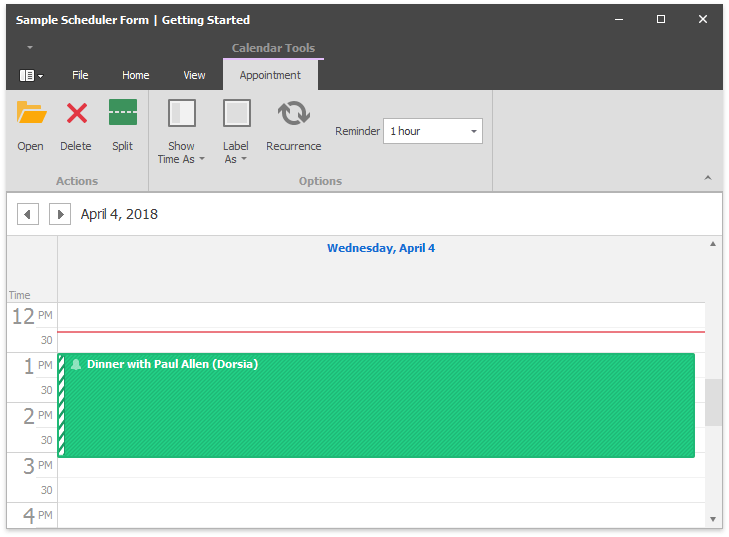
Use the Scheduler’s smart tag menu to access its main settings. For example, click the “Create Ribbon” link under the Command UI category, then select “Create All Bars”. This generates a Ribbon UI with relevant commands.
End-user capabilities include:
- Use commands on the “View” Ribbon tab to change the currently active Scheduler View;
- Zoom the Scheduler in and out using the mouse scroll wheel while holding down the Ctrl key;
- Right-click the Scheduler’s client area to invoke a context menu that allows you to create new appointments and events;
- Right-click the Scheduler Time Ruler or use commands from the Ribbon “View” tab to change the time interval (30 minutes by default);
- Print or export the calendar using the “File” Ribbon tab commands.
Close the application and specify the following properties:
- Use the SchedulerControl.ActiveViewType property to change the default Scheduler View.
- Invoke the control’s smart tag menu and uncheck unnecessary Views to hide them from users.
In the Visual Studio Properties window, expand the SchedulerControl.Views section to access View settings. Every View has its own set of properties that you can change individually. For instance, change settings from the DayView’s DayView.TimeRulers group to modify the Time Ruler element (increase or decrease the time interval, show minutes and/or time designators (“AM” and “PM” labels), display the current time marker, etc).
Tip
Note that there is no option that switches the Time Ruler between the 12-H and 24-H time formats. Refer to the following help topic for more information: How to: Display TimeRulers with Different Time Formats Together.
The Scheduler includes multiple options to navigate through dates at runtime: scrolling, “Back” and “Forward” navigation buttons, and the “Go to Date…” item in the Scheduler’s context menu. To provide a more convenient and intuitive date navigation option, locate the DateNavigator control on the Visual Studio toolbox and drop it into the form. Date Navigator is a calendar that automatically connects to the Scheduler via the DateNavigator.SchedulerControl property. If you select a date in Date Navigator, the Scheduler scrolls to that specific date. Users can also use marquee selection or hold down the Shift/Ctrl keys to select date ranges. The Scheduler automatically applies the View that fits the selected range.
Tip
Place Scheduler and DateNavigator controls into separate SplitContainerControl panels to resize both controls at runtime.
Binding to Data: Scheduler Storage & Appointments
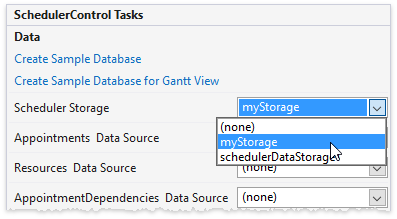
When you add a Scheduler Control to a form, it automatically adds the associated SchedulerDataStorage component - an external storage that keeps all Scheduler data: appointments, resources, labels, etc. The storage is associated with the Scheduler control via the SchedulerControl.DataStorage property. You can manually add more storage to the form and use the control’s smart tag to select the currently active one.
You can bind the storage to a data source that stores appointments. This example requires the “CarsDB.mdb” MS Access database located in the demo source code folder (SchedulerDemos\Data).
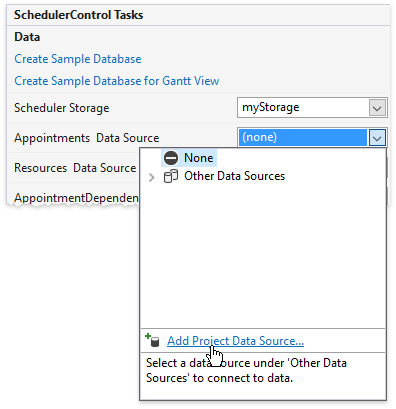
Invoke the Scheduler’s smart tag menu, open the “Appointments Data Source” combo box, and click the “Add Project Data Source…” link.
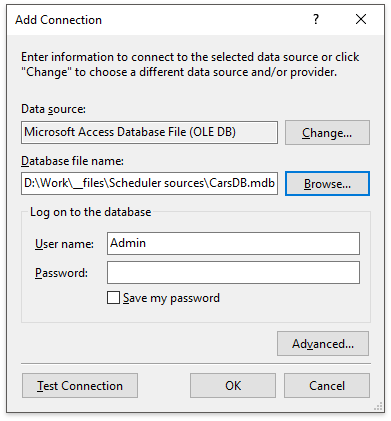
- In the Data Source Configuration Wizard, select “Database” and then “Dataset”. Click “New Connection…” to proceed to connection settings.
Change the database type to “Microsoft Access Database File (OLE DB)” and search for the sample “CarsDB.mdb” file. Click “OK” to add a new connection.
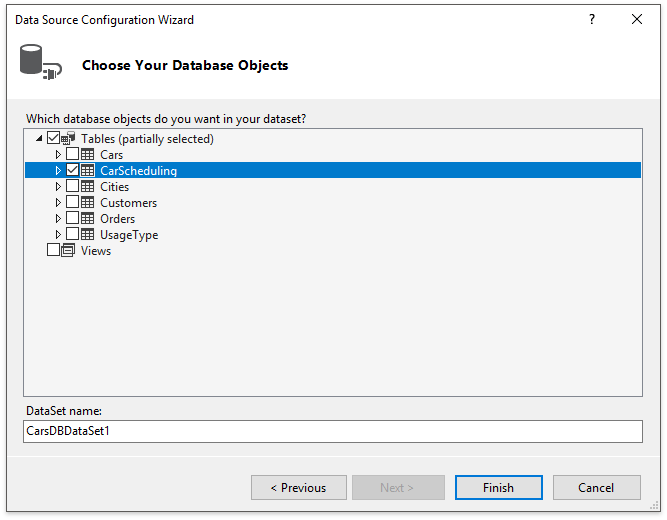
Select the “Cars Scheduling” table and click “Finish”.
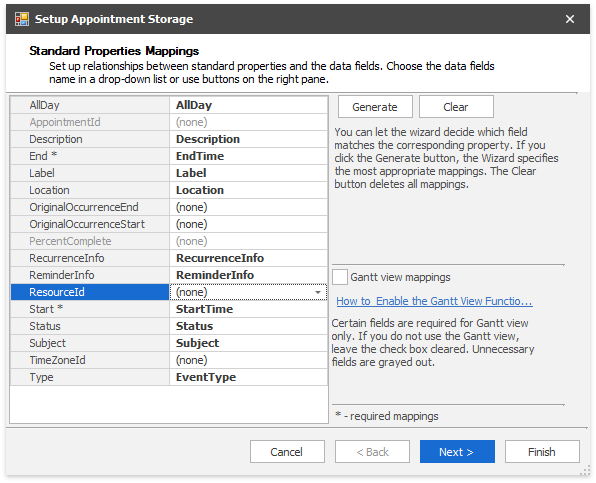
Each appointment has data associated with it: start and end time stamps, descriptions, labels, etc. To display appointments, the Scheduler needs to know which appointment properties relate to which data source fields. The process of binding appointment properties to source fields is called mapping. This operation is performed in the “Setup Appointment Storage” dialog that pops up automatically after binding the storage to a data source. Should you need to modify these mappings later on, invoke a control or a storage smart tag and click “Mappings Wizard…”

You can set up all required mappings manually, or use the Wizard. Click the “Generate” button to scan data source fields and automatically assign them to the corresponding properties.
Important
This sample database contains the “CarID” field, which attaches itself to the “ResourceID” property if you generate mappings automatically. Since you have no appointment resources yet, clear this specific mapping, or else the Scheduler shows no appointments.
- The final Wizard page shows all data source fields that remain unmapped, and allows you to bind them to custom fields. You can skip this step for now and click “Finish”.
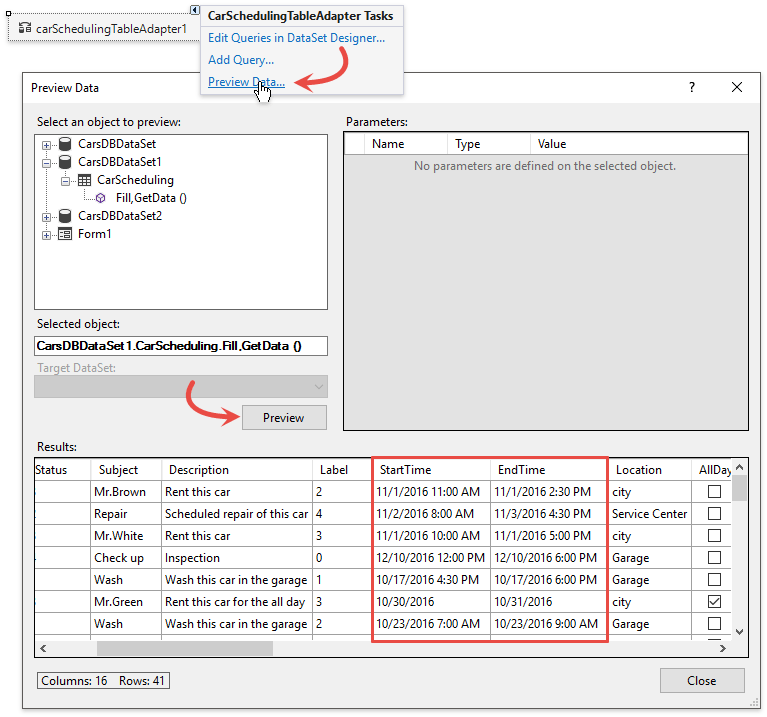
Visual Studio adds two standard WinForms components when you bind to the MS Access database - DataSet and TableAdapter. Invoke the adapter’s smart tag menu, choose “Preview Data…” and then click the “Preview” button. Inspect the loaded database records: all sample appointments belong to the last three months of 2016.
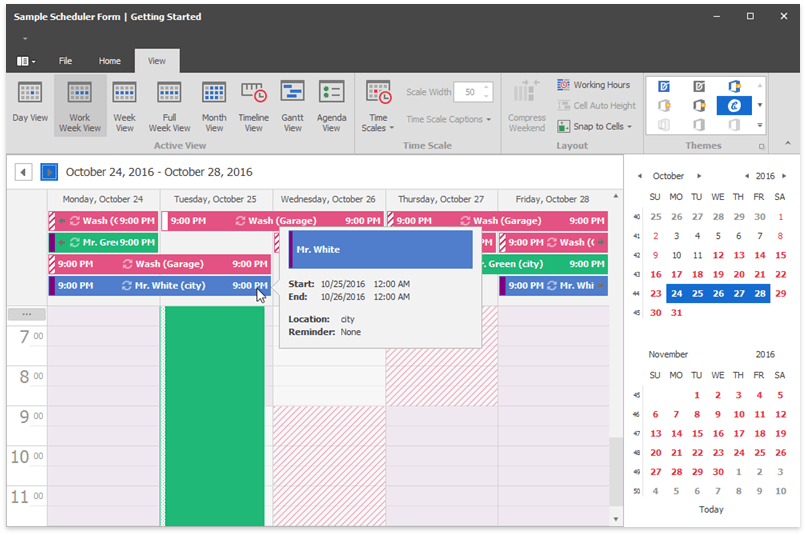
The Scheduler focuses the current day by default, so to browse these database appointments you have to scroll the Scheduler a few years back every time you run the project. Set the SchedulerControl.Start property to “October 13, 2016” - the day of the first sample appointment.
Run the application to test the result.
- To customize appointment backgrounds (Labels) and side strips (Statuses), load custom labels and statuses from external sources bound to the SchedulerDataStorage.Labels and SchedulerDataStorage.Statuses properties.
Resources
In real-life applications, appointments often have related resources. A resource is an entity that owns appointments. For instance, the sample CardsDB database belongs to a fictional car rental agency. In this case, any car owned by this agency is a resource that has related appointments (time intervals during which these cars are leased, washed or repaired). In this section, you will learn how to add these resources to the Scheduler.
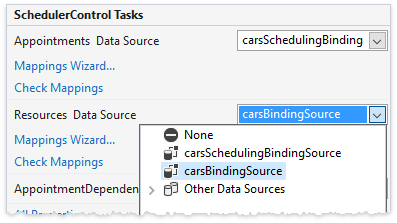
Open the “Resources Data Source” editor in the Scheduler’s smart tag and repeat the same steps performed for appointments. Use the project’s existing connection, but this time select the ”Cars” table.
When the Mapping Wizard pops up, use the following mappings:
- Caption: Model
- Color: (none)
- ID: ID
- Image: Picture
- ParentId: (none)
- Now when you have resources, restore appointment “ResourceID” property mapping removed earlier. Assign the “CarID” data field to this property.
Run the application and add a new appointment or modify an existing one: the appointment edit form now allows you to choose a parent resource.
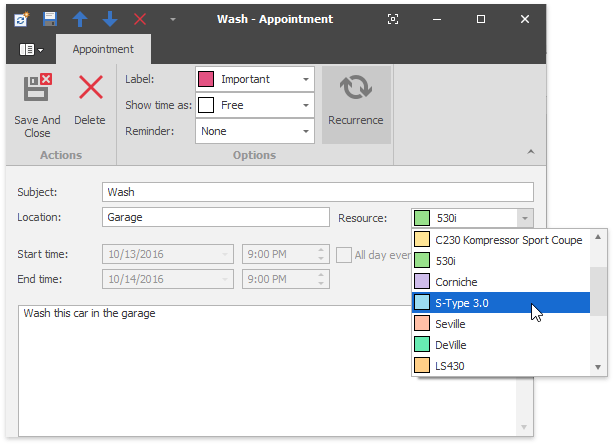
Note
To modify a recurring appointment’s resource, click the “Recurrence” Ribbon command or right-click the appointment and select “Edit Series”. If you edit a single instance of a recurring appointment, the resource selector is disabled.
Set the SchedulerControl.GroupType property to Resources to display resources on main Scheduler screen and organize appointments under their parent resources. The number of simultaneously visible resources is managed for each View individually via the SchedulerViewBase.ResourcesPerPage property.
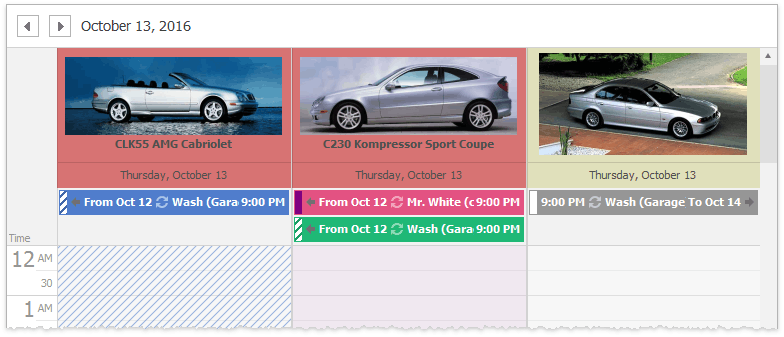
Use properties from the SchedulerOptionsView.ResourceHeaders group to customize the resource header bar. The image above was taken using the following settings:
Custom Appointment Edit Form
You can slightly modify the Edit Appointment form (for example, rename the “Resource” label to “Car” in this example) or completely re-design this form and make it display custom field values, not shown by default. In this section, the editor for the custom “Contacts” field is added.
Click the SchedulerControl’s smart tag to invoke the SchedulerControl Tasks menu and click the Create Custom Appointment Form item.
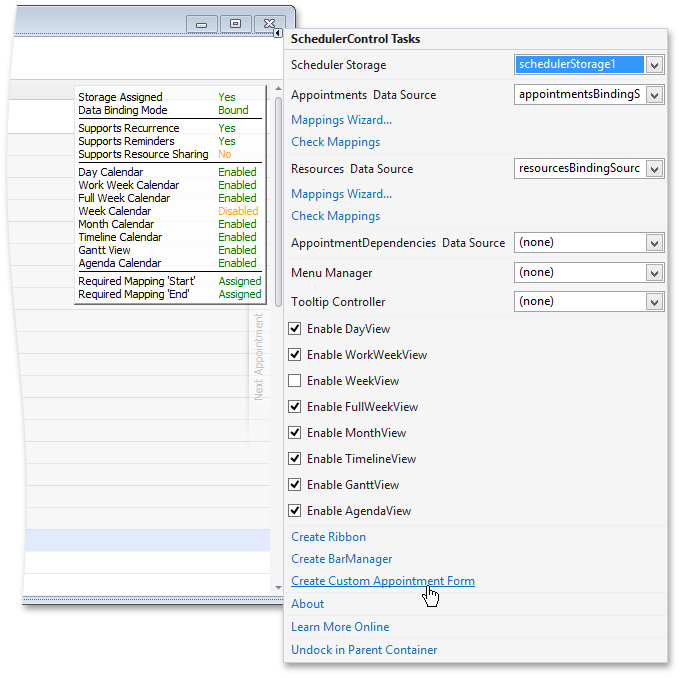
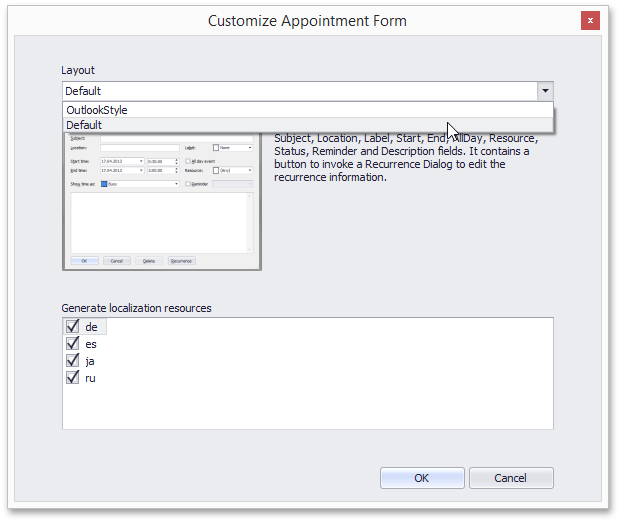
In the invoked Customize Appointments Form window, select the Default layout and click OK.
Tip
Note that if you select the OutlookStyle layout, the steps that follows are essentially the same (except those related to the layout itself).
Open the CustomAppointmentForm in design mode. Drag the LabelControl control and the MemoExEdit control from the DX.25.2: Common Controls Toolbox tab to the form.
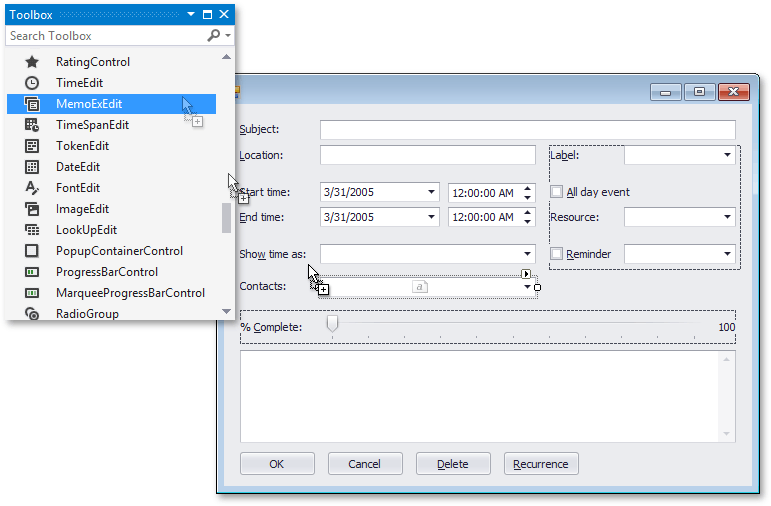
In the Properties window, set the Text property of LabelControl to Contacts:, and change the Name property of the MemoExEdit control to mxContacts.
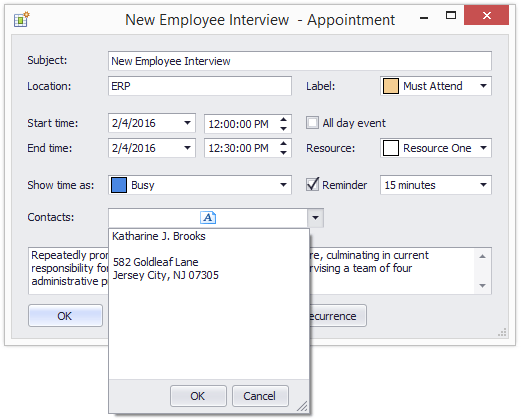
To add the capability to obtain a custom field value or set a custom appointment field, modify the LoadFormData(), SaveFormData() and IsAppointmentChanged() methods in the CustomAppointmentForm code file.
string _contacts; public virtual void LoadFormData(Appointment appointment) { if (appointment.CustomFields["Contacts"] == null) mxContacts.Text = ""; else { _contacts = appointment.CustomFields["Contacts"].ToString(); mxContacts.Text = _contacts; } } public virtual bool SaveFormData(Appointment appointment) { appointment.CustomFields["Contacts"] = mxContacts.Text; return true; } public virtual bool IsAppointmentChanged(Appointment appointment) { if (_contacts == appointment.CustomFields["Contacts"].ToString()) return false; else return true; }Handle the EditAppointmentFormShowing event to pass your custom form to the Scheduler Control.
this.schedulerControl1.EditAppointmentFormShowing += schedulerControl1_EditAppointmentFormShowing; void schedulerControl1_EditAppointmentFormShowing(object sender, AppointmentFormEventArgs e) { // The recurrence form allows you to edit daily appointments only. MyAppointmentEditForm myForm = new MyAppointmentEditForm(schedulerControl1, e.Appointment, e.OpenRecurrenceForm, DevExpress.XtraScheduler.RecurrenceType.Daily); myForm.ShowDialog(); e.Handled = true; }Run the application to see the result.
Converters
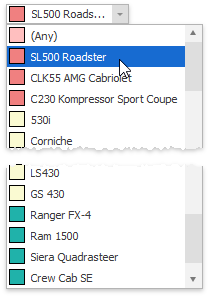
In some instances a data source does not contain a field that matches the required appointment\resource property. For example, the sample database stores three categories of cars - sports, truck, and saloon. You cannot map this “Category” field to the resource’s “Color” property so that all resources that belong to the same category have the same color. This is not possible because the data source field stores strings, and the resource property accepts colors (in various formats, ResourceDataStorage.ColorSaving). Use Mapping Converters to modify data source values.
Declare a custom converter class that implements the ISchedulerMappingConverter interface, implement the conversion logic, create a new converter instance and assign it to the required <Mapping_Property_Name>Converter property. The following code converts category names to colors and implements the scenario described above: trucks are LightSeaGreen, sport cars are LightCoral and saloons are LightGoldenrodYellow.
schedulerControl2.DataStorage.Resources.Mappings.ColorConverter = new ColorMappingConverter();
schedulerControl2.DataStorage.Resources.ColorSaving = ColorSavingType.Color;
schedulerControl2.DataStorage.Resources.Mappings.ColorConversionBehavior = MappingConversionBehavior.InPlaceOfMapping;
schedulerControl2.DataStorage.Resources.Mappings.Color = "Category";

class ColorMappingConverter : ISchedulerMappingConverter {
    object ISchedulerMappingConverter.Convert(object obj, Type targetType, object parameter) {
        string category = obj as string;
        Color resColor = Color.White;
        switch (category) {
            case ("SALOON"):
                resColor = Color.LightGoldenrodYellow;
                break;
            case ("SPORTS"):
                resColor = Color.LightCoral;
                break;
            case ("TRUCK"):
                resColor = Color.LightSeaGreen;
                break;
        }
        return resColor;
    }

    object ISchedulerMappingConverter.ConvertBack(object obj, Type targetType, object parameter) {
        string resColorName = obj as string;
        string category = "NO CATEGORY";
        switch (resColorName) {
            case ("LightGoldenrodYellow"):
                category = "SALOON";
                break;
            case ("LightCoral"):
                category = "SPORTS";
                break;
            case ("LightSeaGreen"):
                category = "TRUCK";
                break;
        }
        return category;
    }
}