The NotificationService allows you to display popup notifications in your applications. You can use the native Windows 8/10 look & feel or create a custom template.
Create Windows 8/10 Native Notification
To display a Windows 8/10 native notification, specify the following NotificationService properties:
Create the ApplicationActivator instance and connect it to the service.
Specify the ApplicationId.
Set the UseWin8NotificationsIfAvailable to true.
Set the CreateApplicationShortcut property to true or create an application shortcut based on the custom logic:
DevExpress.Data.ShellHelper.TryCreateShortcut([application id], [application name], [application icon], [application activator]);
DevExpress.Data.ShellHelper.TryCreateShortcut([application id], [application name], [application icon], [application activator])
Place the NotificationService into the Interaction.Behaviors collection and define your View Model’s NotificationService as a POCO object.
<UserControl x:Class="DXSampleNotificationSevice.View.MainView"
    ...
    xmlns:dxmvvm="http://schemas.devexpress.com/winfx/2008/xaml/mvvm"
    xmlns:ViewModel="clr-namespace:DXSampleNotificationSevice.ViewModel"
    DataContext="{dxmvvm:ViewModelSource Type={x:Type ViewModel:MainViewModel}}">
    ...
    <dxmvvm:Interaction.Behaviors>
        <dxmvvm:NotificationService x:Name="notificationService"
            UseWin8NotificationsIfAvailable="True"
            CreateApplicationShortcut="True"
            ApplicationActivator="{x:Type local:MyNotificationActivator}">
            <dxmvvm:NotificationService.ApplicationId>
                <Binding Source="{x:Static local:MainWindow.ApplicationID}" />
            </dxmvvm:NotificationService.ApplicationId>
        </dxmvvm:NotificationService>
    </dxmvvm:Interaction.Behaviors>
    ...
</UserControl>
public partial class MainWindow : Window {
    public MainWindow() {
        InitializeComponent();
    }
    public static string ApplicationID {
        get { return "FunWithNotifications_19_1"; }
    }
}

[Guid("E343F8F2-CA68-4BF4-BB54-EEA4B3AC4A31"), ComVisible(true)]
public class MyNotificationActivator : ToastNotificationActivator {
    public override void OnActivate(string arguments, Dictionary<string, string> data) {
        MessageBox.Show("Activate it!");
    }
}
[POCOViewModel]
public class MainViewModel {
[ServiceProperty(Key = "NotificationService")]
protected virtual INotificationService AppNotificationService { get { return null; } }
...
public void ShowNotification() {
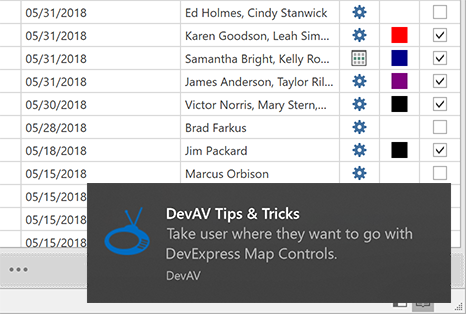
INotification notification = AppNotificationService.CreatePredefinedNotification("DevAV Tips & Tricks",
"Take user where they want to go with", "DevExpress Map Controls.",
new BitmapImage(new Uri("pack://application:,,,/NotificationsSampleApp;component/images/ImageName.png", UriKind.Absolute)));
notification.ShowAsync();
}
...
}
<POCOViewModel> _
Public Class MainViewModel
    <ServiceProperty(Key:="NotificationService")>
    Protected Overridable ReadOnly Property AppNotificationService As INotificationService
        Get
            Return Nothing
        End Get
    End Property

    Public Sub ShowNotification()
        Dim notification As INotification = AppNotificationService.CreatePredefinedNotification("DevAV Tips & Tricks", "Take user where they want to go with", "DevExpress Map Controls.", New BitmapImage(New Uri("pack://application:,,,/NotificationsSampleApp;component/images/ImageName.png", UriKind.Absolute)))
        notification.ShowAsync()
    End Sub
End Class
Create a Custom Notification
The NotificationService uses its own notification mechanism to create a custom notification.
Use the NotificationService.CustomNotificationTemplate property to define a custom notification layout.
<UserControl x:Class="DXSampleNotificationSevice.View.MainView"
    ...
    xmlns:dxmvvm="http://schemas.devexpress.com/winfx/2008/xaml/mvvm"
    xmlns:ViewModel="clr-namespace:DXSampleNotificationSevice.ViewModel"
    DataContext="{dxmvvm:ViewModelSource Type={x:Type ViewModel:MainViewModel}}">
    <UserControl.Resources>
        <DataTemplate x:Key="CustomNotificationTemplate">
            <Border Background="DarkBlue" BorderThickness="1" BorderBrush="Black">
                <StackPanel Orientation="Vertical" HorizontalAlignment="Stretch" VerticalAlignment="Stretch">
                    <TextBlock HorizontalAlignment="Left" Text="{Binding Caption}" Foreground="White" FontSize="20" FontWeight="Bold" Margin="5" FontFamily="SegoeUI"/>
                    <TextBlock HorizontalAlignment="Center" Text="{Binding Content}" Foreground="LightGray" FontSize="16" Margin="3" FontFamily="SegoeUI"/>
                    <TextBlock HorizontalAlignment="Right" Text="{Binding Time}" Foreground="Gray" FontSize="14" Margin="3" FontFamily="SegoeUI"/>
                </StackPanel>
            </Border>
        </DataTemplate>
    </UserControl.Resources>
    <dxmvvm:Interaction.Behaviors>
        <dxmvvm:NotificationService x:Name="ServiceWithCustomNotifications" CustomNotificationTemplate="{StaticResource CustomNotificationTemplate}"/>
    </dxmvvm:Interaction.Behaviors>
    ...
</UserControl>
To create a custom notification, use the NotificationService.CreateCustomNotification method. This method requires a notification’s View Model as a parameter.
[POCOViewModel]
public class MainViewModel {
[ServiceProperty(Key = "ServiceWithCustomNotifications")]
protected virtual INotificationService CustomNotificationService { get { return null; } }
...
public void ShowCustomNotification() {
CustomNotificationViewModel vm = ViewModelSource.Create(() => new CustomNotificationViewModel());
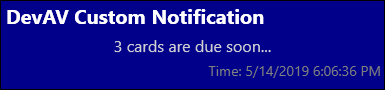
vm.Caption = "DevAV Custom Notification";
vm.Content= "3 cards are due soon...";
vm.Time = String.Format("Time: {0}", DateTime.Now);
INotification notification = CustomNotificationService.CreateCustomNotification(vm);
notification.ShowAsync();
}
...
}
<POCOViewModel> _
Public Class MainViewModel
    <ServiceProperty(Key := "ServiceWithCustomNotifications")> _
    Protected Overridable ReadOnly Property CustomNotificationService() As INotificationService
        Get
            Return Nothing
        End Get
    End Property
    ...
    Public Sub ShowCustomNotification()
        Dim vm As CustomNotificationViewModel = ViewModelSource.Create(Function() New CustomNotificationViewModel())
        vm.Caption = "Custom Notification"
        vm.Content = "3 cards are due soon..."
        vm.Time = String.Format("Time: {0}", Date.Now)
        Dim notification As INotification = CustomNotificationService.CreateCustomNotification(vm)
        notification.ShowAsync()
    End Sub
    ...
End Class
Use the INotification.ShowAsync method to display the created notification. This method returns a NotificationResult enumeration value depending on how the notification is displayed and which notification element an end user clicks. The ShowAsync method returns the following values depending on the notification result:
- Activated, if a user clicks the notification.
- UserCanceled, if a user clicks the notification’s close button.
- TimedOut, if a user does not click the notification during the time specified in the NotificationService.CustomNotificationDuration or NotificationService.PredefinedNotificationDuration property.
- ApplicationHidden, if you use the INotification.Hide method when the notification is displayed.
- Dropped, if the system’s notification queue is full and the notification cannot be displayed.
The code snippet below illustrates how to process the ShowAsync method’s result.
public void ShowCustomNotification() {
    CustomNotificationViewModel vm = ViewModelSource.Create(() => new CustomNotificationViewModel());
    vm.Caption = "Custom Notification";
    vm.Content= "3 cards are due soon...";
    vm.Time = String.Format("Time: {0}", DateTime.Now);
    INotification notification = CustomNotificationService.CreateCustomNotification(vm);
    notification.ShowAsync().ContinueWith(result => OnContinueWith(result));
}
private void OnContinueWith(Task<NotificationResult> res) {
    ...
}
Public Sub ShowCustomNotification()
    Dim vm As CustomNotificationViewModel = ViewModelSource.Create(Function() New CustomNotificationViewModel())
    vm.Caption = "Custom Notification"
    vm.Content = "3 cards are due soon..."
    vm.Time = [String].Format("Time: {0}", DateTime.Now)
    Dim notification As INotification = CustomNotificationService.CreateCustomNotification(vm)
    notification.ShowAsync().ContinueWith(Function(result) OnContinueWith(result))
End Sub
Private Sub OnContinueWith(res As Task(Of NotificationResult))
    ...
End Sub
NotificationService Sample Project
View Example
Imports DevExpress.Mvvm.DataAnnotations

Namespace DXSampleNotificationSevice.ViewModel
    <POCOViewModel> _
    Public Class CustomNotificationViewModel
        Public Overridable Property Caption() As String
        Public Overridable Property Content() As String
    End Class
End Namespace
Imports System.Windows

Namespace DXSampleNotificationSevice
    Partial Public Class App
        Inherits Application

        Private Sub OnAppStartup_UpdateThemeName(ByVal sender As Object, ByVal e As StartupEventArgs)
            DevExpress.Xpf.Core.ApplicationThemeHelper.UpdateApplicationThemeName()
            DevExpress.Data.ShellHelper.TryCreateShortcut("sample_notification_app", "DXSampleNotificationSevice")
        End Sub
    End Class
End Namespace
<UserControl x:Class="DXSampleNotificationSevice.View.MainView"
    xmlns="http://schemas.microsoft.com/winfx/2006/xaml/presentation"
    xmlns:x="http://schemas.microsoft.com/winfx/2006/xaml"
    xmlns:mc="http://schemas.openxmlformats.org/markup-compatibility/2006"
    xmlns:d="http://schemas.microsoft.com/expression/blend/2008"
    xmlns:dxmvvm="http://schemas.devexpress.com/winfx/2008/xaml/mvvm"
    xmlns:ViewModel="clr-namespace:DXSampleNotificationSevice.ViewModel"
    mc:Ignorable="d" d:DesignHeight="300" d:DesignWidth="300"
    DataContext="{dxmvvm:ViewModelSource Type={x:Type ViewModel:MainViewModel}}">

    <UserControl.Resources>
        <DataTemplate x:Key="CustomNotificationTemplate">
            <Border Background="White" BorderThickness="1" BorderBrush="Black">
                <StackPanel Orientation="Vertical" HorizontalAlignment="Stretch" VerticalAlignment="Stretch">
                    <TextBlock HorizontalAlignment="Left" Text="{Binding Caption}" Foreground="Blue" FontSize="20" FontWeight="Bold" Margin="5"/>
                    <TextBlock HorizontalAlignment="Center" Text="{Binding Content}" Foreground="Black" FontSize="16" Margin="3"/>
                </StackPanel>
            </Border>
        </DataTemplate>
    </UserControl.Resources>
    <dxmvvm:Interaction.Behaviors>
        <dxmvvm:NotificationService x:Name="ServiceWithDefaultNotifications" ApplicationId="sample_notification_app" PredefinedNotificationTemplate="ShortHeaderAndTwoTextFields"/>
        <dxmvvm:NotificationService x:Name="ServiceWithCustomNotifications" CustomNotificationTemplate="{StaticResource CustomNotificationTemplate}" CustomNotificationPosition="BottomRight" />
    </dxmvvm:Interaction.Behaviors>
    <Grid>
        <StackPanel VerticalAlignment="Center" HorizontalAlignment="Center">
            <Button Content="Default notification" Command="{Binding ShowDefaultNotificationCommand}" VerticalAlignment="Center" HorizontalAlignment="Center" Margin="2"/>
            <Button Content="Custom notification" Command="{Binding ShowCustomNotificationCommand}" VerticalAlignment="Center" HorizontalAlignment="Center" Margin="2"/>
        </StackPanel>
    </Grid>
</UserControl>
Imports System
Imports System.Collections.Generic
Imports System.Linq
Imports System.Text
Imports System.Windows
Imports System.Windows.Controls
Imports System.Windows.Data
Imports System.Windows.Documents
Imports System.Windows.Input
Imports System.Windows.Media
Imports System.Windows.Media.Imaging
Imports System.Windows.Navigation
Imports System.Windows.Shapes

Namespace DXSampleNotificationSevice.View
    ''' <summary>
    ''' Interaction logic for MainView.xaml
    ''' </summary>
    Partial Public Class MainView
        Inherits UserControl

        Public Sub New()
            InitializeComponent()
        End Sub
    End Class
End Namespace
Imports System
Imports DevExpress.Mvvm
Imports DevExpress.Mvvm.DataAnnotations
Imports DevExpress.Mvvm.POCO

Namespace DXSampleNotificationSevice.ViewModel
    <POCOViewModel> _
    Public Class MainViewModel
        <ServiceProperty(Key := "ServiceWithDefaultNotifications")> _
        Protected Overridable ReadOnly Property DefaultNotificationService() As INotificationService
            Get
                Return Nothing
            End Get
        End Property
        <ServiceProperty(Key := "ServiceWithCustomNotifications")> _
        Protected Overridable ReadOnly Property CustomNotificationService() As INotificationService
            Get
                Return Nothing
            End Get
        End Property

        Public Sub ShowDefaultNotification()
            Dim notification As INotification = DefaultNotificationService.CreatePredefinedNotification("Predefined Notification", "First line", String.Format("Second line. Time: {0}", Date.Now), Nothing)
            notification.ShowAsync()
        End Sub

        Public Sub ShowCustomNotification()
            Dim vm As CustomNotificationViewModel = ViewModelSource.Create(Function() New CustomNotificationViewModel())
            vm.Caption = "Custom Notification"
            vm.Content = String.Format("Time: {0}", Date.Now)
            Dim notification As INotification = CustomNotificationService.CreateCustomNotification(vm)
            notification.ShowAsync()
        End Sub
    End Class
End Namespace
using DevExpress.Mvvm.DataAnnotations;

namespace DXSampleNotificationSevice.ViewModel {
    [POCOViewModel]
    public class CustomNotificationViewModel {
        public virtual string Caption { get; set; }
        public virtual string Content { get; set; }
    }
}
using System;
using DevExpress.Mvvm;
using DevExpress.Mvvm.DataAnnotations;
using DevExpress.Mvvm.POCO;

namespace DXSampleNotificationSevice.ViewModel {
    [POCOViewModel]
    public class MainViewModel {
        [ServiceProperty(Key = "ServiceWithDefaultNotifications")]
        protected virtual INotificationService DefaultNotificationService { get { return null; } }
        [ServiceProperty(Key = "ServiceWithCustomNotifications")]
        protected virtual INotificationService CustomNotificationService { get { return null; } }

        public void ShowDefaultNotification() {
            INotification notification = DefaultNotificationService.CreatePredefinedNotification("Predefined Notification", "First line", String.Format("Second line. Time: {0}", DateTime.Now), null);
            notification.ShowAsync();
        }

        public void ShowCustomNotification() {
            CustomNotificationViewModel vm = ViewModelSource.Create(() => new CustomNotificationViewModel());
            vm.Caption = "Custom Notification";
            vm.Content = String.Format("Time: {0}", DateTime.Now);
            INotification notification = CustomNotificationService.CreateCustomNotification(vm);
            notification.ShowAsync();
        }
    }
}
using System.Windows;

namespace DXSampleNotificationSevice {
    public partial class App : Application {
        private void OnAppStartup_UpdateThemeName(object sender, StartupEventArgs e) {
            DevExpress.Xpf.Core.ApplicationThemeHelper.UpdateApplicationThemeName();
            DevExpress.Data.ShellHelper.TryCreateShortcut("sample_notification_app", "DXSampleNotificationSevice");
        }
    }
}
using System;
using System.Collections.Generic;
using System.Linq;
using System.Text;
using System.Windows;
using System.Windows.Controls;
using System.Windows.Data;
using System.Windows.Documents;
using System.Windows.Input;
using System.Windows.Media;
using System.Windows.Media.Imaging;
using System.Windows.Navigation;
using System.Windows.Shapes;

namespace DXSampleNotificationSevice.View {
    /// <summary>
    /// Interaction logic for MainView.xaml
    /// </summary>
    public partial class MainView : UserControl {
        public MainView() {
            InitializeComponent();
        }
    }
}
How to: Use NotificationService to Create Interactive Notifications
View Example
NotificationService allows you to create and display feedback notifications introduced in Windows 10. Feedback notifications can be used to get a quick answer from a user. If the application has already been closed, the user can reopen it on the notification click.
When multiple native Windows notifications are displayed simultaneously, the optional Id parameter of the CreatePredefinedNotification method allows the service to identify a specific notification that the user interacts with. NotificationActivator passes the Id value to the arguments parameter of the OnActivate method.