Custom Request Headers
- 6 minutes to read
This topic describes how to pass custom request headers from the client to the server. It includes limitations, a general overview, and task-based examples.
Limitations
To use the approach described in this topic in applications with the ASP.NET Web Forms Dashboard Control, set the control’s UseDashboardConfigurator property to
true. For more information, refer to the following topic: Server-Side API Overview.In the case of the Ajax remote service, the Web Dashboard Control uses
form.submitfor export operations. You cannot add custom headers forform.submit- use the Fetch remote service to add custom headers for export operations instead. For more information, refer to the following breaking change document: Web Dashboard — Export utilizes Fetch instead of jQuery Ajax.
Overview
To pass a value from the client to the server, use the FetchRemoteService.headers or AjaxRemoteService.headers property to add a record (a key/value object) to request headers:
onBeforeRender(e: DashboardControlArgs) {
  this.dashboardControl = e.component;
  this.dashboardControl.option('fetchRemoteService.headers', {
    'Authorization': 'AuthToken123'
  });
}
You can also use the FetchRemoteService.beforeSend or AjaxRemoteService.beforeSend callback to add a custom request header or modify predefined headers of the dashboard control.
The following snippets add a custom Authorization header to the request headers depending on the framework:
- Angular
<dx-dashboard-control endpoint='http://localhost:5000/api/dashboard'> <dxo-fetch-remote-service [headers] = "headers"> </dxo-fetch-remote-service> </dx-dashboard-control>For more information on property binding in Angular applications, refer to the following topic: Property Binding in Angular.
- React
import React from 'react';
import './App.css';
import DashboardControl, { FetchRemoteService } from 'devexpress-dashboard-react';

const headerAuth = { "Authorization": "AuthToken123" };

function App() {
return (
    <div style={{ position : 'absolute', top : '0px', left: '0px', right : '0px', bottom: '0px' }}>
    <DashboardControl style={{ height: '100%' }}
        endpoint="http://localhost:5000/api/dashboard">
        <FetchRemoteService
            headers = { headerAuth }/>
    </DashboardControl>
</div>
);
}

export default App;
For more information on how to change control properties in React applications, refer to the following topic: Change Control Properties.
- Vue
<template>
    <div>
        <DxDashboardControl
            style="height:900px; display: 'block'; width: '100%';"
            endpoint="http://localhost:5000/api/dashboard">
            <DxFetchRemoteService
                :headers="{ 'Authorization': 'AuthToken123' }">
            </DxFetchRemoteService>
        </DxDashboardControl>
    </div>
</template>

<script>
import { DxDashboardControl, DxFetchRemoteService } from 'devexpress-dashboard-vue/dashboard-control';

export default {
    components: {
        DxDashboardControl,
        DxFetchRemoteService
    }
}
</script>
For more information on property binding in Vue applications, refer to the following topic: Property Binding in Vue.
Examples
How to Implement Authentication
The following example implements authentication based on JWT for ASP.NET Core Dashboard Control. The FetchRemoteService.headers property is used to pass authorization token from the client to the server:
const tokenKey = "accessToken";
function onBeforeRender(sender) {
    var dashboardControl = sender;
    const token = sessionStorage.getItem(tokenKey);
    dashboardControl.remoteService.headers = { "Authorization": "Bearer " + token };
}
How to Use Parameters to Update a Specific Dashboard Item Without Refreshing the Entire Dashboard
This example uses dashboard parameters to update data in a specific dashboard item without refreshing the entire dashboard. The approach allows you to avoid performance delays.
In this example, a user can select a row in the Products grid item. This product selection defines the filter criteria for the Sales per Product chart:
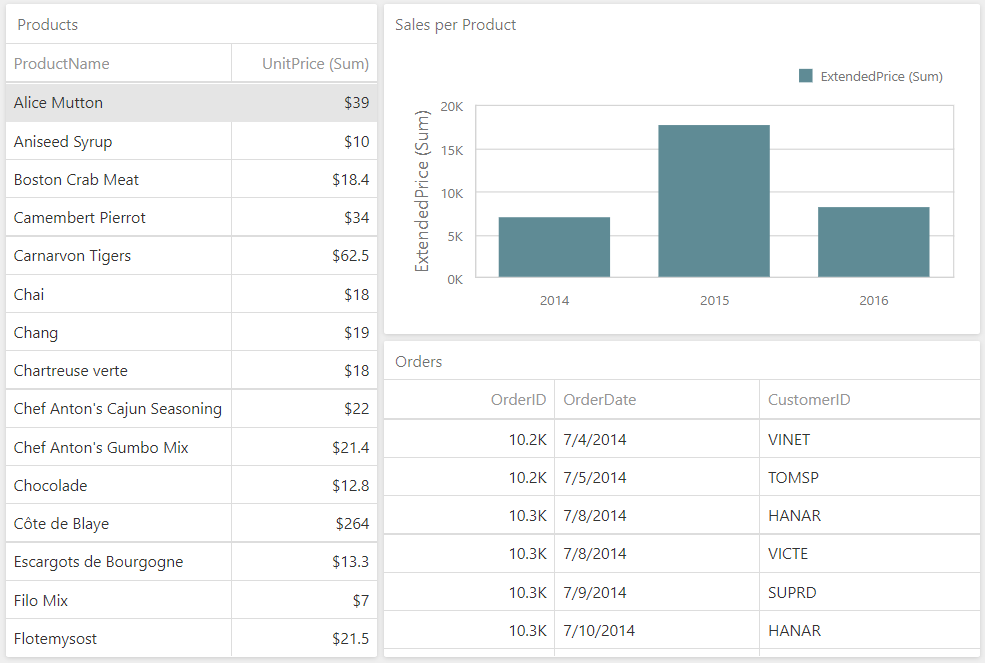
The headers property stores a ProductId value and sends it to the server:
function onItemMasterFilterStateChanged(dashboardControl, e) {
    if (e.itemName === 'gridDashboardItem1') {
        var viewerApi = dashboardControl.findExtension('viewerApi');
        var filterValues = viewerApi.getCurrentFilterValues(e.itemName);
        if (filterValues) {
            var slice = viewerApi.getItemData(e.itemName).getSlice(filterValues[0].getAxisPoint());
            var productIdMeasure = slice.getMeasures().filter(m => m.dataMember === 'ProductID')[0];
            var productId = slice.getMeasureValue(productIdMeasure.id).getValue();
            // Send a ProductId value to the server using Request Headers
            dashboardControl.remoteService.headers = { 'ProductId': productId };
            // Refresh the Chart Dashboard Item
            dashboardControl.refresh(['chartDashboardItem1']);
        }
    }
}
On the server side, pass the obtained ProductId value to the dashboard parameter collection in the CustomParameters event handler. The change of the ProductIdParameter value results in requesting filtered data from the server:
// ...
configurator.SetConnectionStringsProvider(new DashboardConnectionStringsProvider(configuration));
// ...
var contextAccessor = serviceProvider.GetService<IHttpContextAccessor>();

configurator.CustomParameters += (s, e) => {
    var value = Convert.ToInt32(contextAccessor?.HttpContext?.Request.Headers["ProductId"].FirstOrDefault());
    e.Parameters.Add(new DashboardParameter("ProductIdParameter", typeof(int), value));
};
How to Limit Data Displayed in Designer Mode
The following example filters data when the dashboard control operates in Designer mode. In this mode, the control displays only several records from the data source to improve performance.
On the client, the onOptionChanged event is handled to catch working mode changes. Pass the working mode to the server through the FetchRemoteService.headers property. The DashboardControl.reloadData method call initiates data reloading:
function UpdateDashboardData() {
    dashboardControl.remoteService.headers = { "DashboardWorkingMode": dashboardControl.option("workingMode") };
    dashboardControl.reloadData();
}
The DashboardWorkingMode value from the request header is used to filter data when the dashboard control is in Designer mode:
// ...
// Applies dynamic filter in the Designer working mode for the DashboardObjectDataSource.
configurator.DataLoading += (s, e) => {
    var contextAccessor = serviceProvider.GetService<IHttpContextAccessor>();
    var workingMode = contextAccessor.HttpContext.Request.Headers["DashboardWorkingMode"];

    if (e.DashboardId == "Object" && e.DataId == "odsInvoices") {
        var data = Invoices.CreateData();

        if (workingMode == "Designer")
            e.Data = data.Where(item => item.Country == "USA");
        else
            e.Data = data;
    }
};
How to Change the Database Connection from the Web Dashboard UI
The following example switches between database connections from the Web Dashboard UI using two custom buttons.
When a user clicks a button, use the headers property to pass a custom header with the corresponding database connection ID (nwind/nwind2). After that, call the DashboardControl.reloadData method to reload data:
e.items.unshift({
    widget: 'dxButton',
    options: {
        text: 'DB1',
        type: 'default'
    },
    onClick: () => {
        dashboardControl.option('fetchRemoteService.headers', { "database": "nwind" });
        dashboardControl.reloadData();
    }
}, {
    widget: 'dxButton',
    options: {
        text: 'DB2',
        type: 'default'
    },
    onClick: () => {
        dashboardControl.option('fetchRemoteService.headers', { "database": "nwind2" });
        dashboardControl.reloadData();
    }
});
On the server, use an IHttpContextAccessor object to access the passed parameter value (database connection ID) in the ConfigureDataConnection event handler:
// ...
configurator.ConfigureDataConnection += (s, e) => {
    if (e.ConnectionName == "nwind") {
        IHttpContextAccessor httpContextAccessor = serviceProvider.GetService<IHttpContextAccessor>();
        IHeaderDictionary headers = httpContextAccessor.HttpContext.Request.Headers;
        string dbKey = headers.ContainsKey("database") ? headers["database"] : "nwind";
        string connectionString = dbKey switch {
            "nwind" => "XpoProvider=InMemoryDataStore;Read Only=true;Data Source=Data\\nwind.xml",
            "nwind2" => "XpoProvider=InMemoryDataStore;Read Only=true;Data Source=Data\\nwind2.xml",
            _ => throw new ArgumentOutOfRangeException("Incorrect database name")
        };
        e.ConnectionParameters = new CustomStringConnectionParameters(connectionString);
    }
};