Add RichEdit to a .NET Core Application
- 6 minutes to read
Configure a Visual Studio Project
Install Required Packages
Perform the following steps to install the Rich Text Editor control’s NuGet packages:
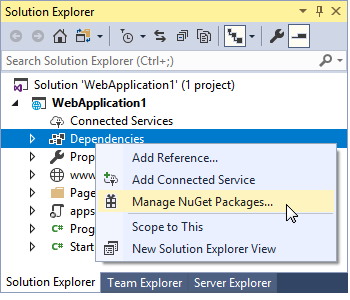
Right-click the Dependencies node in the Solution Explorer and select Manage NuGet Packages in the invoked context menu.
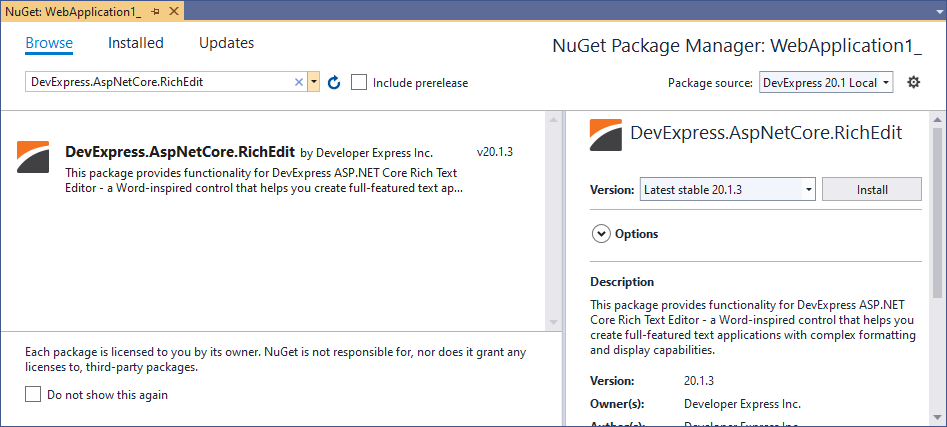
Select DevExpress 20.2 Local in the Package source drop-down list and go to the Browse page. Locate the DevExpress.AspNetCore.RichEdit package and install it.
Configure the Project
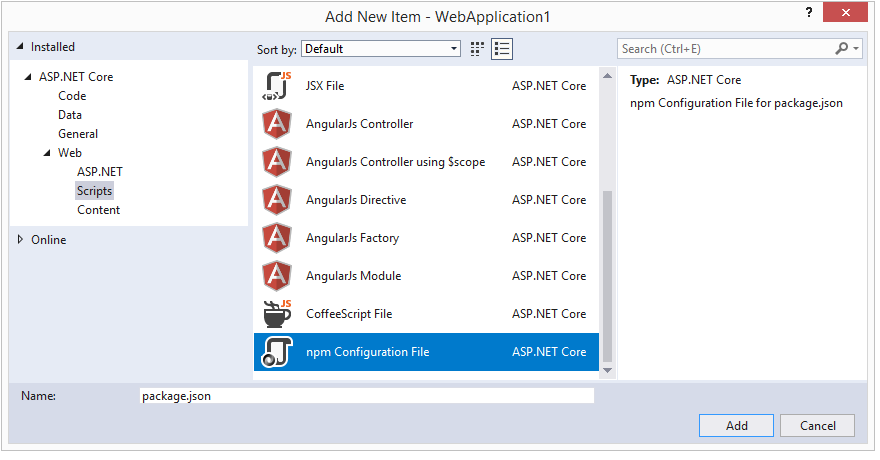
Right-click the application’s name in the Solution Explorer and select Add | New Item. In the invoked Add New Item dialog, select the Installed | Visual C# | ASP.NET Core | Web category and the npm Configuration File item template. Click Add.
This adds the package.json file to the project. Open this file and add the following dependencies:
{
  "version": "1.0.0",
  "name": "asp.net",
  "private": true,
  "dependencies": {
    "devextreme": "20.2.13",
    "devexpress-richedit": "20.2.13"
  }
}
Right-click the package.json file and select Restore Packages. This adds the node_modules directory to the application folder.
Add the following code to the Startup.cs file to configure the application, so that it can serve the node_modules directory’s files:
using Microsoft.Extensions.FileProviders;
using System.IO;
//...

public class Startup {
//...
    public void Configure(IApplicationBuilder app, IHostingEnvironment env) {
        // ...
        app.UseStaticFiles();
        // ...
        app.UseStaticFiles(new StaticFileOptions {
            FileProvider = new PhysicalFileProvider(Path.Combine(env.ContentRootPath, "node_modules")),
            RequestPath = "/node_modules"
        });
    }
}
Note that the code above makes all the files in the node_modules directory accessible from the client. To restrict access, bundle and minify assets (for example, using Gulp).
Configure Razor Pages web apps
If you save a Rich Text Editor’s document server side using the ExportUrl(String) property in a Razor Pages web app, it is necessary to add the following adjustments.
Disable the AntiForgeryToken option (enabled for Razor Pages web apps by default).
- To disable the AntiForgeryToken for an application, add the following code to the ConfigureServices method in Startup.cs.
services.AddMvc().AddRazorPagesOptions(o => { o.Conventions.ConfigureFilter(new IgnoreAntiforgeryTokenAttribute()); });- To disable the AntiForgeryToken for a page, add the following code to a page model.
[IgnoreAntiforgeryToken]
public class IndexModel : PageModel
{
    public void OnPost()
    {
    }
}
Declare a POST action handler.
public void  OnPostExport(string base64, string fileName, DevExpress.AspNetCore.RichEdit.DocumentFormat format) {
    byte[] fileContents = System.Convert.FromBase64String(base64);
}
Use this handler in the ExportUrl(String) method as follows.
.ExportUrl("RichEditPage?handler=export")
Register Static Resources
In the _ViewImports.cshtml file, import the DevExpress.AspNetCore namespace all the views in the project should use.
@using DevExpress.AspNetCoreCreate or open an existing view (for example, the Index.cshtml file), and register the resources in a header section as shown below.
<link href="~/node_modules/devextreme/dist/css/dx.common.css" rel="stylesheet" />
<link href="~/node_modules/devextreme/dist/css/dx.light.css" rel="stylesheet" />
<link href="~/node_modules/devexpress-richedit/dist/dx.richedit.css" rel="stylesheet" />

<script src="~/node_modules/jszip/dist/jszip.min.js"></script>
<script src="~/node_modules/devextreme/dist/js/dx.all.js"></script>

@* If you localize the control, you should register localization resources before control script registration.*@
@*<script src="~/node_modules/devexpress-richedit/localization/dx-rich.de.js"></script>*@

@* If you export a document to PDF on the client side (the exportToPdf method) or enable client PDF printing mode,
you should register the pdfkit library before control script registration.*@
@*<script src="~/node_modules/devexpress-richedit/dist/pdfkit.js"></script>*@

<script src="~/node_modules/devexpress-richedit/dist/dx.richedit.js"></script>
Add Control to a Project
You can add a Rich Text Editor to a Razor file (.cshtml) as shown below.
@Html.DevExpress().RichEdit("richEdit")
Use the HTML helper’s fluent API to configure the control:
@(Html.DevExpress().RichEdit("richEdit")
    .Width("100%")
    .Height(800)
    .ExportUrl(Url.Action("Export"))
    .AutoCorrect(a => a
        .CorrectTwoInitialCapitals(true)
        .ReplaceTextAsYouType(true)
        .ReplaceInfoCollectionSettings(s => {
            s.CaseSensitive(true);
            s.ReplaceInfoCollection(c => {
                c.Add().What("(c)").With("©");
                c.Add().What("wnwd").With("well-nourished, well-developed");
            });
        })
    )
    .Bookmarks(b => b
        .Visibility(DevExpress.AspNetCore.RichEdit.Visibility.Visible)
        .Color(System.Drawing.Color.Blue)
    )
    .Ribbon(ribbon => ribbon
        .ActiveTabIndex(0)
    )
    .Open("Documents/Example.docx")
)
Server-Side Ribbon Customization
The Rich Text Editor allows you to customize its built-in Ribbon control on the server and client sides. This topic describes server-side modifications.
View Demo: Ribbon Customization

You can access the ribbon settings with the Ribbon method.
Modify the Tab Collection
Add a Default Tab
The Rich Text Editor provides methods that allow you to populate the ribbon with default tabs. For instance, use the AddHomeTab() method to add the Home tab to ribbon.
Note that the ribbon is initially populated with default tabs. To clear the collection, call the Clear() method.
@(Html.DevExpress().RichEdit("richEdit")
    .Ribbon(ribbon => ribbon
        .Tabs(tabs => {
            tabs.Clear();
            tabs.AddHomeTab()
            //...
Add a Custom Tab
Use the following methods to add a custom tab to the ribbon.
| Method | Description |
|---|---|
| Add() | Adds a new tab to the end of the ribbon tab collection. |
| Add(String) | Adds a new tab with the specified title to the end of the ribbon tab collection. |
| Insert(Int32) | Inserts a new tab to the ribbon tab collection at the specified position. |
@(Html.DevExpress().RichEdit("richEdit")
    .Ribbon(ribbon => ribbon
        .Tabs(tabs => {
            tabs.Clear();
            tabs.Add("History")
                .Items(items => {
                    items.AddUndoItem();
                    items.AddRedoItem();
                    //...
Remove a Tab
Use the following methods to remove tabs from the ribbon.
| Method | Description |
|---|---|
| Clear() | Removes all tabs from the ribbon tab collection. |
| RemoveAt(Int32) | Removes a tab at the specified position from the ribbon tab collection. |
| RemoveByTitle(String) | Removes a tab with the specified title from the ribbon tab collection. |
@(Html.DevExpress().RichEdit("richEdit")
    .Ribbon(ribbon => ribbon
        .Tabs(tabs => {
            tabs.RemoveByTitle("References");
            //...
Modify the Context Tab Category Collection
Use the ContextTabCategories method to access a collection of context tab categories. You can clear, add and customize the default categories.
@(Html.DevExpress().RichEdit("richEdit")
    .Ribbon(ribbon => ribbon
        .ContextTabCategories(categories => {
            categories.Clear();
            categories.AddHeaderAndFooterContextTabCategory();
            //...
Modify the Item Collection
Add a Default Item
A ribbon item collection provides a set of methods that allow you to add default items to a ribbon. For instance, use the AddUndoItem() and AddRedoItem() methods to add the Undo and Redo items.
@(Html.DevExpress().RichEdit("richEdit")
    .Ribbon(ribbon => ribbon
        .Tabs(tabs => {
            tabs.Clear();
            tabs.Add("History")
                .Items(items => {
                    items.AddUndoItem();
                    items.AddRedoItem();
                    //...
Add a Custom Item
Use the following methods to add custom items to a tab.
| Item Type | Add Methods | Insert Method |
|---|---|---|
| Button | AddButton | InsertButton(Int32) |
| Color Box | AddColorBox | InsertColorBox(Int32) |
| Menu | AddMenu() | InsertMenu(Int32) |
| Number Box | AddNumberBox | InsertNumberBox(Int32) |
| Select Box | AddSelectBox() | InsertSelectBox(Int32) |
| Toggle Button | AddToggleButton | InsertToggleButton(Int32, Boolean) |
@(Html.DevExpress().RichEdit("richEdit")
    .Ribbon(ribbon => ribbon
        .Tabs(tabs => {
            tabs.Clear();
            tabs.Add()
                .Title("Email")
                .Items(items => {
                    items.AddButton()
                        .Text("Send Email")
                        .CommandName("sendEmail")
                        .ShowText(true)
                        .Icon("email");
                });
        })
    )
    .OnCustomCommandExecuted("onCustomCommandExecuted")
    //...
To process a custom item click, handle the CustomCommandExecuted event. The commandName event argument returns the clicked item’s commandName property value and allows you to identify the clicked item.
function onCustomCommandExecuted(s, e) {
    switch (e.commandName) {
        case 'sendEmail':
            var text = s.document.getText();
            var mailto_link = 'mailto:bob@example.com?subject=Test&body=' + encodeURIComponent(text);
            window = window.open(mailto_link, 'emailWindow');
            if(window && window.open && !window.closed)
                window.close();
            break;
    }
}
Remove an Item
Use the following methods to remove items from a tab.
| Method | Description |
|---|---|
| Clear() | Removes all items from the tab item collection. |
| RemoveAt(Int32) | Removes an item at the specified position. |
@(Html.DevExpress().RichEdit("richEdit")
    .Ribbon(ribbon => ribbon
        .Tabs(tabs => {
            tabs.GetByTitle("Home")
                .Items(items => {
                    items.RemoveAt(0);
                    //...
Hide the Ribbon
Set the Visible method to false to hide the ribbon.
@(Html.DevExpress().RichEdit("richEdit")
    .Ribbon(ribbon => ribbon
        .Visible(false)
        //...