Create and Preview a Report
- 4 minutes to read
This lesson explains how to create reports in the integrated reporting system. This system is based on the DevExpress Reporting library.
The instructions below show how to do the following:
- Add the Reports V2 Module to the application.
- Create a report that displays a list of Employee objects with their names and email addresses.
Add Reports V2 Module
Add the DevExpress.ExpressApp.ReportsV2 NuGet package to the MySolution.Module project. See the following topic for more information on how to install DevExpress NuGet packages: Choose Between Offline and Online DevExpress NuGet Feeds.
Add the DevExpress.ExpressApp.ReportsV2.Blazor NuGet package to the MySolution.Blazor.Server project and the DevExpress.ExpressApp.ReportsV2.Win NuGet package to the MySolution.Win project.
Go to the MySolution.Module\MySolutionDbContext file and add a DbSet of
ReportDataV2type:public class MySolutionEFCoreDbContext : DbContext { //... public DbSet<ReportDataV2> ReportData { get; set; } }Add a migration and update the database. See the following section for details: Use a DBMS: Setup Migrations.
In the MySolution.Blazor.Server project, open the Startup.cs file and add the Reports V2 module to the application builder. Do the same in the Startup.cs file in the MySolution.Win folder.
public class Startup { // ... public void ConfigureServices(IServiceCollection services) { // ... services.AddXaf(Configuration, builder => { builder.UseApplication<MySolutionBlazorApplication>(); builder.Modules // ... .AddFileAttachments() .AddReports(options => { options.EnableInplaceReports = true; options.ReportDataType = typeof(DevExpress.Persistent.BaseImpl.EF.ReportDataV2); options.ReportStoreMode = DevExpress.ExpressApp.ReportsV2.ReportStoreModes.XML; }); // ... }); // ... } }If you add the Reports V2 module when you create an XAF application, the Solution Wizard generates the code used to add the Reports V2 module automatically.
Run the application. In the navigation control, expand the Reports group and select the Reports item to invoke the Report List View.
- ASP.NET Core Blazor

- Windows Forms

Create a Report
In ASP.NET Core Blazor or Windows Forms runtime, the steps to create a report are the same. This lesson demonstrates these steps in the ASP.NET Core Blazor application.
In the Report List View, click the New button to invoke the New Report Wizard Parameters pop-up window.
Specify Employee List as the name of the report in the application UI and select Employee in the Data Type drop-down list. Click Create. XAF uses data of this type to generate the report.

Tip
The Data Type drop-down list only shows the entity classes with DefaultClassOptionsAttribute or VisibleInReportsAttribute.
In the Report Wizard, select Table Report and click Next.

Select the FirstName, LastName, and Email data fields and click Next.

XAF displays values of these fields in the report.
Select the Grey report color scheme and specify Employee List as the report’s title. Click Finish.

XAF displays the Runtime Report Designer.

Click the Preview button in the upper right corner to preview the report’s print version.

The current order of the columns in the table header is arbitrary. Let’s change it to the following:
- First Name
- Last Name
Click the Design button in the upper right corner to exit the preview mode. In the menu on the right, switch to the Report Explorer.

Expand the Report | GroupHeader | table | tableRow1 item and rearrange its sub-items as displayed in the animation below. Do the same for the Detail | table2 | tableRow2 | item.
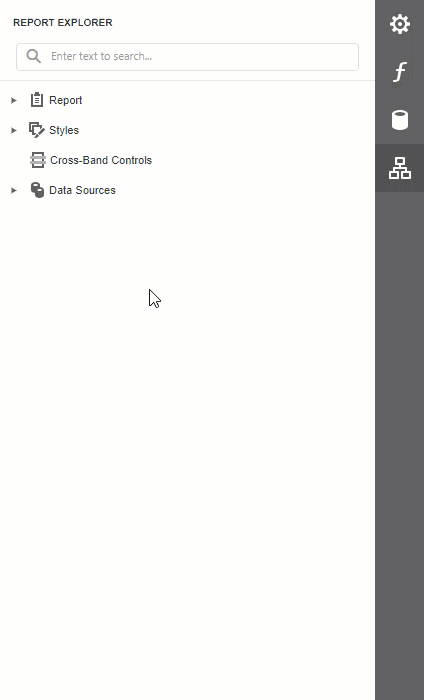
The GroupHeader item contains the table header cells. The Detail item contains cells with report data. You have to adjust both, so that the data matches the column header names.
Adjust the width of the cells.
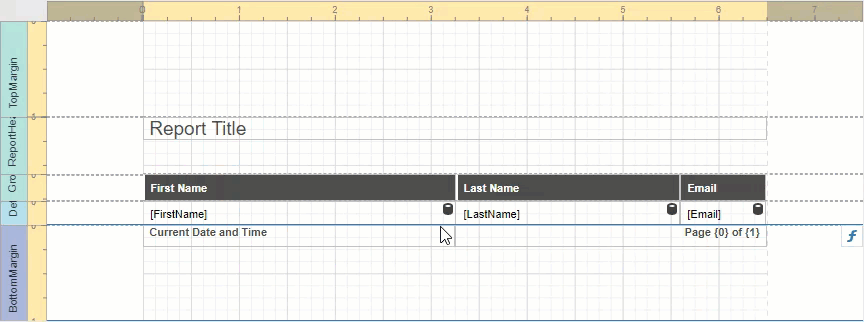
The LastName and Email cells in the table header have no separator between them. Let’s use cell borders to separate the header cells from each other visually.
Select the Email cell. Click the gear icon in the menu on the right to open the cell’s properties. Navigate to the Appearance section and select the left border option.

Specify the same option for the LastName cell and set no borders for the FirstName cell.
Save the report and go back to the Report List View. Click the Employee List item in the grid and see the report.

The created report is also available in the Windows Forms application.

At runtime, you can use the search function, print the report, and export it in different formats such as PDF, XLS, CSV, and so on. Click the gear icon in the menu on the right to access the export settings for the available formats.
Note
- You can create predefined reports at design time. For additional information, see the following article: Create Predefined Static Reports.
- You can sort and filter the report data based on the parameter that the end user defines.