AI Chat Control
- 9 minutes to read
Note
The DevExpress AI Chat Control (AIChatControl) can only be used in WPF applications that target the .NET 8+ framework.
The AI Chat Control allows you to incorporate an interactive, Copilot-inspired chat-based UI within your WPF application. This control leverages BlazorWebView to reuse the DevExpress Blazor AI Chat component (DxAIChat). To use the WPF AI Chat Control you must have one of the following active subscriptions:
Getting Started
To use the AIChatControl:
- Install
DevExpress.AIIntegration.Wpf.Chat. - See the following help topics for information on how to obtain the DevExpress NuGet Feed and install DevExpress NuGet packages:
- Choose Between Offline and Online DevExpress NuGet Feeds
- Install NuGet Packages in Visual Studio, VS Code, and Rider
- Change Project SDK
- Update the project SDK to
Microsoft.NET.Sdk.Razor:<Project Sdk="Microsoft.NET.Sdk.Razor"> - Register AI Client
See the following help topic for information on required NuGet packages and system requirements: Register an AI Client.
The following code snippet registers an Azure OpenAI client at application startup within the AIExtensionsContainerDesktop container:
using Azure.AI.OpenAI;
using DevExpress.AIIntegration;
using DevExpress.Xpf.Core;
using Microsoft.Extensions.AI;
using System;
using System.Windows;

namespace AIAssistantApp {
    public partial class App : Application {
        static App() {
            CompatibilitySettings.UseLightweightThemes = true;
        }

        protected override void OnStartup(StartupEventArgs e) {
            base.OnStartup(e);
            ApplicationThemeHelper.ApplicationThemeName = "Win11Light";

            // For example, ModelId = "gpt-4o-mini"
            IChatClient azureChatClient = new Azure.AI.OpenAI.AzureOpenAIClient(new Uri(AzureOpenAIEndpoint),
                new System.ClientModel.ApiKeyCredential(AzureOpenAIKey)).GetChatClient(ModelId).AsIChatClient();
            AIExtensionsContainerDesktop.Default.RegisterChatClient(azureChatClient);
        }
    }
}
Create AI Chat Control
Note
The AI Chat Control does not support design-time rendering.
The following code snippet creates the AIChatControl with default settings:
<dx:ThemedWindow
    x:Class="DXApplication3.MainWindow"
    xmlns="http://schemas.microsoft.com/winfx/2006/xaml/presentation"
    xmlns:x="http://schemas.microsoft.com/winfx/2006/xaml"
    xmlns:dx="http://schemas.devexpress.com/winfx/2008/xaml/core"
    xmlns:dxaichat="http://schemas.devexpress.com/winfx/2008/xaml/aichat"
    Title="MainWindow" Height="800" Width="1000">
    <Grid>
        <dxaichat:AIChatControl
            x:Name="aiChatControl"
            InputEnabled="True"
            HorizontalAlignment="Stretch"
            VerticalAlignment="Stretch"
            Margin="10">
        </dxaichat:AIChatControl>
    </Grid>
</dx:ThemedWindow>
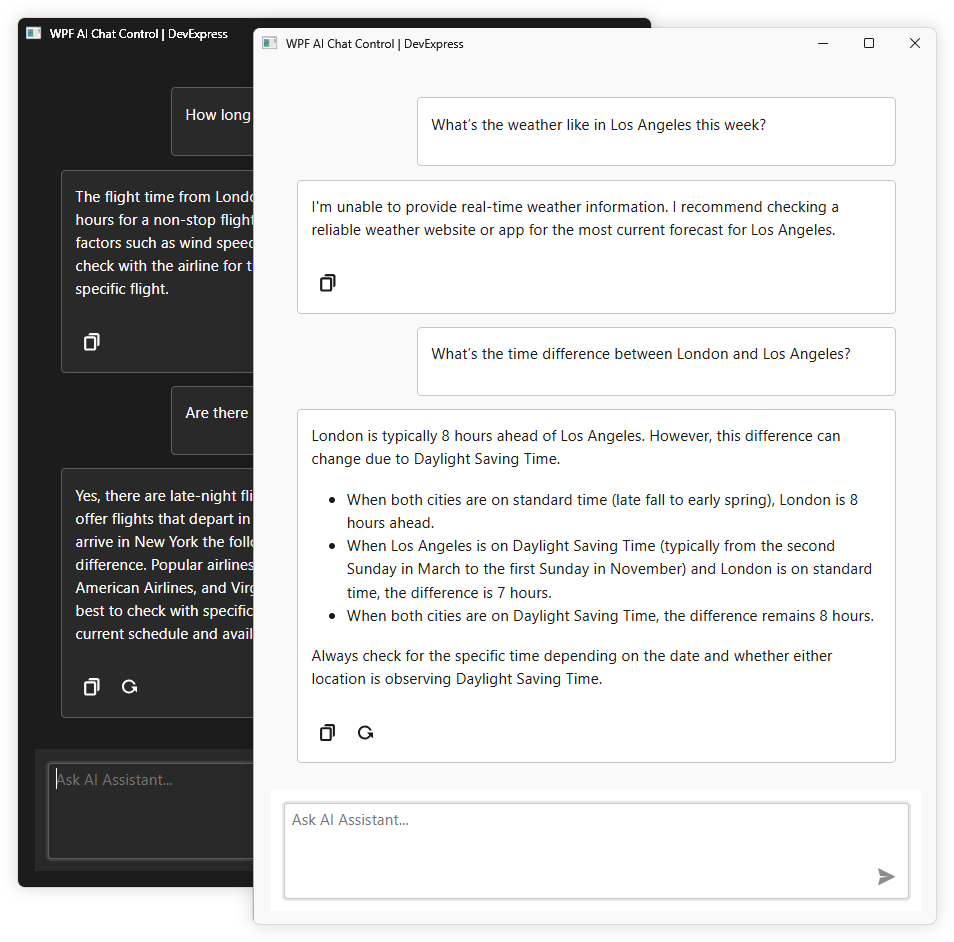
Streaming
The AI Chat Control can display responses from the AI assistant as they are generated in a natural, conversational flow (rather than waiting for the entire message to complete before showing it to the user). Enable the UseStreaming setting to activate this feature:
<dxaichat:AIChatControl
    x:Name="aiChatControl"
    UseStreaming="True"
    InputEnabled="True"
    HorizontalAlignment="Stretch"
    VerticalAlignment="Stretch"
    Margin="10">
</dxaichat:AIChatControl>
Play the following animation to see the result:
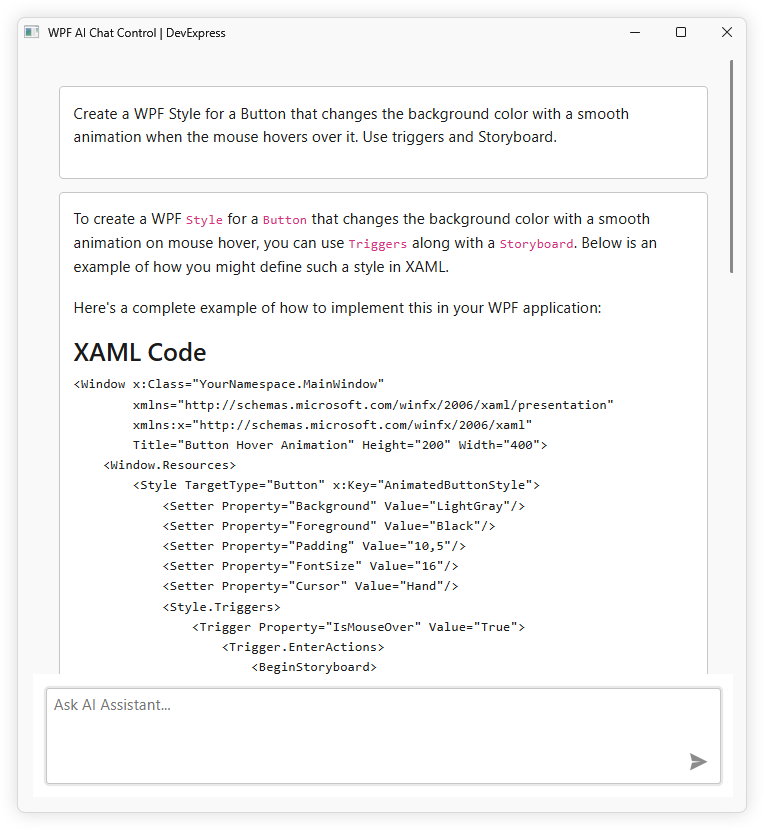
Markdown Message Rendering
To enable Markdown message rendering:
- Set the
ContentFormatproperty toMarkdownto receive responses as Markdown. - Handle the
MarkdownConvertevent to convert markdown text into HTML and make responses more readable, structured, and visually appealing.
The following example enables Markdown message rendering. The example uses the Markdig Markdown processing library to convert Markdown text into HTML.
<dxaichat:AIChatControl
    x:Name="aiChatControl"
    UseStreaming="True"
    ContentFormat="Markdown"
    MarkdownConvert="AiChatControl_MarkdownConvert"
    InputEnabled="True"
    HorizontalAlignment="Stretch"
    VerticalAlignment="Stretch"
    Margin="10">
</dxaichat:AIChatControl>
using DevExpress.Xpf.Core;
using DevExpress.AIIntegration.Blazor.Chat.WebView;
using Microsoft.AspNetCore.Components;
using Markdig;

namespace DXApplication3 {
    /// <summary>
    /// Interaction logic for MainWindow.xaml
    /// </summary>
    public partial class MainWindow : ThemedWindow {
        public MainWindow() {
            InitializeComponent();
        }

        void AiChatControl_MarkdownConvert(object sender, AIChatControlMarkdownConvertEventArgs e) {
            e.HtmlText = (MarkupString)Markdown.ToHtml(e.MarkdownText);
        }
    }
}
The following screenshot shows the result:
File Attachments
Users can now attach files directly to their chat messages. The AI analyzes document content (such as text files, PDFs, images) and delivers more context-aware responses.
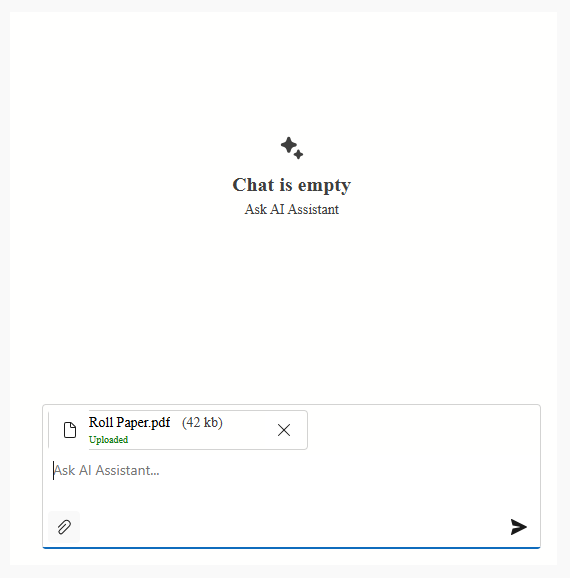
To activate file upload:
- Enable the
FileUploadEnabledproperty to allow users to attach files. - Configure additional settings based on your project requirements (the maximum file size, allowed file types/extensions, the maximum number of files that users can attach to a message).
xmlns:dxaichat="http://schemas.devexpress.com/winfx/2008/xaml/aichat"
xmlns:chat="clr-namespace:DevExpress.AIIntegration.Blazor.Chat;assembly=DevExpress.AIIntegration.Blazor.Chat.v25.1"
xmlns:system="clr-namespace:System;assembly=mscorlib"

<dxaichat:AIChatControl
    x:Name="aiChatControl"
    FileUploadEnabled="True"
    InputEnabled="True"
    UseStreaming="True"
    HorizontalAlignment="Stretch"
    VerticalAlignment="Stretch"
    Margin="10">
    <dxaichat:AIChatControl.FileUploadSettings>
        <chat:DxAIChatFileUploadSettings MaxFileSize="5000000" MaxFileCount="5">
            <chat:DxAIChatFileUploadSettings.AllowedFileExtensions>
                <system:String>.png</system:String>
                <system:String>.pdf</system:String>
                <system:String>.txt</system:String>
            </chat:DxAIChatFileUploadSettings.AllowedFileExtensions>
            <chat:DxAIChatFileUploadSettings.FileTypeFilter>
                <system:String>image/png</system:String>
                <system:String>application/pdf</system:String>
                <system:String>text/plain</system:String>
            </chat:DxAIChatFileUploadSettings.FileTypeFilter>
        </chat:DxAIChatFileUploadSettings>
    </dxaichat:AIChatControl.FileUploadSettings>
</dxaichat:AIChatControl>
Tip
See the following article for more information on MIME types (FileTypeFilter): Common Media Types.
Prompt Suggestions
To help users get started or explore new possibilities, the AI Chat Control can display prompt suggestions.
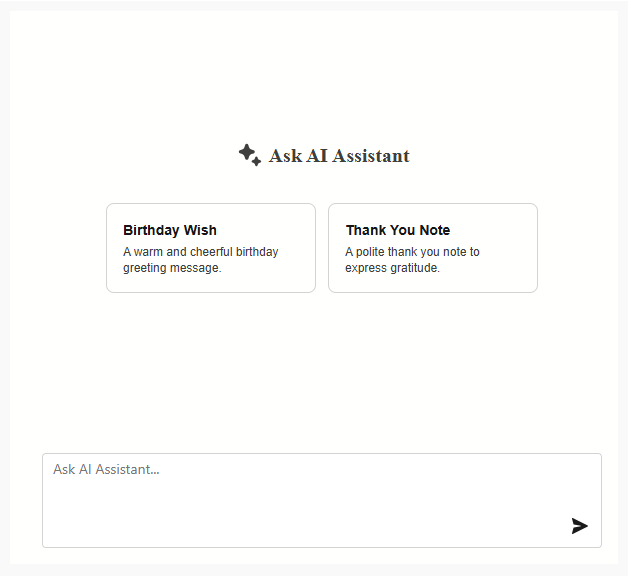
Use the SetPromptSuggestions method to supply intelligent suggestions:
<dxaichat:AIChatControl>
    <dxaichat:AIChatControl.PromptSuggestions>
        <chat:DxAIChatPromptSuggestion
            Title="Birthday Wish"
            Text="A warm and cheerful birthday greeting message."
            PromptMessage="Write a heartfelt birthday message for a close friend." />
        <chat:DxAIChatPromptSuggestion
            Title="Thank You Note"
            Text="A polite thank you note to express gratitude."
            PromptMessage="Compose a short thank you note to a colleague who helped with a project." />
    </dxaichat:AIChatControl.PromptSuggestions>
</dxaichat:AIChatControl>
Handle Chat Messages
To manually process messages sent to an AI service, handle the MessageSent event. For example, you can manually call the AI client or service of choice and return its responses to the chat. The following example adds responses to user questions:
<dxaichat:AIChatControl x:Name="aiChatControl"
                MessageSent="AiChatControl_MessageSent"
                HorizontalAlignment="Stretch"
                VerticalAlignment="Stretch"
                Margin="10">
</dxaichat:AIChatControl>
async void AiChatControl_MessageSent(object sender, AIChatControlMessageSentEventArgs e) {
    await e.SendMessage($"Processed: {e.Content}", ChatRole.Assistant);
}
Save and Load Chat History
Use the following methods to manage chat history:
SaveMessages– Returns anIEnumerable<ChatMessage>collection of messages.LoadMessages– Loads messages from the specifiedIEnumerable<ChatMessage>collection to the AI Chat Control and refreshes the control.
The following example saves/loads chat history when the user clicks the Save/Load button:
public partial class MainWindow : ThemedWindow {
    List<BlazorChatMessage> chatHistory;

    public MainWindow() {
        InitializeComponent();
    }

    void ButtonSave_Click(object sender, EventArgs e) {
        chatHistory = (List<BlazorChatMessage>)aiChatControl.SaveMessages();
    }

    void ButtonLoad_Click(object sender, EventArgs e) {
        if(chatHistory != null)
            aiChatControl.LoadMessages(chatHistory);
    }
}
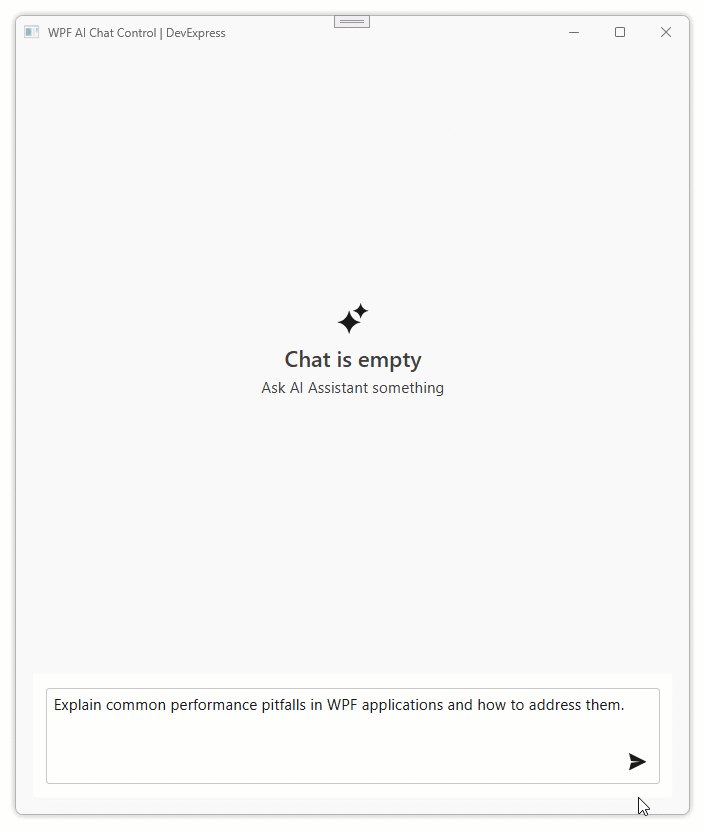
Customize Empty Text and Area
You can modify the message or empty area displayed when a chat has yet to start.
Use one of the following properties:
EmptyStateText- Specifies the empty area message.EmptyStateTemplate- Specifies a custom template (RenderFragment) to customize the entire area.
Note
If both EmptyStateText and EmptyStateTemplate properties are set, the chat control uses the EmptyStateTemplate and ignores the EmptyStateText.
Customize Empty Text
<dxaichat:AIChatControl x:Name="aiChatControl"
                EmptyStateText="AI Assistant is ready to answer your questions."
                HorizontalAlignment="Stretch"
                VerticalAlignment="Stretch"
                Margin="10">
</dxaichat:AIChatControl>
Customize Empty Area
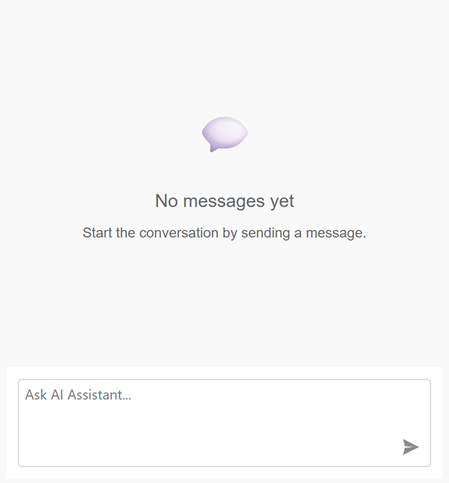
using Microsoft.AspNetCore.Components;

public MainWindow() {
    InitializeComponent();
    aiChatControl.EmptyStateTemplate = MyEmptyStateTemplate;
}

RenderFragment MyEmptyStateTemplate = builder => {
    builder.OpenElement(0, "div");
    builder.AddAttribute(1, "style", "display: flex; flex-direction: column; align-items: center; justify-content: center; height: 100%; color: #666; font-family: sans-serif; text-align: center; padding: 40px;");

    // Icon or decorative emoji (optional)
    builder.OpenElement(2, "div");
    builder.AddAttribute(3, "style", "font-size: 48px; margin-bottom: 16px;");
    builder.AddContent(4, "💬");
    builder.CloseElement();

    // Main message
    builder.OpenElement(5, "div");
    builder.AddAttribute(6, "style", "font-size: 18px; font-weight: 500;");
    builder.AddContent(7, "No messages yet");
    builder.CloseElement();

    // Optional subtext
    builder.OpenElement(8, "div");
    builder.AddAttribute(9, "style", "font-size: 14px; margin-top: 8px;");
    builder.AddContent(10, "Start the conversation by sending a message.");
    builder.CloseElement();

    builder.CloseElement();
};
Create an Assistant That Chats Using Your Own Data
When integrating the AI Chat Control with the OpenAI Assistant API, you can configure it to retain and reference a specific context (for example, a text file or a PDF document). By providing a supplementary document as a context source, the assistant is primed with background information. OpenAI automatically parses the document and searches through it to retrieve relevant content to better respond to user queries.
- Install the
DevExpress.AIIntegration.OpenAINuGet package. Create an assistant.
using OpenAI;
using OpenAI.Assistants;
using OpenAI.Files;
using System.IO;
using System.ClientModel;
using System.Threading.Tasks;
using System.Threading;
using System;

#pragma warning disable OPENAI001
public class OpenAIAssistantCreator {
    readonly AssistantClient assistantClient;
    readonly OpenAIFileClient fileClient;
    readonly string deployment;

    public OpenAIAssistantCreator(OpenAIClient client, string deployment) {
        assistantClient = client.GetAssistantClient();
        fileClient = client.GetOpenAIFileClient();
        this.deployment = deployment;
    }

    public async Task<string> CreateAssistantAsync(
            Stream data,
            string fileName,
            string instructions,
            bool useFileSearchTool = true,
            CancellationToken ct = default) {

        data.Position = 0;

        ClientResult<OpenAIFile> fileResponse = await fileClient.UploadFileAsync(data, fileName, FileUploadPurpose.Assistants, ct);
        OpenAIFile file = fileResponse.Value;

        var resources = new ToolResources() {
            CodeInterpreter = new CodeInterpreterToolResources(),
            FileSearch = useFileSearchTool ? new FileSearchToolResources() : null
        };
        resources.FileSearch?.NewVectorStores.Add(new VectorStoreCreationHelper([file.Id]));
        resources.CodeInterpreter.FileIds.Add(file.Id);

        AssistantCreationOptions assistantCreationOptions = new AssistantCreationOptions() {
            Name = Guid.NewGuid().ToString(),
            Instructions = instructions,
            ToolResources = resources
        };

        assistantCreationOptions.Tools.Add(new CodeInterpreterToolDefinition());
        if (useFileSearchTool) {
            assistantCreationOptions.Tools.Add(new FileSearchToolDefinition());
        }

        ClientResult<Assistant> assistantResponse = await assistantClient.CreateAssistantAsync(deployment, assistantCreationOptions, ct);
        Assistant assistant = assistantResponse.Value;

        return assistant.Id;
    }
}
#pragma warning restore OPENAI001
Warning
OpenAI.OpenAIClientAPI is for evaluation purposes only and is subject to change or removal in future updates. The code snippet suppresses theOPENAI001diagnostic.Register the OpenAI Assistant service in the App.xaml.cs file:
using DevExpress.AIIntegration;
using DevExpress.Xpf.Core;
using Microsoft.Extensions.AI;
using System.ClientModel;
using System.Windows;
using System;

namespace DXChatApplication {
    /// <summary>
    /// Interaction logic for App.xaml
    /// </summary>
    public partial class App : Application {
        static App() {
            CompatibilitySettings.UseLightweightThemes = true;
        }

        protected override void OnStartup(StartupEventArgs e) {
            base.OnStartup(e);
            ApplicationThemeHelper.ApplicationThemeName = "Win11Light";

            var azureOpenAiClient = new Azure.AI.OpenAI.AzureOpenAIClient(AzureOpenAIEndpoint, AzureOpenAIKey);

            var container = AIExtensionsContainerDesktop.Default;
            container.RegisterChatClient(azureOpenAiClient.GetChatClient(ModelId).AsIChatClient());
            container.RegisterOpenAIAssistants(azureOpenAiClient, ModelId); // For example, ModelId = "gpt-4o-mini"

            var mainWindow = new MainWindow(new OpenAIAssistantCreator(azureOpenAiClient, ModelId));
            mainWindow.Show();
        }

        static string AzureOpenAIEndpoint = Environment.GetEnvironmentVariable("AZURE_OPENAI_ENDPOINT");
        static string AzureOpenAIKey = Environment.GetEnvironmentVariable("AZURE_OPENAI_APIKEY");
        static string ModelID = "gpt-4o-mini";
    }
}
Note
Availability of Azure Open AI Assistants depends on the region. See the following article for more information: Assistants (Preview).
Handle the
Initializedevent with an async handler. Call thee.SetupAssistantAsyncmethod to supply Open AI Assistant identifier:<dx:ThemedWindow x:Class="DXApplication3.MainWindow" xmlns="http://schemas.microsoft.com/winfx/2006/xaml/presentation" xmlns:x="http://schemas.microsoft.com/winfx/2006/xaml" xmlns:dx="http://schemas.devexpress.com/winfx/2008/xaml/core" xmlns:dxaichat="http://schemas.devexpress.com/winfx/2008/xaml/aichat" Title="MainWindow" Height="800" Width="1000"> <Grid> <dxaichat:AIChatControl x:Name="aiChatControl" Initialized="AiChatControl_Initialized" ContentFormat="Markdown" MarkdownConvert="aiChatControl_MarkdownConvert" HorizontalAlignment="Stretch" VerticalAlignment="Stretch" Margin="10"> </dxaichat:AIChatControl> </Grid> </dx:ThemedWindow>using DevExpress.AIIntegration.Blazor.Chat.WebView; using Markdig; using Microsoft.AspNetCore.Components; using System.IO; namespace DXChatApplication { public partial class MainWindow { FileStream dataStream; readonly OpenAIAssistantCreator _openAIAssistantCreator; public MainWindow(OpenAIAssistantCreator openAIAssistantCreator) { InitializeComponent(); _openAIAssistantCreator = openAIAssistantCreator; dataStream = File.OpenRead(@"RestaurantMenu.pdf"); } async void aiChatControl_Initialized(object sender, AIChatControlInitializedEventArgs e) { string fileName = "RestaurantMenu.pdf"; string prompt = "You are an Analyst Assistant specializing in PDF file analysis. Your role is to assist users by providing accurate answers to their questions about data contained in these files."; string assistantID = await _openAIAssistantCreator.CreateAssistantAsync(dataStream, fileName, prompt); await e.SetupAssistantAsync(assistantID); } void aiChatControl_MarkdownConvert(object sender, AIChatControlMarkdownConvertEventArgs e) { e.HtmlText = (MarkupString)Markdown.ToHtml(e.MarkdownText); } } }
The following screenshot shows the result:
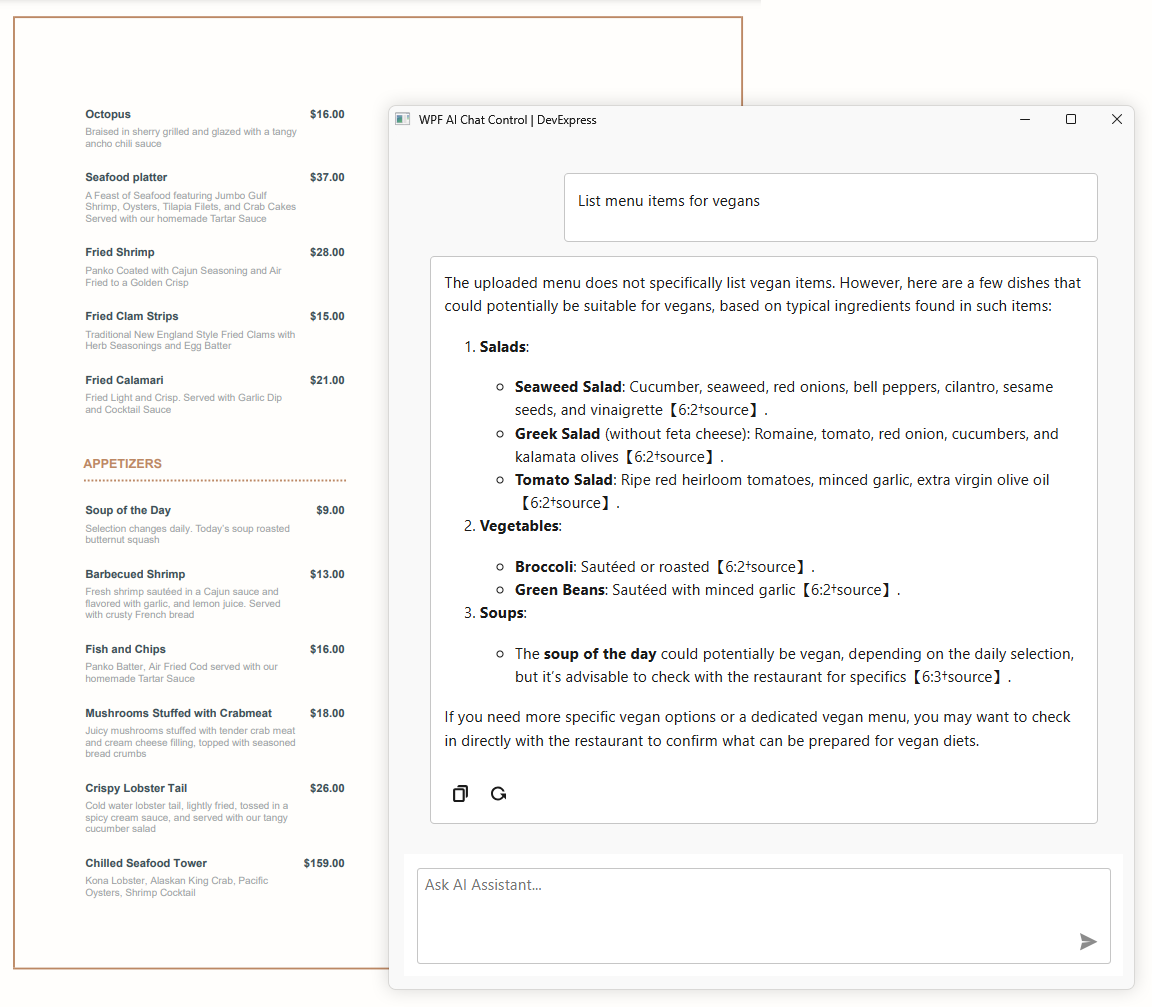
Tip
The AI Chat Control does not render citation references as clickable links. These references appear as plain text (for example, [6:2†source]) in the output. To remove citation references from the AI response before display, handle the AI Chat Control’s MarkdownConvert event:
using Markdig;
using System.Text.RegularExpressions;

void AiChatControl1_MarkdownConvert(object sender, AIChatControlMarkdownConvertEventArgs e) {
    string output = ClearCitationReferences(e.MarkdownText);
    e.HtmlText = (MarkupString)Markdown.ToHtml(output);
}

string ClearCitationReferences(string text) {
    return Regex.Replace(text, @"\【.*?】", "");
}
Troubleshooting
Deploy to Windows Server
When deploying WPF applications with the AI Chat Control to Windows Server or earlier versions of Windows, you may encounter the following error:
Warning
Microsoft.Web.WebView2.Core.WebView2RuntimeNotFoundException: “Couldn’t find a compatible WebView2 Runtime installation to host WebViews.”
The WPF AI Chat Control leverages BlazorWebView to reuse the DevExpress Blazor DxAIChat component. This integration requires the WebView2 runtime to be installed on the target machine.
Windows 11 includes WebView2. However, earlier versions of Windows and Windows Server may not have it pre-installed. To ensure compatibility,refer to the following help topic for information on distributing the WebView2 runtime with your WPF application to operating systems other than Windows 11: Distribute your app and the WebView2 Runtime.