How to: Customize ASP.NET Web Forms Layout Elements Using Custom CSS Classes
- 6 minutes to read
This topic describes the most popular uses of CSS classes in an XAF ASP.NET Web Forms application. They can be helpful when performing customization of several layout elements for a particular Detail View. The examples from this topic show the customization of the Contact Detail View layout from the MainDemo demo project.
To add a new CSS class for the target element, specify the IModelViewLayoutElementWeb.CustomCSSClassName property of layout group, or item node in the Model Editor to this class name. Run the application, find the newly created class name on the proper Detail View page using page Inspector tools and choose the classes of elements which you want to customize. Edit and add the necessary CSS rules to this new class in the Default.aspx file.
Tip
If you want to use rules to change a layout element’s color or visibility, you should use the Conditional Appearance Module.
Group Header’s Customization
This section describes how a group header can be customized. For instance, create the ContactPersonInfoGroupStyle CSS class and rules with the Person‘s group header text color and background color customization. In this example, the items with the GroupHeader and Label classes are customized.
Change a header’s font color
.ContactPersonInfoGroupStyle .GroupHeader .Label
{
    color: White;
}
Change a header’s background color
.CardGroupBase .ContactPersonInfoGroupStyle .GroupHeader
{
    background-color: LightSteelBlue;
}
Save changes and refresh the Contact‘s Detail View page to see the result.
Property Editors Customization
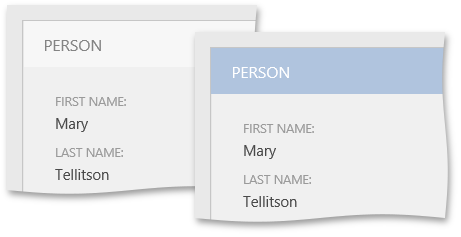
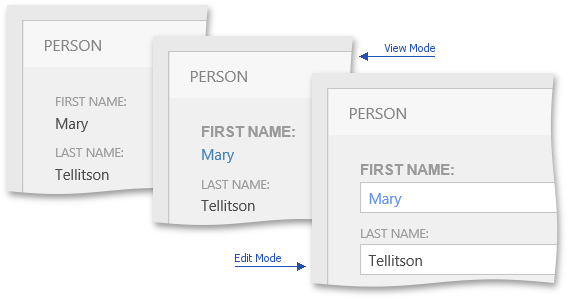
It is possible to customize Property Editors for both the View and Edit Detail View mode (see the DetailView.ViewEditMode topic). CSS rules for these modes may be different, for instance, the ContactFirstNameStyle CSS class and its rules are created to customize the Property Editor’s caption and text for the different modes. In the Model Editor, set the CustomCSSClassName property of the FirstName layout item to the ContactFirstNameStyle CSS class name. The code snippets below demonstrate these customization rules.
Change caption’s text color and font
.ContactFirstNameStyle .Caption
{
    font: bold 14px;
}
Change editor’s text color
/* In the View mode */
.ContactFirstNameStyle .WebEditorCell
{
    color: SteelBlue;
}
/* In the Edit mode */
.ContactFirstNameStyle .dxeEditAreaSys
{
    color: CornflowerBlue;
}
The result of this customization shows in the image below.
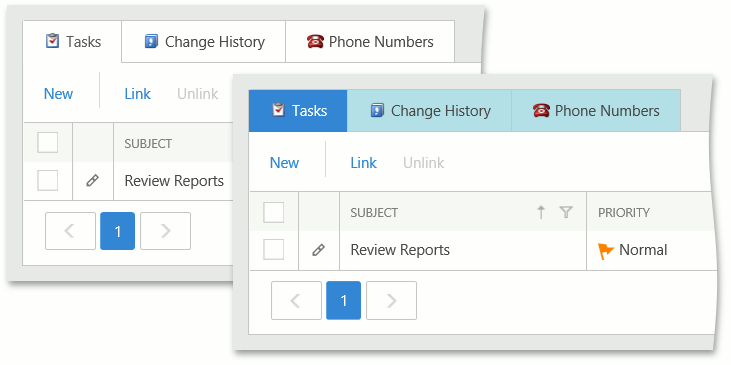
Tabbed Group Customization
You can customize the background and caption color of active and inactive tabs in the tabbed group. For example, in the Model Editor, set the CustomCSSClassName of the Tabs tabbed group to ContactTabsStyle and add new CSS rules to this class in the Default.aspx file.
.ContactTabsStyle.LayoutTabbedGroupContainer > .dxtc-stripContainer .dxtc-activeTab,
.ContactTabsStyle.LayoutTabbedGroupContainer .dxtc-noSpacing > .dxtc-stripContainer .dxtc-activeTab.dxtc-lead,
.ContactTabsStyle.LayoutTabbedGroupContainer .dxtc-noSpacing > .dxtc-stripContainer .dxtc-activeTab
{
    background-color: #2c86d3 !important;
}
.ContactTabsStyle.LayoutTabbedGroupContainer .dxtcLite_XafTheme > .dxtc-stripContainer .dxtc-activeTab .dxtc-link
{
    color: white;
}
.ContactTabsStyle.LayoutTabbedGroupContainer .dxtcLite_XafTheme > .dxtc-stripContainer .dxtc-tab,
.ContactTabsStyle.LayoutTabbedGroupContainer .dxtcLite_XafTheme > .dxtc-stripContainer .dxtc-activeTab
{
    background-color: PowderBlue;
}
.ContactTabsStyle.LayoutTabbedGroupContainer .dxtcLite_XafTheme > .dxtc-stripContainer .dxtc-tabHover,
.ContactTabsStyle.LayoutTabbedGroupContainer .dxtcLite_XafTheme > .dxtc-stripContainer .dxtc-tabHover .dxtc-link
{
    background-color: PowderBlue;
}
The tabs style changes according to the customization code above.
Action Customization
You can customize the Action appearance using the CustomCssClassName property in the Model Editor or set the required CSS class name by Controller. Actions are not usually associated with a particular View, so, when you set a CSS class name to the CustomCssClassName property of an Action, an adjustment is applied to the Action in all Views where it appears.
Using the CustomCssClassName property
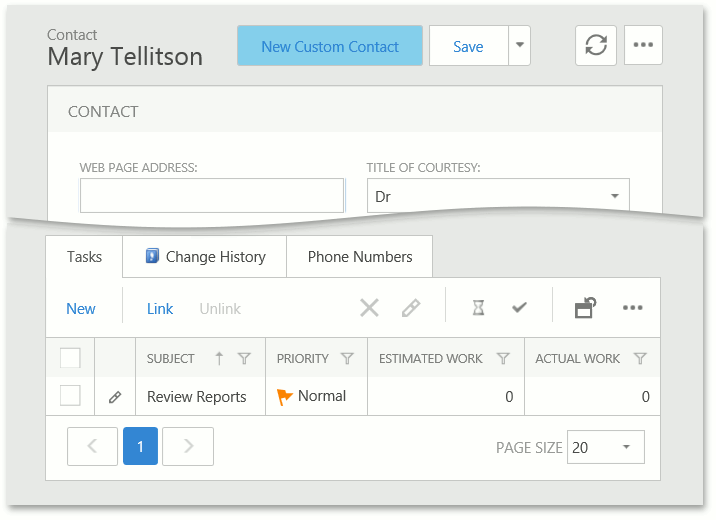
For example, change the background color of the New action. In the Model Editor, find the Application | ActionDesign | Actions | New Action node, set its CustomCSSClassName property to the NewActionStyle CSS class name and add the following CSS rules in the Default.aspx file:
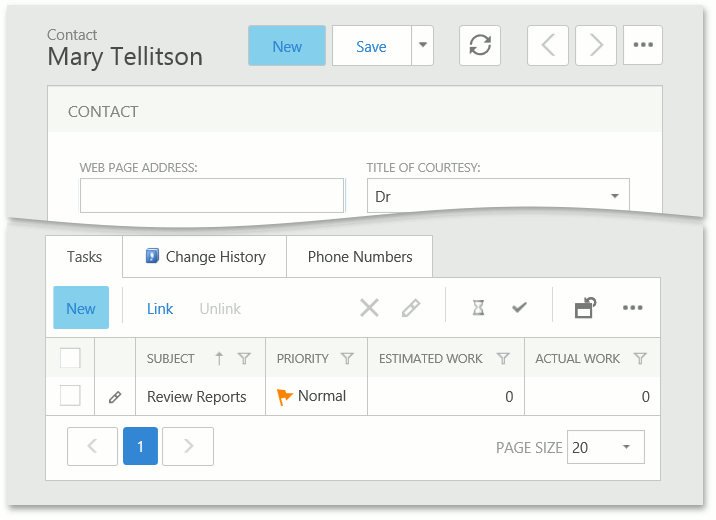
.menuAreaDiv .menuButtons .dxm-item.NewActionStyle,
.menuLinks .dxm-item.NewActionStyle,
.menuButtons .dxm-item.NewActionStyle a.dx
{
    background-color: SkyBlue;
}
The image below demonstrates the customized New Action.
Using a ViewController
To apply a CSS rule to an Action on the particular View, create a new Controller for DetailView which is a descendant of the ViewController<ViewType>.
Note that this approach forces menu rendering that may reduce the layout drawing. Thus, use this method if you want to customize several Views. Use the Model Editor’s global settings and manage them using the Controller if you want to customize an Action in most Views.
For example, the following Controller customizes the text color and caption using the CSS rules, demonstrated in the previous paragraph, for the New Action displayed only in the Contact Detail View. This Controller uses the ActionBase.CustomizeControl event.
public class CustomizeContactDetailViewAction : ViewController<DetailView> { private SingleChoiceActionItemAsOperationActionMenuItem actionItem = null; protected override void OnActivated() { base.OnActivated(); NewObjectViewController controller = Frame.GetController<NewObjectViewController>(); if (controller != null) { controller.NewObjectAction.CustomizeControl += NewObjectAction_CustomizeControl; controller.NewObjectAction.ItemsChanged += NewObjectAction_ItemsChanged; } } protected override void OnDeactivated() { base.OnDeactivated(); NewObjectViewController controller = Frame.GetController<NewObjectViewController>(); if (controller != null) { controller.NewObjectAction.CustomizeControl -= NewObjectAction_CustomizeControl; controller.NewObjectAction.ItemsChanged -= NewObjectAction_ItemsChanged; } } protected override void OnViewChanged() { base.OnViewChanged(); if (actionItem != null) { if (View != null && View.Id == "Contact_DetailView") { SetNewCaption(actionItem.MenuItem); } else { RemoveCustomCssClass(actionItem.MenuItem); } } } private void NewObjectAction_CustomizeControl(object sender, DevExpress.ExpressApp.Actions.CustomizeControlEventArgs e) { actionItem = (SingleChoiceActionItemAsOperationActionMenuItem)e.Control; if (View.Id == "Contact_DetailView") { SetNewCaption(actionItem.MenuItem); } } void NewObjectAction_ItemsChanged(object sender, DevExpress.ExpressApp.Actions.ItemsChangedEventArgs e) { if (actionItem != null && View.Id == "Contact_DetailView") { SetNewCaption(actionItem.MenuItem); } } bool menuChanged = false; private void SetNewCaption(XafMenuItem menuItem) { menuItem.Text = "New Custom Contact"; menuItem.ItemStyle.CssClass += " NewActionStyle"; menuItem.ForceMenuRendering(); menuChanged = true; } //Remove the CSS class which was added by model private void RemoveCustomCssClass(XafMenuItem menuItem) { if (menuChanged) { menuItem.ItemStyle.CssClass = menuItem.ItemStyle.CssClass.Replace("NewActionStyle", string.Empty); menuItem.ForceMenuRendering(); menuChanged = false; } } }The following image demonstrates how this Controller manages an Action’s customization: