How to: Show a Custom Data-Bound Control in an XAF View (ASP.NET Web Forms)
- 8 minutes to read
This article describes how you can use a custom control to view and edit data in an ASP.NET Web Forms application’s Detail View. The example in this article shows how to add ASPxTextBox and the ASPxCardView controls to the MainDemo application (%PUBLIC%\Documents\DevExpress Demos 25.1\Components\XAF\MainDemo.NET.EFCore). You can use a similar approach in your own application with any other web control.
Tip
Similar examples for ASP.NET Core Blazor and WinForms applications are available here:
- ASP.NET Core Blazor
- WinForms
Declare an Interface to Access a Web Forms User Control from a View Controller
In the Solution Explorer, right-click the ASP.NET Web Forms module project and choose Add | New Item… to add the IDepartmentView interface.
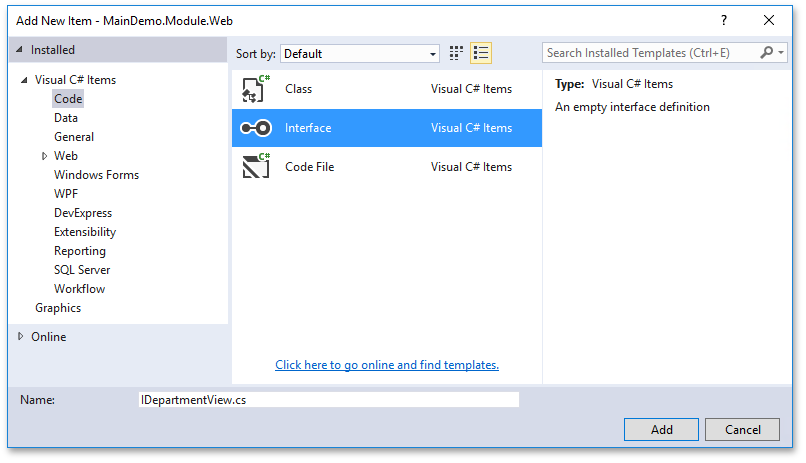
Make this interface public and add the following members:
- the Title string property specifying the ASPxTextBox control’s text;
- the Contacts collection property specifying the ASPxCardView control’s data source;
- the TitleChanged event which occurs when the ASPxTextBox control’s text changes.
using System;
using System.Collections.Generic;
using MainDemo.Module.BusinessObjects;
// ..
public interface IDepartmentView {
    string Title { get; set; }
    ICollection<Contact> Contacts { get; set; }
    event EventHandler TitleChanged;
}
Create a View Controller to Manage the Web Forms User Control’s Data
In the Solution Explorer, right-click the the ASP.NET Web Forms module project’s Controllers folder and choose Add | New Item… to add the DepartmentViewController class.
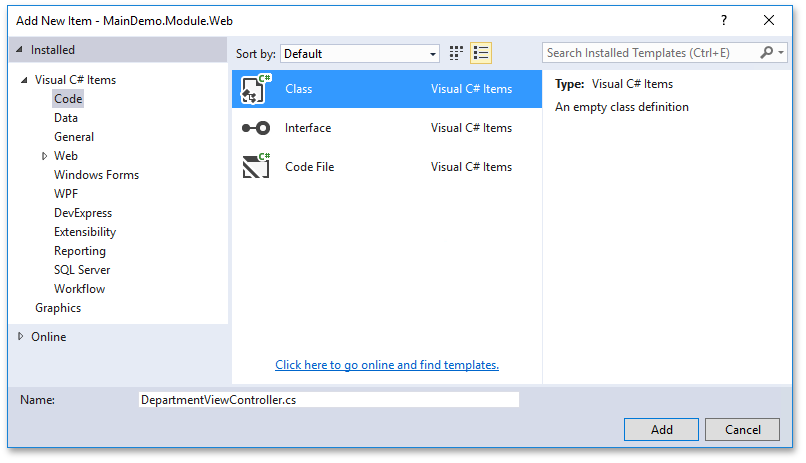
Do the following changes with the created Controller class:
- Make the Controller public.
- Inherit the Controller from the ObjectViewController<DetailView, Department> class to activate the Controller in Department Detail Views only.
- Override the OnActivated method, iterate all Detail View’s WebCustomUserControlViewItems items, and subscribe to each item’s ControlCreated event.
- In the WebCustomUserControlViewItem.ControlCreated event handler, check if the current control supports the IDepartmentView interface, setup the control with the ViewCurrentObject’s data and subscribe to the IDepartmentView.TitleChanged event.
- In the IDepartmentView.TitleChanged event handler, pass the control’s data to the ViewCurrentObject property.
- In the OnActivated method, subscribe to the CurrentObjectChanged event. In the event handler, pass the ViewCurrentObject to the control.
- Override the OnDeactivated method and unsubscribe from the WebCustomUserControlViewItem.ControlCreated and View.CurrentObjectChanged events.
using System;
using DevExpress.ExpressApp;
using DevExpress.ExpressApp.Web.Editors;
using MainDemo.Module.BusinessObjects;
// ...
public class DepartmentViewController : ObjectViewController<DetailView, Department> {
    protected override void OnActivated() {
        base.OnActivated();
        foreach(WebCustomUserControlViewItem item in View.GetItems<WebCustomUserControlViewItem>()) {
            item.ControlCreated += ViewItem_ControlCreated;
        }
        View.CurrentObjectChanged += View_CurrentObjectChanged;
    }
    protected override void OnDeactivated() {
        foreach(WebCustomUserControlViewItem item in View.GetItems<WebCustomUserControlViewItem>()) {
            item.ControlCreated -= ViewItem_ControlCreated;
        }
        View.CurrentObjectChanged -= View_CurrentObjectChanged;
        base.OnDeactivated();
    }
    private void ViewItem_ControlCreated(object sender, EventArgs e) {
        IDepartmentView departmentView = ((WebCustomUserControlViewItem)sender).Control as IDepartmentView;
        if(departmentView != null) {
            departmentView.TitleChanged += DepartmentView_TitleChanged;
            InitializeDepartmentView(departmentView);
        }
    }
    private void View_CurrentObjectChanged(object sender, EventArgs e) {
        foreach(WebCustomUserControlViewItem item in View.GetItems<WebCustomUserControlViewItem>()) {
            IDepartmentView departmentView = item.Control as IDepartmentView;
            if(departmentView != null) {
                InitializeDepartmentView(departmentView);
            }
        }
    }
    private void DepartmentView_TitleChanged(object sender, EventArgs e) {
        if(ViewCurrentObject != null) {
            ViewCurrentObject.Title = ((IDepartmentView)sender).Title;
        }
    }
    private void InitializeDepartmentView(IDepartmentView departmentView) {
        if(ViewCurrentObject != null) {
            departmentView.Title = ViewCurrentObject.Title;
            departmentView.Contacts = ViewCurrentObject.Contacts;
        }
        else {
            departmentView.Title = null;
            departmentView.Contacts = null;
        }
    }
}
Create a Web Forms User Control
In the Solution Explorer, right-click the ASP.NET Web Forms application project and choose the Add | New Item… to add the Web Forms User Control.
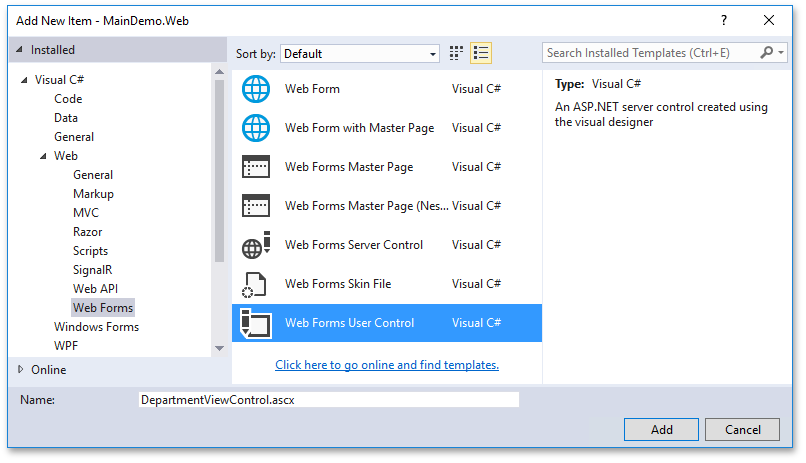
In the designer, do the following:
- Add the ASPxTextBox control, set its ID property to TitleControl, Caption to Title and Width to 100%;
- Add the ASPxCardView control, set its ID property to ContactsControl, set it up to show the Contact’s FullName and Email in two columns.
<%@ Control Language="C#" AutoEventWireup="true" CodeBehind="DepartmentViewControl.ascx.cs" Inherits="MainDemo.Web.DepartmentViewControl" %>
<%@ Register Assembly="DevExpress.Web.v25.1, Version=25.1.12.0, Culture=neutral, PublicKeyToken=b88d1754d700e49a" Namespace="DevExpress.Web" TagPrefix="dx" %>

<dx:ASPxTextBox ID="TitleControl" runat="server" Caption="Title" Width="100%"></dx:ASPxTextBox>
<div style="height:5px"></div>
<dx:ASPxCardView ID="ContactsControl" runat="server" AutoGenerateColumns="false">
    <Columns>
        <dx:CardViewTextColumn Name="FullName" FieldName="FullName" Caption="Full Name" VisibleIndex="0"></dx:CardViewTextColumn>
        <dx:CardViewTextColumn Name="Email" FieldName="Email" Caption="Email" VisibleIndex="1"></dx:CardViewTextColumn>
    </Columns>
    <SettingsPager>
        <SettingsTableLayout ColumnCount="2" />
    </SettingsPager>
</dx:ASPxCardView>
Note
If your User Control needs to call a script on a page load, register it as described in the following help topic: How to Register Scripts Loaded in Callbacks.
Implement the IDepartmentView Interface in the DepartmentViewControl
Close the designer, right-click the DepartmentViewControl.ascx file, choose View Code, and do the following:
Implement the MainDemo.Module.Web.IDepartmentView interface.
Define the following fields:
- isInitialized - a flag to determine if the control’s OnInit method is called;
- _Title - stores the title string;
- _Contacts - stores the contacts collection.
Override the OnInit method:
- set the isInitialized flag to true,
- initialize controls using _Title and _Contacts values,
- subscribe to the TitleControl.TextChanged event.
Add the TitleChanged event and raise it in the TitleControl.TextChanged event handler.
- Add the Title property:
- in the property getter, return the _Title field value.
- in the property setter, set the _Title field value and update the TitleControl.Text value.
- Add the Contacts property:
- in the property getter, return the _Contacts field value
- in the property setter, set the _Contacts field value pass the new value to ContactsControl.DataSource and call the ContactsControl.DataBind method to apply changes.
using System;
using System.Collections.Generic;
using MainDemo.Module.BusinessObjects;
using MainDemo.Module.Web;

namespace MainDemo.Web {
    public partial class DepartmentViewControl : System.Web.UI.UserControl, IDepartmentView {
        private bool isInitialized;
        private string _Title;
        private ICollection<Contact> _Contacts;

        protected override void OnInit(EventArgs e) {
            isInitialized = true;
            UpdateTitleControl();
            UpdateContactsControl();
            TitleControl.TextChanged += TitleControl_TextChanged;
            base.OnInit(e);
        }
        private void UpdateTitleControl() {
            if(!isInitialized) return;
            TitleControl.Text = Title;
        }
        private void UpdateContactsControl() {
            if(!isInitialized) return;
            ContactsControl.DataSource = Contacts;
            ContactsControl.DataBind();
        }
        private void TitleControl_TextChanged(object sender, EventArgs e) {
            _Title = TitleControl.Text;
            if(TitleChanged != null) {
                TitleChanged(this, EventArgs.Empty);
            }
        }
        public string Title {
            get { return _Title; }
            set {
                _Title = value;
                UpdateTitleControl();
            }
        }
        public ICollection<Contact> Contacts {
            get { return _Contacts; }
            set {
                _Contacts = value;
                UpdateContactsControl();
            }
        }
        public event EventHandler TitleChanged;
    }
}
Add a WebCustomUserControlViewItem View Item to a View
In the ASP.NET Web Forms application project, double-click the Model.xafml file to start the Model Editor. Right-click the Views node and choose Add | DetailView.
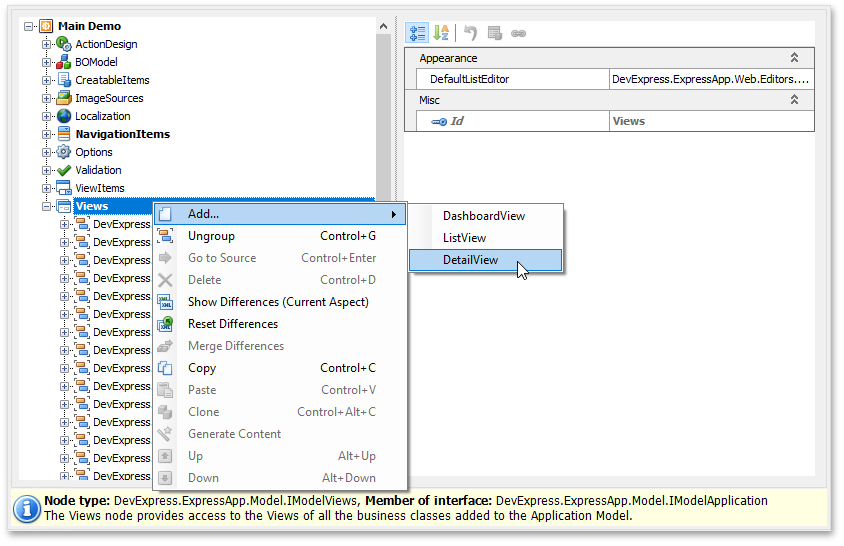
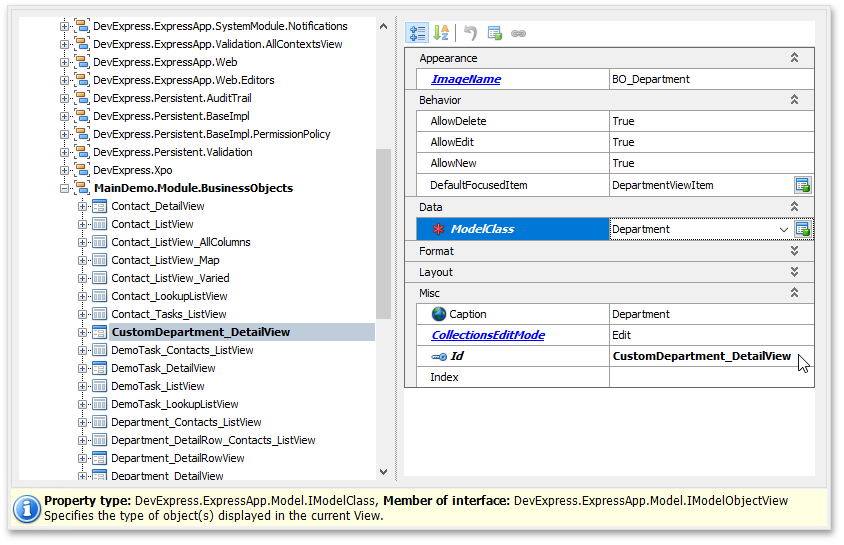
Set the Id property to CustomDepartment_DetailView and the ModelClass property to Department.
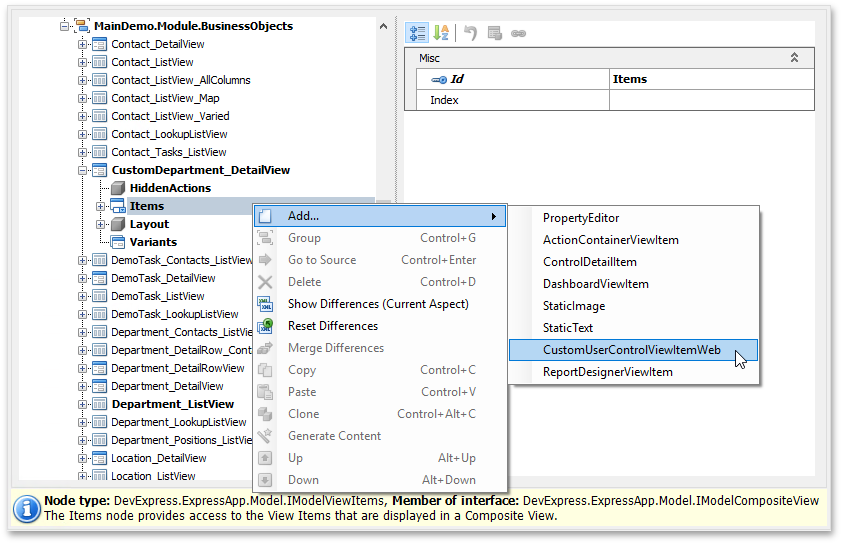
Right-click the Views | MainDemo.Module.BusinessObjects | CustomDepartment_DetailView | Items node and choose Add… | CustomUserControlViewItemWeb.
Set the Id property to DepartmentViewItem, and the CustomControlPath property to DepartmentViewControl.ascx (the file name of the custom Web Forms User Control).
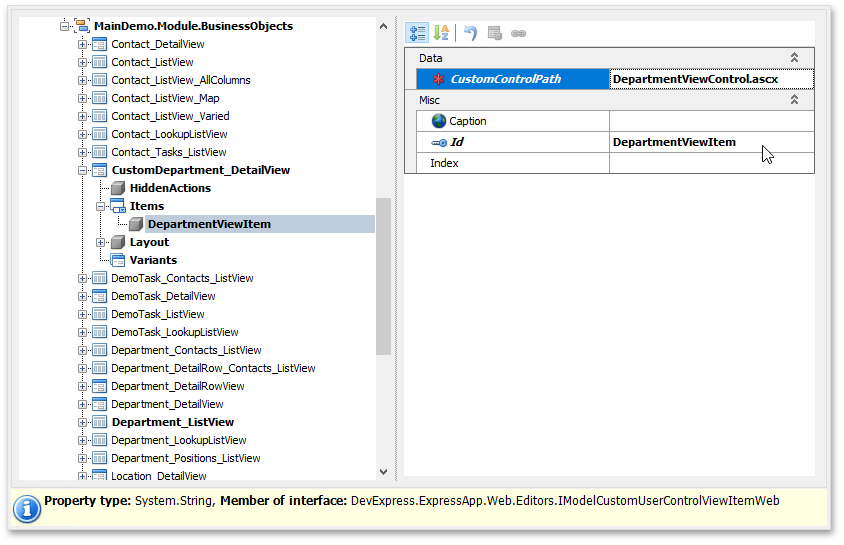
As a result, the WebCustomUserControlViewItem View Item is added to CustomDepartment_DetailView.
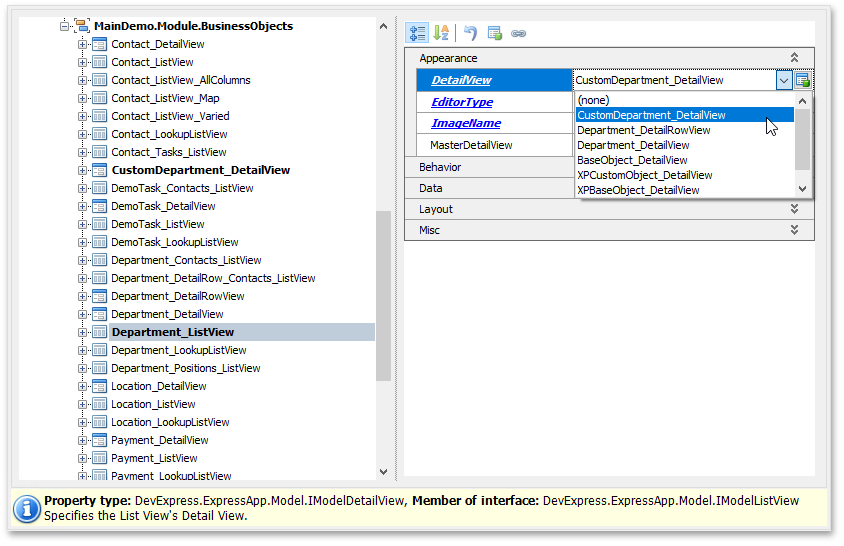
Change the Default Detail View for the Department List View
Navigate to the Views | MainDemo.Module.BusinessObjects | Department_ListView node. In the DetailView drop-down list, select CustomDepartment_DetailView.
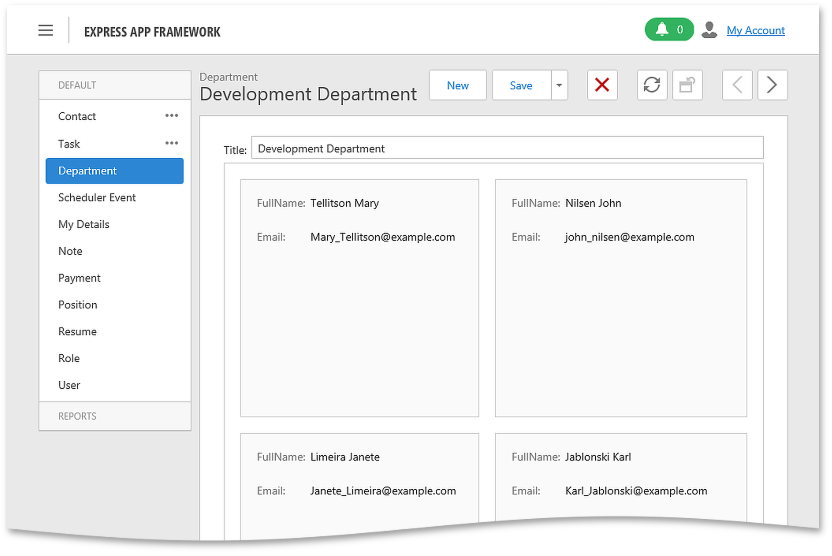
Run the ASP.NET Web Forms application, navigate to the Department List View and edit any Department. The Detail View displays the Text Box and Card View bound to the Department.Contacts collection (see the screenshot in the beginning of this topic).