ASP.NET Web Forms Application Appearance
- 8 minutes to read
ASP.NET Web Forms XAF application appearance is defined by a set of Templates - the pages that support the XAF internal infrastructure. Templates define the Action Containers layout and a View location within the page. XAF supplies two sets of built-in templates - new (used by default) and classic. This topic describes how to switch between these templates, and how to customize each of them.
New Web UI
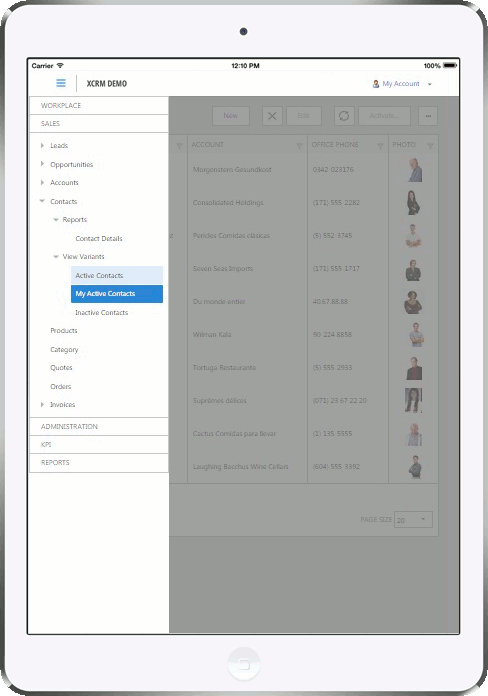
The default web application style is demonstrated in the image below. It is optimized for both hand-held touch devices and desktop browsers.
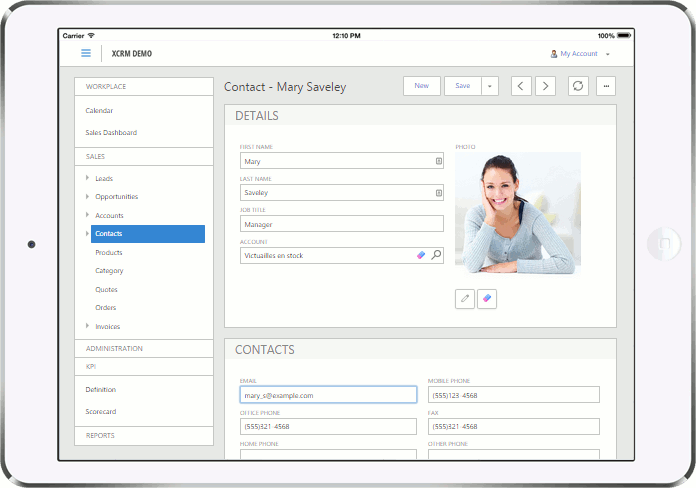
The UI layout adapts itself to the browser width or device orientation changes.
Note that you cannot switch between themes by using the ChooseTheme Action at runtime or by modifying the theme element of the devExpress section in Web.config at design time. The following approaches describe how you can customize the new web UI.
Using Global Theme Parameters
The simplest way to set font and base color in the ASP.NET Web Forms application theme as a whole is specify them in the Web.config configuration file in the web application solution as shown below.
<devExpress>
  <themes enableThemesAssembly="true" styleSheetTheme="" customThemeAssemblies="ThemeAssembly"  theme="XafTheme" baseColor="#00FF00" font="24px 'Calibri'" />
  <!-- ... -->
</devExpress>
Refer to the Changing Theme Base Color and Font Settings topic for additional information.
Use the Application Model
The following table lists the Application Model properties that influence the new web theme only. To learn more about customizing the UI in the Application Model, refer to the Customize Data Display and View Layout section of the tutorial.
Property Node Description IModelApplicationWeb.CurrentUserDisplayMode Application (the root node) Specifies how the current user information is displayed in the top right corner of the application page. IModelRootNavigationItemsWeb.ShowNavigationOnStart NavigationItems Specifies whether or not the navigation panel is expanded when the application is started. IModelRootNavigationItems.ShowImages NavigationItems Specifies whether or not the navigation item images are shown. IModelActionWeb.AdaptivePriority ActionDesign | Actions | <Action> Specifies the Action’s priority with regards to the adaptive and responsive layout. Actions with a lower AdaptivePriority value remain visible when the browser window shrinks, while Actions with a higher priority become hidden. IModelColumnWeb.AdaptivePriority Views | <ListView> | Columns | <Column> Specifies the column’s priority with regards to the adaptive and responsive layout. Columns with a lower AdaptivePriority value remain visible when the browser window shrinks, while columns with a higher value become hidden. Has effect when the ASPxGridListEditor.IsAdaptive property is set to true. IModelViewLayoutElementWeb.IsCardGroup Views | <DetailView> | Layout | … | <LayoutGroup> Specifies whether or not the layout group is displayed as a card. IModelLayoutGroup.IsCollapsibleGroup Views | <DetailView> | Layout | … | <LayoutGroup> Specifies whether or not the layout card group can be collapsed. IModelLayoutGroup.IsGroupCollapsed Views | <DetailView> | Layout | … | <LayoutGroup> Specifies whether or not the layout card group is collapsed by default. IModelViewLayoutElementWeb.CustomCSSClassName Views | <DetailView> | Layout | … | <LayoutElement> Specifies a custom CSS class to be used for the current layout element. For instance, the IModelActionWeb.AdaptivePriority property is changed as follows.
- Invoke the Model Editor for the desktop application project. Navigate to the ActionDesign | Actions | ResetViewSettings and set the AdaptivePriority property to “1001”.
Run the ASP.NET Web Forms application.
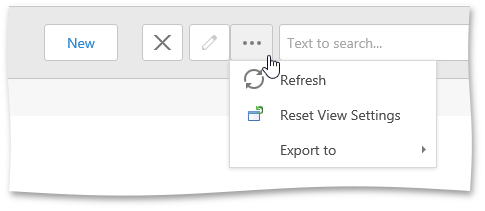
The ResetViewSettings Action become hidden, because other Actions have the default priority value of 1000. The hidden ResetViewSettings Action can be accessed by the “…” button.
You can specify different Application Model settings (for example, Detail View layout settings) for different devices. To do this, edit the ASP.NET Web Forms application project‘s device-specific XAFML files:
- Model.Desktop.xafml - for desktop browsers;
- Model.Tablet.xafml - for tablets.
These files form an additional Application Model layer.
You can also add settings for smartphones. Note that the XAF Web UI is not optimized for small screens. Follow the steps below to add the XAFML file with settings for mobile devices:
- In the Solution Explorer, right-click the ASP.NET Web Forms application project and choose Add | Text File to create a new text file. Name it Model.Mobile.xafml.
Open this file in an XML editor and add the following code to make this file editable via the Model Editor.
<?xml version="1.0" encoding="utf-8"?>
<Application/>
Double-click Model.Mobile.xafml in the Solution Explorer to invoke the Model Editor.
To implement a custom device detection algorithm, create the DevExpress.ExpressApp.Web.DeviceDetector‘s inheritor and override its GetDeviceCategory method. In the Global class constructor, set the static DeviceDetector.Instance property to the new device detector instance.
To create a Model Difference Store for the device-specific Application Model layer, use the CreateCustomDeviceSpecificModelDifferenceStore event.
Use Templates
You can include template content source files into your application project, modify this content and switch to it instead.
The following steps explain how to create and modify the LogonTemplateContent template.
- Right-click your ASP.NET Web Forms application project and choose Add | New Item. In the invoked Add New Item dialog, select the DevExpress XAF category and the DevExpress 25.1 XAF ASP.NET Web Forms Logon Template Content V2 item. Specify a name or leave the default “LogonTemplateContent1” name unchanged and press Add.
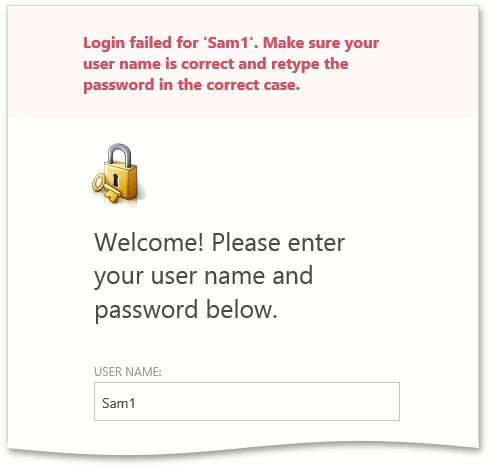
Open the ASCX file and change the font style for the ErrorInfoControl.
<xaf:XafUpdatePanel ID="UPEI" runat="server" CssClass="LogonContentWidth">
<xaf:ErrorInfoControl ID="ErrorInfo" Style="margin: 10px 0px 10px 0px" runat="server" Font-Bold="True" />
To use the modified content instead of default content, open the Global.asax.cs (Global.asax.vb) file and modify the Session_Start event handler. Specify a path to your custom User Control as shown below.
To see the result, run the ASP.NET Web Forms application and try to logon with invalid credentials.
Note
By default, DefaultVerticalTemplateContent has no size limit. Comment out the template’s ClearSizeLimit method call in the Global.asax.cs (Global.asax.vb) file to set a workspace width limit to 1200px. This method has effect on the built-in template only. If you use a custom vertical template, call the ClearSizeLimit method of this custom template instead.
To learn more about template content customization, see How to: Customize an ASP.NET Web Forms Template.
WebApplicationStyleManager Class
By default, in an XAF ASP.NET Web Forms application with the new web style, the navigation groups and grid columns are shown in UPPER CASE. You can change this using the WebApplicationStyleManager.EnableUpperCase property.
Alternatively, you can use the following properties to disable upper case for a grid column, layout group and navigation group captions, individually.
Using the ASP.NET Web Forms Theme Tools
It is possible to customize your XAF application with New Web UI using the ASP.NET Web Forms Theme Tools, such as ASP.NET Web Forms Theme Deployer and ASP.NET Web Forms Theme Builder. Refer to the How to: Use Custom Themes in ASP.NET Web Forms Applications to learn how to customize a built-in XafTheme theme.
Classic Web UI
By default, the new web UI is used in XAF ASP.NET Web Forms applications, but you can switch to the classic style. Edit the Global.asax.cs (Global.asax.vb) file. Comment the WebApplication.SwitchToNewStyle method call in the Session_Start method.
protected void Session_Start(object sender, EventArgs e) {
    WebApplication.SetInstance(Session, new MySolutionWebApplication());
    //WebApplication.Instance.SwitchToNewStyle();
    //...
}
You can customize the classic web UI using the following approaches.
Use Themes
Just like DevExpress ASP.NET Web Forms components, XAF supports themes and has more than a dozen available out of the box. When an ASP.NET Web Forms XAF application project is created, it references the DevExpress.Web.ASPxThemes.25.1.dll assembly. This assembly embeds all the resources that are required for applying a DevExpress theme to the entire web application automatically. By default, the Office2010Blue theme is used because of the following settings in your Web.config file.
<configuration>
  <devExpress>
    <!-- ... -->
    <themes enableThemesAssembly="true" theme="Office2010Blue" />
  </devExpress>
<!-- ... -->
</configuration>
Note
When using ASP.NET Web Forms 4, note that XAF does not support ClientIDMode.Static ClientID generation mode. So, the following declaration is incorrect.
<themes enableThemesAssembly="true" theme="Office2010Blue" clientIDMode="Static"/>End-users can also switch between deployed themes using the ChooseTheme Action implemented in the ChooseThemeController.
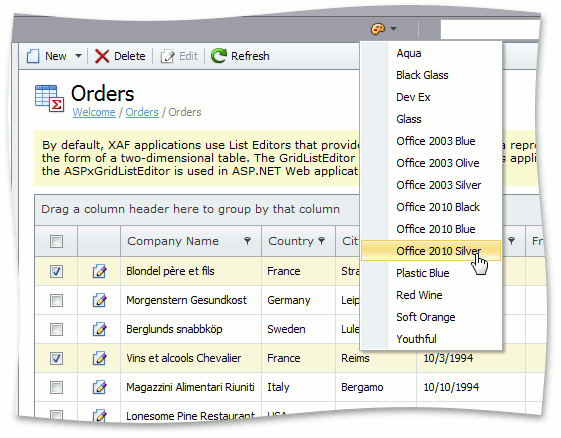
A selected theme is persisted in user browser cookies. So, the theme will be applied every time a user runs the application.
Note
To learn how to use custom themes, refer to the How to: Use Custom Themes in ASP.NET Web Forms Applications topic.
Templates
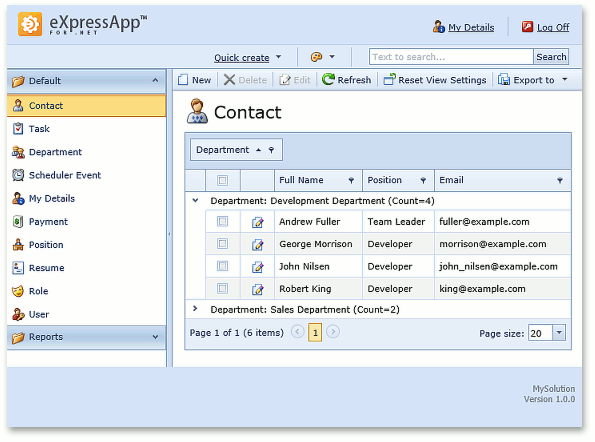
There are two main window Templates - DefaultTemplateContent and DefaultVerticalTemplateContent. The DefaultVerticalTemplateContent Template is the main window’s standard Template with the vertical navigation bar. It consumes more space than DefaultTemplateContent, but more navigation items can fit.
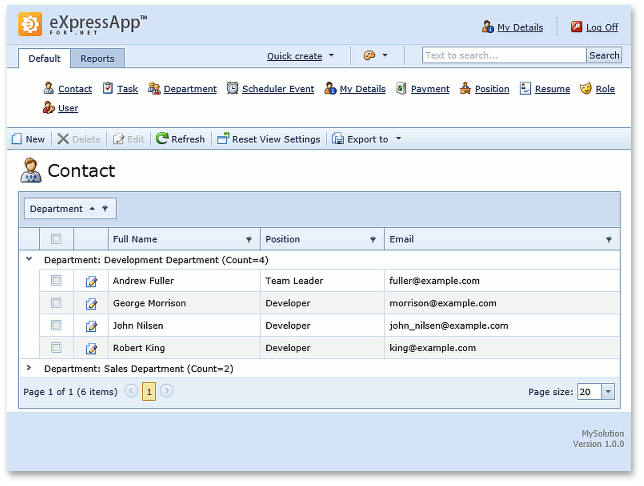
The DefaultTemplateContent Template is an optional template that has horizontally aligned navigation tabs that conserve the main window’s space.
To use the DefaultTemplateContent Template for the main window instead of DefaultVerticalTemplateContent, set the static WebApplication.PreferredApplicationWindowTemplateType property to TemplateType.Horizontal in the ASP.NET Web Forms application’s Session_Start event handler (you can find this handler code in the Global.asax.cs/Global.asax.vb file).
using DevExpress.ExpressApp.Web.Templates; // ... protected void Session_Start(Object sender, EventArgs e) { WebApplication.PreferredApplicationWindowTemplateType = TemplateType.Horizontal; // ... }Note
To learn how to customize a template, refer to the How to: Customize an ASP.NET Web Forms Template topic.
Web Browser Configuration
XAF supports browsers that are supported by DevExpress web controls.
Most web browsers allow you to zoom in and out of displayed pages. ASP.NET Web Forms XAF applications do not support this feature. Make sure that your web browser zoom level is set at 100% to ensure a correct View layout.