User Authentication using a Logon Window in ASP.NET Web Forms Applications
- 10 minutes to read
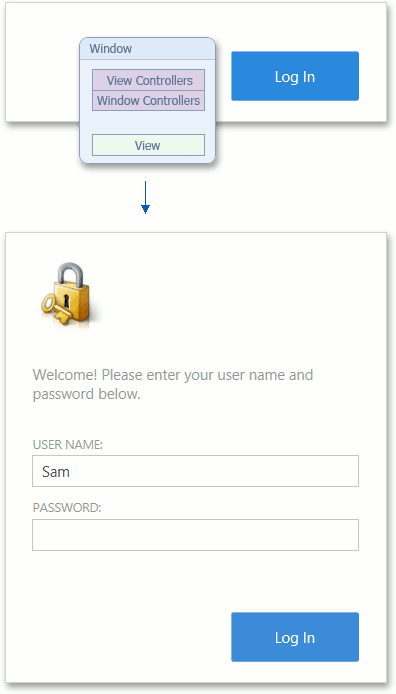
This topic details the steps performed from the time the WebApplication object has been created and initialized, until the moment an end user has been authenticated to the application. In accordance with the Authentication Strategy that is used by the Security System in your application, an end user can be asked to type credentials in a logon window to be authenticated. There are two built-in Authentication Strategies in XAF. The AuthenticationStandard authenticates end users with the information typed in the logon window. The AuthenticationActiveDirectory does not require the logon window to be displayed. It takes the required information from the system’s active directory. This topic details how end users are authenticated when the built-in AuthenticationStandard strategy is used. To learn what steps are taken when the built-in AuthenticationActiveDirectory strategy is used, refer to the User Authentication Without a Logon Window in ASP.NET Web Forms Applications topic. You can customize the AuthenticationActiveDirectory, so that a logon window is displayed and the information typed in it is used for authentication. In this instance, read this topic to learn how the logon window is displayed.
Create a Logon View
Stage Description | Ways to Interfere |
|---|---|
A Detail View is created by the information stored in the Application Model‘s Views | <LogonParameters_class_name>_DetailView node. This Detail View represents a newly created object of the type that is specified by the LogonParametersType property of the security system’s Authentication object. The object’s properties are initialized by the values that were typed the last time an application was run. These values were saved to the Application Model’s Logon node after the user had been authenticated. | If you require that custom information is requested in the logon window, specify a custom LogonParameters class. For this purpose, before the XafApplication.Setup method is called in your Program.Main method, set the LogonParametersType property of the Authentication object that is used by the Security System. If your LogonParameters demand a custom authentication technique, implement an Authentication class, deriving it from the AuthenticationBase class. For details, refer to the How to: Use Custom Logon Parameters and Authentication topic. By default, an object of the specified LogonParameters type is created using a custom Object Space that stores an object in memory and does not connect to the database. If you need to access a database to represent a custom LogonParameters object in the logon window, create an Object Space of the IObjectSpace type. To do this, handle the XafApplication.CreateCustomLogonWindowObjectSpace event in your application. An example of this scenario is described in the How to: Use Custom Logon Parameters and Authentication topic. By default, the values specified by an authenticated user are saved to the SettingsStorageOnCookies store, so that they are read the next time the application is run. This store saves the credentials to cookies. You can implement a custom store by inheriting from the SettingsStorage class. To use this store instead of the default one, handle the XafApplication.CreateCustomLogonParameterStore event. You can access the LogonParameters object before and after values, which are saved when the application was run the last time. For this purpose, handle the XafApplication.LastLogonParametersReading and XafApplication.LastLogonParametersRead events, respectively. Alternatively, you can override the XafApplication.ReadLastLogonParametersCore method to implement a custom technique for reading these values. You can customize the Detail View representing the LoginParameters object. For this purpose, use the Views | <LogonParameters_class_name>_DetailView node in the Model Editor. For example, you can change the View Items layout or perform localization. |
The created View’s DetailView.ViewEditMode property is set to Edit. |
|
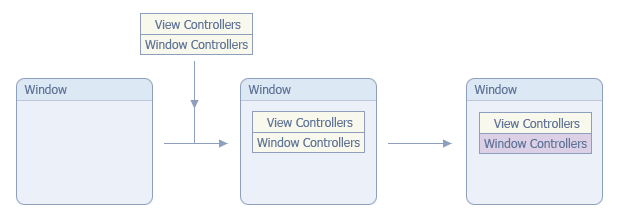
Create a Logon Window
Stage Description | Ways to Interfere |
|---|---|
Before creating an instance of the Window class, required Controllers are created. | If you need to add custom buttons to the logon window, or customize the behavior of the default ones, implement a custom Dialog Controller by inheriting from the WebLogonController Dialog Controller. To replace the default WebLogonController, override the CreateLogonController method in your WebApplication descendant. By default, only the Controllers that are sufficient for the logon window are created. You can create extra Controllers. To do this, handle the XafApplication.CreateCustomLogonWindowControllers event in your WebApplication class. Return a list of created Controllers. Note that the default Template that visualizes the logon window contains only the PopupAction’s Action Container. So, Actions in your Controllers must be mapped to this Action Container to be visualized (see ActionBase.Category). Subscribe to the Controller.AfterConstruction event to set up a Controller’s properties. For instance, you can specify the conditions to be satisfied for the Controller’s activation. |
Then, a Window is created and all the created Controllers are registered in it. This means that their WindowController.Window property is set to the current Window object. | Subscribe to the Controller.FrameAssigned event, to access a Controller’s Window (see WindowController.Window) and perform required actions with it. For instance, in the event handler, you can subscribe to the event that is raised before the Controller is activated. |
The Controllers that represent the WindowController class’ descendants are activated, one after another. | To activate a Window Controller for the Logon Window only, add an item to the Controller.Active collection. As the item’s value, pass an expression that is set to true when the current Window contains the LogonController. Override a Controller’s WindowChanging method, to cancel the activation. Add an item to the Controller.Active collection, passing false as the item’s value. Subscribe to the Controller.Activated event. This is the primary method to perform the required functionality using a Controller. |
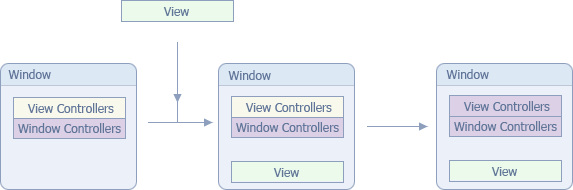
Assign the View to the Window
Stage Description | Ways to Interfere |
|---|---|
The created View is assigned to the Logon Window. | Subscribe to the Frame.ViewChanging or Frame.ViewChanged event. You can do this in a Widow Controller’s Controller.Activated event handler or in a View Controller’s Controller.FrameAssigned event handler. |
View Controllers from the Logon Window’s Frame.Controllers collection are activated. | You can manage the activation of a View Controller using the following properties: ViewController.TargetViewType, ViewController.TargetViewNesting, ViewController.TargetObjectType and ViewController.TargetViewId. Override a Controller’s ViewChanging method to cancel the activation. Add an item to the Controller.Active collection, passing false as the item’s value. Subscribe to the Controller.Activated event. This is the main entry to perform the required functionality using a Controller. |
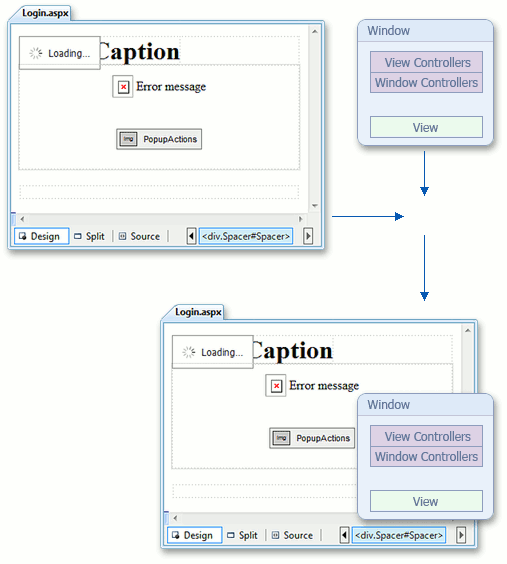
Assign the Logon Template to the Window
| Stage Description | Ways to Interfere |
|---|---|
| The Login.aspx page is loaded. This page implements the IWindowTemplate interface, to support the XAF architecture. When loaded, this page is assigned to the Logon Window as a Template. | You can customize the Logon.aspx page, as required. This page is available in an ASP.NET Web Forms application project of an XAF solution. |
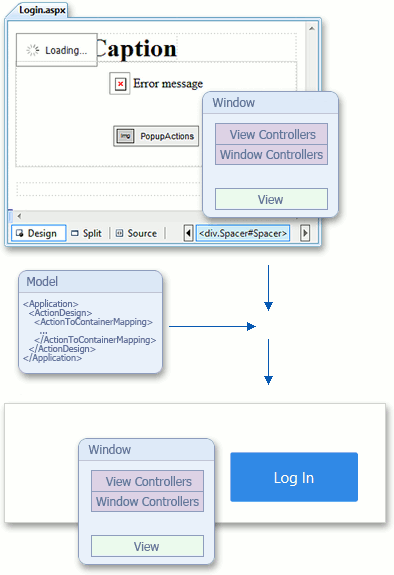
Controls for Actions are Created
| Stage Description | Ways to Interfere |
|---|---|
| The Window’s TemplateChanged event is raised. This event is handled by the FillActionContainersController, which is already activated, since it represents a Window Controller. The TemplateChanged event handler registers Actions in the Action Containers of the Window’s Template. Each Action is registered in the Action Container to which it is mapped in the Application Model’s ActionDesign | ActionToContainerMapping node. The Action Containers create controls for their Actions. | Subscribe to the Frame.TemplateChanged event to access the Logon Window’s Template and its Action Containers. To do this, use a Window Controller’s Controller.Activated event. |
Assign the Window’s View to the Template
| Stage Description | Ways to Interfere |
|---|---|
| The View is assigned to a current Window’s Template. This forces the creation of a View’s control (see View.CreateControls). This control is added to the Template’s ViewSite. | Handle, the View.ControlsCreating and View.ControlsCreated events to perform custom actions before and after the controls that represent the View in a UI are created. |
Authentication
Stage Description | Ways to Interfere |
|---|---|
To start the authentication process, an Object Space (see BaseObjectSpace) is created, to check whether or not a record defining the user who is logging on exists in the application database. Before accessing the database, the compatibility of the module versions in the database and their actual versions is checked. If the versions in the database are greater than the actual ones, an exception is raised, requiring that you increase your application’s version. If lower, the XafApplication.DatabaseVersionMismatch event is raised. By default, this event is handled in XAF solutions. The event handler calls the Database Updater’s Update method, which updates the database to the required version. However, this method is called when the application is run in debug mode. In release mode, an exception is raised (you can see the entire code in your application). | Before the authenticating process is started, you can access the Log inParameters object, modified by the user who is logging on. For this purpose, handle the XafApplication.LoggingOn event. You can perform a custom process of checking the database and application compatibility. For this purpose handle the XafApplication.CustomCheckCompatibility event. In this instance, you should raise the XafApplication.DatabaseVersionMismatch event in this code as well, in order to update the database when required. If you do not need this scenario implemented in the XafApplication.DatabaseVersionMismatch event handler that is generated automatically in your application, write a custom event handler. For instance, you can implement a custom DatabaseUpdater class and call its Update method in the DatabaseVersionMismatch event handler. Use the XafApplication.DatabaseUpdateMode property to set the required behavior for the updating database mechanism. For instance, you can set the UpdateDatabaseAlways value, so that the database’s version is updated each time the application runs. This is useful in applications written using VB, because of the difficulty in incrementing versions in VB projects. |
Authentication is accomplished after an end user clicks Log In in the logon window. When the AuthenticationStandard strategy is used, users whose name and password typed in the logon window coincide with the corresponding records in the database are authenticated. | If the default authentication that is performed by a built-in Authentication class does not satisfy your requirements, implement a custom class. For instance, inherit from one of the built-in authentication classes: AuthenticationStandard or AuthenticationActiveDirectory. Alternatively, inherit from the base AuthenticationBase class. In your class, override the Authenticate method. It returns the user object that is found in the database with the credentials specified by the end user who is logging on. To use a custom authentication instead of a default one, assign an instance of your class to the Application.Security.Authentication property. To see an example, refer to the How to: Use Custom Logon Parameters and Authentication topic. You can access the LogonParameters object before its property values are saved to a store. For this purpose, handle the XafApplication.LastLogonParametersWriting event. Alternatively, you can override the XafApplication.WriteLastLogonParametersCore method, to implement a custom technique for saving the credentials. |
The system gives end users three attempts to logon to the application. After the third attempt, the Logon Window’s View is changed to a newly created LoginAttemptsAmountedToLimit DetailView. This requires that the end user rerun the application to try to log on to it again. | To change the default three-attempt scenario, override the OnLogonFailed method in your WebApplication class’ descendant. You can customize the LoginAttemptsAmountedToLimit Detail View. For this purpose, use the Views | LogonAttemptsAmountedToLimit_DetailView node in the Model Editor. For instance, you can change the View Items’ layout or perform localization. |
The end-user customizations layer is created. In XAF ASP.NET Web Forms applications, this layer is not used, because user customizations are not stored anywhere, by default. | You can store the customizations made to a List View in the web browser cookies by setting the IModelOptionsStateStore.SaveListViewStateInCookies property of the Options node and the IModelListViewStateStore.SaveStateInCookies property of the corresponding Views | <ListView> node to true. To access the LogonParameters object or perform custom actions after the logon procedure has been completed, handle the XafApplication.LoggedOn event. |