DxMap Class
An interactive component that displays a geographic map with markers and routes.
Namespace: DevExpress.Blazor
Assembly: DevExpress.Blazor.v24.1.dll
Declaration
public class DxMap :
    ClientComponentBase,
    IModelProvider<MapApiKeyModel>,
    IModelProvider<MapLocationModel>,
    IModelProvider<ClientComponentCollectionModel<MapMarkerModel>>,
    IModelProvider<ClientComponentCollectionModel<MapRouteModel>>
Remarks
The DevExpress Map for Blazor (<DxMap>) can display Google and Bing maps and allows you to create markers and routes. Built-in controls allow a user to zoom and navigate the map or change its type.
Prerequisites
You must have a map API key to display maps in your application. For information on where to get a key, refer to the following topics:
Add a Map to a Project
Follow the steps below to add a Map component to an application:
- Use a DevExpress Project Template to create a new Blazor Server or Blazor WebAssembly application. If you use a Microsoft project template or already have a Blazor project, configure your project to incorporate DevExpress Blazor components.
- Add the following markup to a
.razorfile:<DxMap>…</DxMap>. - Set the Provider property to the map data provider used by the control:
Bing,Google, orGoogleStatic. - Assign your map API key to the corresponding property (Bing, Google, or GoogleStatic) in the DxMapApiKeys object.
- Use Height and Width properties to set control size.
- Configure other options (see sections below).
Map Navigation
The DxMap control automatically adjusts map center and zoom level to display all markers and routes. Set the AutoAdjust property to false to disable this behavior.
Manual Map Adjustment
You can specify the map center and zoom level manually.
- Use the Zoom property to specify the initial map zoom level.
- Use the DxMapCenter object to specify a location that should be displayed in the center of the component.
<DxMap Zoom="14" Provider="MapProvider.Bing" Width="100%" Height="600px" >
    <DxMapApiKeys Bing="@MapApiKeyProvider.GetBingProviderKey()" />
    <DxMapCenter GeoPosition="40.7061, -73.9969" />
</DxMap>
Manual map adjustment can be useful when automatic adjustment is not available:
DxMapdisplays a static Google Map image.- AutoAdjust property is set to
false. - The map does not contain markers or routes.
User Navigation Controls
Set the ControlsVisible property to true to display map type and navigation controls.
<DxMap Zoom="14" Provider="MapProvider.Bing" Width="100%" Height="600px" ControlsVisible="true" >
    <DxMapApiKeys Bing="@MapApiKeyProvider.GetBingProviderKey()" />
    <DxMapCenter GeoPosition="40.7061, -73.9969" />
</DxMap>
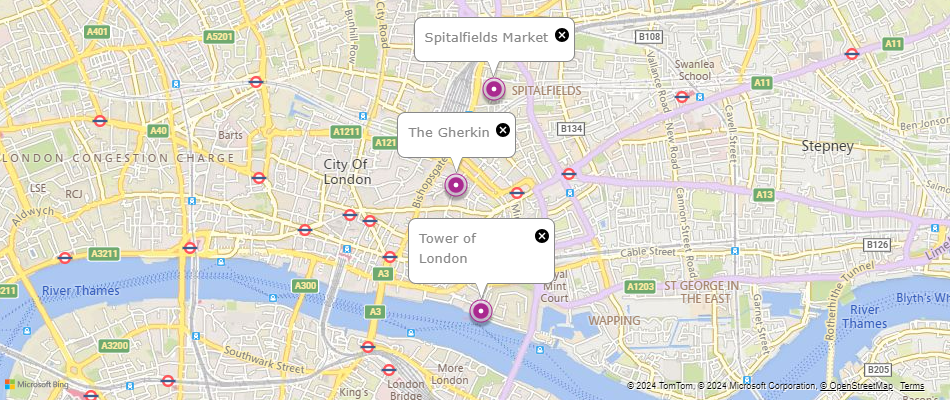
Map Markers
To create a map marker, follow the steps below:
- Place a DxMapMarker component in the DxMapMarkers collection.
- Add a DxMapMarkerLocation object and specify marker location. You can use either the GeoPosition property or Latitude and Longitude properties.
- Optional. Add a DxMapMarkerTooltip object to specify a tooltip for the marker. Use the Text property to specify the tooltip text and the Visible property to specify the initial tooltip visibility.
- Optional. Use the IconUrl property to specify a custom icon for the marker. You can use the MarkerIconUrl property to set a common icon for every marker on the map.
- Optional. Specify the MarkerId property. This value allows you to identify the clicked marker in the MarkerClick event handler.
<DxMap Zoom="14" Provider="MapProvider.Bing" Width="950px" Height="400px" >
    <DxMapApiKeys Bing="@MapApiKeyProvider.GetBingProviderKey()" />
    <DxMapMarkers>
        <DxMapMarker>
            <DxMapMarkerLocation GeoPosition="51.519852,-0.077593" />
            <DxMapMarkerTooltip Text="Spitalfields Market" Visible="true" />
        </DxMapMarker>
        <DxMapMarker>
            <DxMapMarkerLocation GeoPosition="51.514763,-0.080787" />
            <DxMapMarkerTooltip Text="The Gherkin" Visible="true" />
        </DxMapMarker>
        <DxMapMarker>
            <DxMapMarkerLocation GeoPosition="51.508029,-0.078674" />
            <DxMapMarkerTooltip Text="Tower of London" Visible="true" />
        </DxMapMarker>
    </DxMapMarkers>
</DxMap>
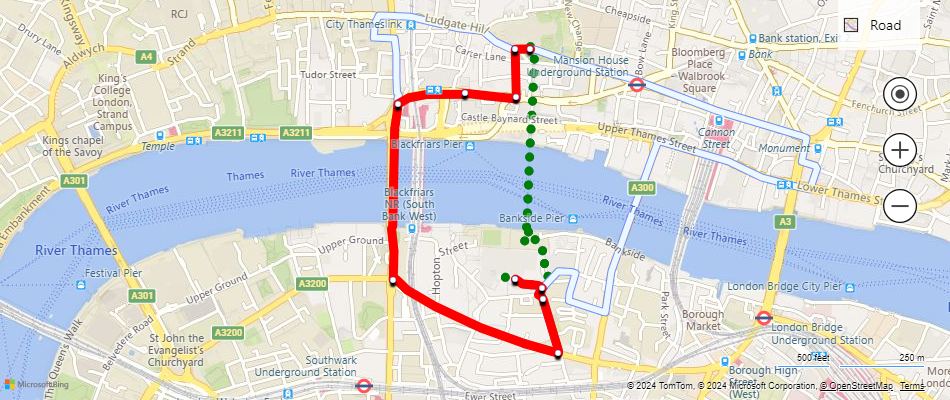
Map Routes
To create a route, follow the steps below:
- Place a DxMapRoute component in the DxMapRoutes collection.
- Use the Mode property to specify the transportation mode:
WalkingorDriving. - Add the DxMapRouteLocations component and populate it with key route points (DxMapRouteLocation objects).
- Optional. Customize route style settings: Color, Opacity, and Weight.
<DxMap Zoom="14" Provider="MapProvider.Bing" Width="950px" Height="400px" ControlsVisible="true" >
    <DxMapApiKeys Bing="@MapApiKeyProvider.GetBingProviderKey()" />
    <DxMapRoutes>
        <DxMapRoute Color="green" Weight="9" Mode="MapRouteMode.Walking" >
            <DxMapRouteLocations>
                <DxMapRouteLocation GeoPosition="St. Paul's Cathedral,London" />
                <DxMapRouteLocation GeoPosition="Tate Modern,London" />
            </DxMapRouteLocations>
        </DxMapRoute>
        <DxMapRoute Color="red" Weight="9" Mode="MapRouteMode.Driving" >
            <DxMapRouteLocations>
                <DxMapRouteLocation GeoPosition="St. Paul's Cathedral,London" />
                <DxMapRouteLocation GeoPosition="Tate Modern,London" />
            </DxMapRouteLocations>
        </DxMapRoute>
    </DxMapRoutes>
</DxMap>