A Custom Editor for a Custom Parameter Type
- 4 minutes to read
This topic explains how to implement a custom parameter type, add custom type parameters to a report, and create a custom editor for the Document Viewer Parameters Panel. The custom parameter type defines email addresses.
Create a Custom Parameter Type and a Converter
Define a CustomParameterType class with the Value property. Implement a CustomParameterTypeConverter converter to display a parameter value in a document.
using System;
using System.ComponentModel;
using System.Globalization;

    [TypeConverter(typeof(CustomParameterTypeConverter))]
    public class CustomParameterType
    {
        public string Value { get; set; }
        public override string ToString()
        {
            return Value;
        }
    }

    public class CustomParameterTypeConverter : TypeConverter
    {
        public override object ConvertTo(ITypeDescriptorContext context,
            CultureInfo culture, object value, Type destinationType)
        {
            if (destinationType == typeof(string))
            {
                return ((CustomParameterType)value).Value;
            }
            return base.ConvertTo(context, culture, value, destinationType);
        }
        public override bool CanConvertTo(ITypeDescriptorContext context,
            Type destinationType)
        {
            return destinationType == typeof(string) ||
                base.CanConvertTo(context, destinationType);
        }

        public override bool CanConvertFrom(ITypeDescriptorContext context, Type sourceType)
        {
            return sourceType == typeof(string) || base.CanConvertFrom(context, sourceType);
        }
        public override object ConvertFrom(ITypeDescriptorContext context,
            CultureInfo culture, object value)
        {
            var valueString = value as string;
            if (valueString != null)
            {
                return new CustomParameterType { Value = valueString };
            }
            return base.ConvertFrom(context, culture, value);
        }
    }
Implement a Custom Parameter Serializer
A serializer is necessary to pass data from the client to the controller on the server and store the parameter value in report definition files.
using System;
using System.Collections.Generic;
using System.ComponentModel;
using System.Linq;
using CustomParameterEditorAngularExample;
using DevExpress.XtraReports.Native;

namespace CustomParameterEditorAngularExample
{
    [TypeConverter(typeof(CustomParameterTypeConverter))]
    public class CustomDataSerializer : IDataSerializer
    {
        public const string Name = "myCustomDataSerializer";

        public bool CanDeserialize(string value, string typeName, object extensionProvider)
        {
            return typeName == typeof(CustomParameterType).FullName;
        }

        public bool CanSerialize(object data, object extensionProvider)
        {
            return data is CustomParameterType;
        }

        public object Deserialize(string value, string typeName, object extensionProvider)
        {
            if (typeName == typeof(CustomParameterType).FullName)
            {
                return new CustomParameterType { Value = value };
            }
            return null;
        }

        public string Serialize(object data, object extensionProvider)
        {
            var parameter = data as CustomParameterType;
            return parameter != null ? parameter.Value : null;
        }
    }
}
Register Custom Classes and Serializer at Startup
Add the following code snippet to the Program.cs file to register the CustomParameterType, an array of CustomParameterType, and the CustomDataSerializer service in the application:
DevExpress.Utils.DeserializationSettings.RegisterTrustedClass(typeof(CustomParameterType));
DevExpress.Utils.DeserializationSettings.RegisterTrustedClass(typeof(CustomParameterType[]));
SerializationService.RegisterSerializer(CustomDataSerializer.Name, new CustomDataSerializer());
For more information, review the following help topic: Reporting — Safe Deserialization.
Specify an Editor Template in a CustomizeParameterEditors Callback
In the CustomizeParameterEditors callback function, specify the name of the template that contains the custom editor (custom-parameter-text-editor). The editor implements the email validation rule. For more information on validation rules, review the following help topic: Validator Validation Rules.
<dx-report-viewer [reportUrl]="reportUrl" height="calc(100vh - 90px)" developmentMode="true">
    <dxrv-request-options [invokeAction]="invokeAction" [host]="hostUrl"></dxrv-request-options>
    <dxrv-progressbar-settings position="BottomLeft"></dxrv-progressbar-settings>
    <dxrv-callbacks (CustomizeParameterEditors)="onCustomizeParameterEditors($event)"></dxrv-callbacks>
</dx-report-viewer>
import { Component, Inject, ViewEncapsulation } from '@angular/core';

@Component({
    selector: 'report-viewer',
    encapsulation: ViewEncapsulation.None,
    templateUrl: './report-viewer.html',
    styleUrls: [
        "../../../node_modules/devextreme/dist/css/dx.material.blue.light.css",
        "../../../node_modules/@devexpress/analytics-core/dist/css/dx-analytics.common.css",
        "../../../node_modules/@devexpress/analytics-core/dist/css/dx-analytics.material.blue.light.css",
        "../../../node_modules/devexpress-reporting/dist/css/dx-webdocumentviewer.css"
    ]
})
export class ReportViewerComponent {
    reportUrl: string = "CustomParameterReport";
    invokeAction: string = '/DXXRDV';

    onCustomizeParameterEditors(event): void {
        const parameter = event.args.parameter;
        const info = event.args.info;
        if (parameter.type === 'CustomParameterType') {
                info.validationRules = info.validationRules || [];
                info.validationRules.push(
                    { type: 'email', message: 'Email parameter value has invalid format.' });
                info.editor.header = "custom-parameter-text-editor";
        }
    }

    constructor(@Inject('BASE_URL') public hostUrl: string) { }
}
Register Editor Template
The custom-parameter-text-editor template is registered as the myCustomInput component in app.component files:
<ng-template #myCustomInput let-data="data">
    <custom-input-component [data]="data"></custom-input-component>
</ng-template>
import { AfterViewInit, Component, TemplateRef, ViewChild } from '@angular/core';
import { TemplateEngine } from 'devexpress-reporting-angular/dx-report-viewer';

@Component({
    selector: 'app-root',
    templateUrl: './app.component.html'
})
export class AppComponent implements AfterViewInit {
    title = 'report-viewer-app';
    @ViewChild('myCustomInput') myCustomInput!: TemplateRef<{ data: any }>;
    constructor(private _templateEngine: TemplateEngine) {
    }
    ngAfterViewInit(): void {
        this._templateEngine.register('custom-parameter-text-editor', this.myCustomInput);
    }
}
The myCustomInput component is a DevExtreme text editor defined as follows:
<dx-text-box [value]="data.value" [disabled]="data.disabled">
    <dx-validator [validationRules]="data.validationRules">
    </dx-validator>
</dx-text-box>
import { Component, Input, OnInit } from '@angular/core';
import { IEditorViewModel } from '@devexpress/analytics-core/analytics-widgets-native';

@Component({
    selector: 'custom-input-component',
    templateUrl: 'custom.input.component.html'
})
export class CustomInputComponent {
    @Input('data') data!: IEditorViewModel;
}
For more information about the DevExtreme text editor, review the following help topic: dxTextBox.
You should add related modules to the app.module.ts file:
import { DxTextBoxModule } from "devextreme-angular";
import { DxValidatorModule } from "devextreme-angular";

import { CustomInputComponent } from './custominputcomponent/custom.input.component';

@NgModule({
    declarations: [
    // ...
        CustomInputComponent,
    ],
    imports: [
    // ...
        DxTextBoxModule,
        DxValidatorModule
    ],
    providers: [],
    bootstrap: [AppComponent]
})
export class AppModule { }
Add Custom Parameter to Report
The following code snippet adds a CustomParameterType parameter to the report and binds it to the label2 XRLabel control:
using DevExpress.XtraReports.Parameters;
using DevExpress.XtraReports.UI;
// ...
            Parameter customMailParameter = new Parameter {
                Description = "Custom Email Parameter",
                Name = "customMailParameter",
                ValueInfo = "SampleMail@example.com",
                Type = typeof(CustomParameterType),
                Visible = true,
                Enabled = true
            };

            this.Parameters.Add(customMailParameter);

            this.label2.ExpressionBindings.AddRange(new ExpressionBinding[] {
            new ExpressionBinding("BeforePrint", "Text", "?customMailParameter") });
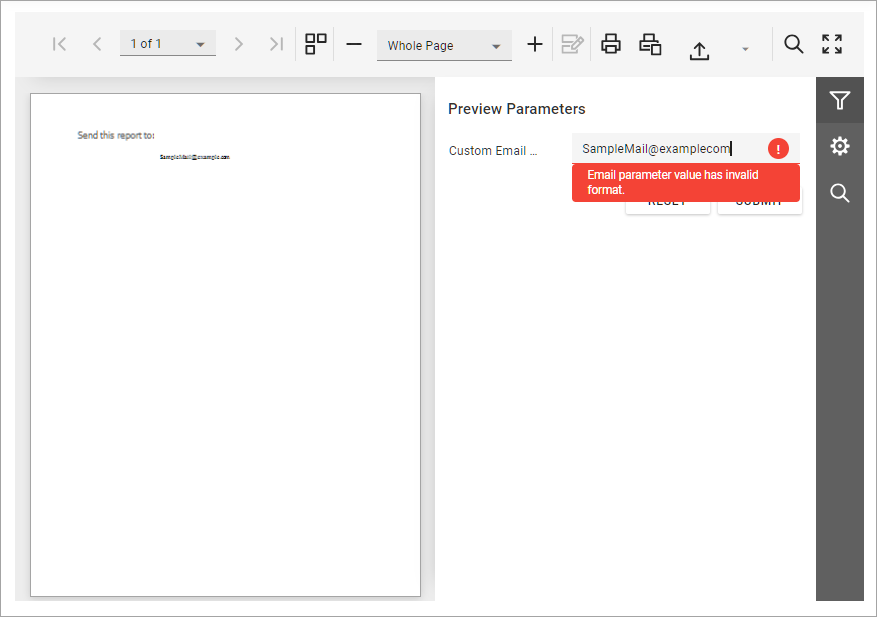
Run the App to Show the Result
The Document Viewer control that displays a report with a custom parameter appears as follows: