Add a Simple Action
- 3 minutes to read
This lesson explains how to create a Simple Action.
A Simple Action is a button that executes custom code when a user clicks it.
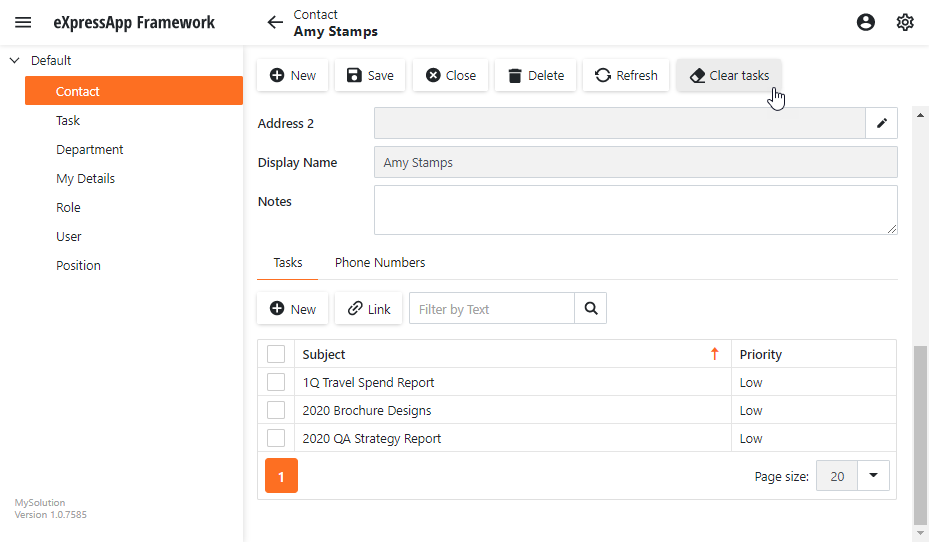
In this lesson, you will add a “Clear tasks” button to the Contact Detail View.
Note
Before you proceed, take a moment to review the previous lessons:
Step-by-Step Instructions
Add a View Controller. In the Solution Explorer, right-click the Controllers folder in the MySolution.Module project, and choose Add DevExpress Item | New Item… to invoke the Template Gallery. Select the XAF Controllers | View Controller Visual Studio template, specify ClearContactTasksController as the new item’s name and click Add Item. As a result, you will get an autogenerated ClearContactTasksController.cs file with a single View Controller declaration.

Open the newly added ClearContactTasksController.cs file, and specify the controller properties in its constructor:
using System;
using DevExpress.ExpressApp;
using DevExpress.ExpressApp.Actions;
using DevExpress.Persistent.Base;
using MySolution.Module.BusinessObjects;

//...
public partial class ClearContactTasksController : ViewController {
    public ClearContactTasksController() {
        InitializeComponent();
        TargetViewType = ViewType.DetailView;
        TargetObjectType = typeof(Contact);
    }
// ...
Add a new action to the controller and a handler for the action’s
Executeevent.using System; using DevExpress.ExpressApp; using DevExpress.ExpressApp.Actions; using DevExpress.Persistent.Base; using MySolution.Module.BusinessObjects; //... public partial class ClearContactTasksController : ViewController { public ClearContactTasksController() { InitializeComponent(); TargetViewType = ViewType.DetailView; TargetObjectType = typeof(Contact); SimpleAction clearTasksAction = new SimpleAction(this, "ClearTaskAction", PredefinedCategory.View) { Caption = "Clear tasks", ConfirmationMessage = "Are you sure you want to clear the Tasks list?", ImageName = "Action_Clear" }; clearTasksAction.Execute += ClearTasksAction_Execute; } private void ClearTasksAction_Execute(Object sender, SimpleActionExecuteEventArgs e) { while(((Contact)View.CurrentObject).Tasks.Count > 0) { ((Contact)View.CurrentObject).Tasks.Remove(((Contact)View.CurrentObject).Tasks[0]); } ObjectSpace.SetModified(View.CurrentObject); } // ...Run the application.
Open a detail form for a Contact object. Link several tasks to this object and save it.
Click the Clear tasks button (the Action you implemented). A confirmation message appears. Click OK to remove all Tasks from the current Contact.
Detailed Explanation
Controller Options
View Controllers (ViewController descendants) serve as containers for Actions.
In this tutorial you set the following properties for the controller:
TargetViewType
This property is set to
ViewType.DetailView, so the controller is activated only in detail forms.TargetObjectType
This property specifies the type of objects that use the controller (Contact in this lesson). If you do not specify this property, the controller’s actions are displayed for each detail form in your application.
Tip
You can also create a generic ViewController<ViewType> or ObjectViewController<ViewType, ObjectType> object and specify the target type as the ViewType parameter.
Action Options
- The Caption property specifies the Action’s button caption. If this property is not specified, the button caption is set to the Action’s Id property value.
- The Category property specifies the Action group to which the current Action belongs. All Actions within one group are displayed sequentially in a UI.
- The ImageName property specifies the icon of the Action’s button in the interface. You can use one of the standard images or import your own.
- The ConfirmationMessage property specifies the confirmation message displayed when a user executes an Action. If this property is not specified, the confirmation message is not displayed.
- The main entry point of a Simple Action is its Execute event. This event is raised when a user clicks the Simple Action’s control (a button by default). Handle this event to execute custom code.
Tip
You can display an action’s button in a Detail View layout instead of a toolbar: How to: Include an Action in a Detail View Layout.