Ways to Show a Confirmation Dialog
- 6 minutes to read
This topic describes how to show a confirmation message/dialog with additional fields.
This topic consists of the following sections:
- Platform-independent approaches:
- A WinForms-specific approach:
Tip
Refer to the following topics if you want to show a text notification:
Using the ConfirmationMessage Property
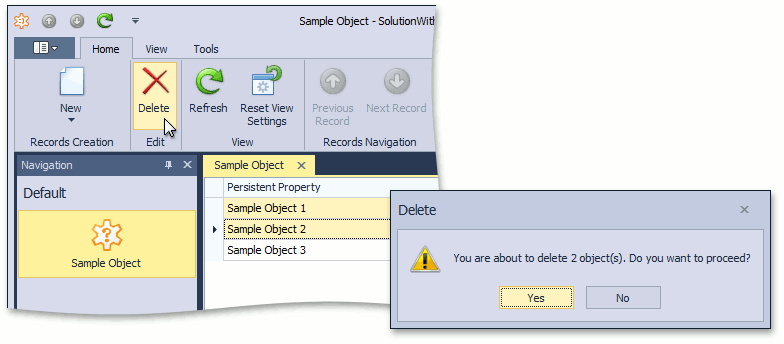
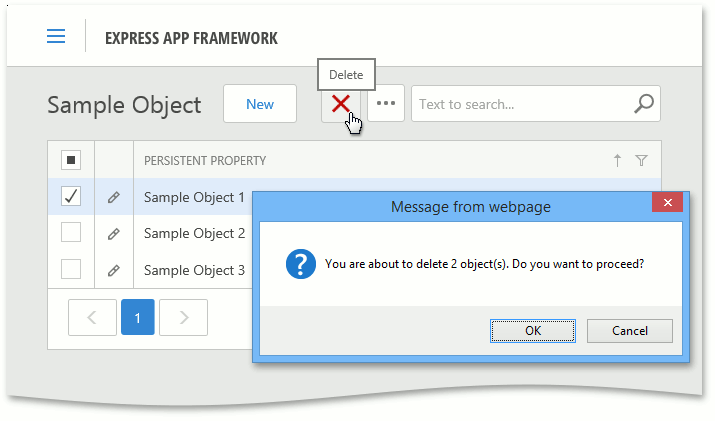
Use the ActionBase.ConfirmationMessage property in code or IModelAction.ConfirmationMessage in the Model Editor to change a default confirmation message for built-in or custom Actions.
For example, implement the following Controller to change the Delete Action’s confirmation message:
public class ConfirmationWindowActionController : ViewController {
    DeleteObjectsViewController deleteObjectsViewController;
    protected override void OnActivated() {
        base.OnActivated();
        deleteObjectsViewController = Frame.GetController<DeleteObjectsViewController>();
        if (deleteObjectsViewController != null) {
            View.SelectionChanged += View_SelectionChanged;
        }
    }
    void View_SelectionChanged(object sender, System.EventArgs e) {
        deleteObjectsViewController.DeleteAction.ConfirmationMessage =
                String.Format("You are about to delete {0} object(s). Do you want to proceed?",
(View.SelectedObjects.Count));
    }
    protected override void OnDeactivated() {
        base.OnDeactivated();
        if (deleteObjectsViewController != null) {
            View.SelectionChanged -= View_SelectionChanged;
            deleteObjectsViewController = null;
        }
    }
}
Click the Delete Action to see the result:
Using a New Detail View
This section demonstrates how to invoke pop-up window with a non-persistent object’s Detail View.
Add the following non-persistent class to your platform-agnostic module project. Decorate this class with the DomainComponentAttribute to register it in the Types Info Subsystem.
using DevExpress.ExpressApp.DC;
using DevExpress.ExpressApp.Model;
//...
[DomainComponent]
public class ConfirmationWindowParameters {
    public ConfirmationWindowParameters() { }
    [ModelDefault("AllowEdit", "False")]
    public string ConfirmationMessage { get; set; }
}
Use one of the following approaches to show the confirmation message in a pop-up window when an Action is executed:
- using the CustomizePopupWindowParams event;
- using the ShowViewInPopupWindow method (WinForms and ASP.NET only).
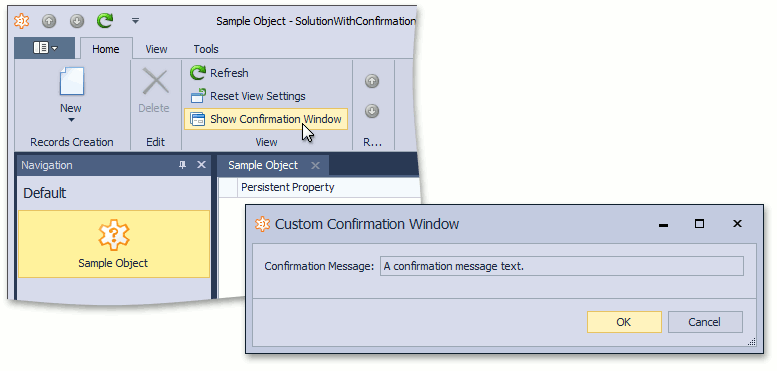
Using the CustomizePopupWindowParams event
- Create a new ViewController and PopupWindowShowAction in its constructor.
- In the Action’s CustomizePopupWindowParams event, create a non-persistent Object Space, a new ConfirmationWindowParameters class instance, and the DetailView for this object.
- Specify the ConfirmationWindowParameters object’s properties and set the CustomizePopupWindowParamsEventArgs.View parameter to the newly created Detail View to show it in the pop-up window.
using DevExpress.ExpressApp;
using DevExpress.ExpressApp.Actions;
//...
public class ConfirmationWindowController : ViewController {
    public ConfirmationWindowController() {
        PopupWindowShowAction showConfirmationWindowAction =
new PopupWindowShowAction(this, "CustomConfirmationWindow", DevExpress.Persistent.Base.PredefinedCategory.View);
        showConfirmationWindowAction.ImageName = "ModelEditor_Views";
        showConfirmationWindowAction.CustomizePopupWindowParams +=
showConfirmationWindowAction_CustomizePopupWindowParams;
    }
    private void showConfirmationWindowAction_CustomizePopupWindowParams(object sender,
CustomizePopupWindowParamsEventArgs e) {
        NonPersistentObjectSpace objectSpace =
        (NonPersistentObjectSpace)Application.CreateObjectSpace(typeof(ConfirmationWindowParameters));
        ConfirmationWindowParameters parameters =
        objectSpace.CreateObject<ConfirmationWindowParameters>();
        parameters.ConfirmationMessage = "Confirmation message text.";
        objectSpace.CommitChanges();
        DetailView confirmationDetailView = Application.CreateDetailView(objectSpace, parameters);
        confirmationDetailView.Caption = "Custom Confirmation Window";
        confirmationDetailView.ViewEditMode = DevExpress.ExpressApp.Editors.ViewEditMode.View;
        e.View = confirmationDetailView;
    }
}
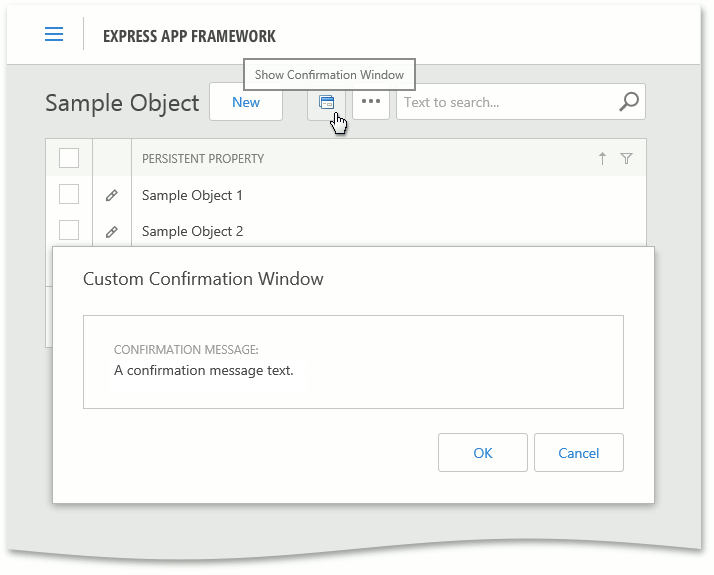
The following images demonstrate this confirmation window:

Note
You can also process the OK and Close button clicks. For this purpose, use the CustomizePopupWindowParamsEventArgs.DialogController property to access the Dialog Controller, and subscribe to its Accepting and Canceling events.
Using the ShowViewInPopupWindow method
- Create a new ViewController and SimpleAction in its constructor.
- In the Action’s Execute event, create a non-persistent Object Space, a new ConfirmationWindowParameters class instance, and the DetailView for this object.
- Set the ConfirmationWindowParameters object’s properties to the required values and call the ShowViewStrategyBase.ShowViewInPopupWindow method. Pass the newly created Detail View as the ShowViewInPopupWindow‘s first parameter to show this View in a pop-up. You can also pass delegates for processing the Ok and Cancel buttons click.
using DevExpress.ExpressApp;
using DevExpress.ExpressApp.Actions;
using DevExpress.Persistent.Base;
// ...
public class ConfirmationWindowController : ViewController {
    public ConfirmationWindowController() {
        SimpleAction showConfirmationWindowAction = new SimpleAction(this, "CustomConfirmationWindow", PredefinedCategory.View);
        showConfirmationWindowAction.ImageName = "ModelEditor_Views";
        showConfirmationWindowAction.Execute += ShowConfirmationWindowAction_Execute;
    }
    private void ShowConfirmationWindowAction_Execute(object sender,
    SimpleActionExecuteEventArgs e) {
        NonPersistentObjectSpace objectSpace =
        (NonPersistentObjectSpace)Application.CreateObjectSpace(typeof(ConfirmationWindowParameters));
        ConfirmationWindowParameters parameters = new ConfirmationWindowParameters();
        parameters.ConfirmationMessage = "A confirmation message text.";
        DetailView confirmationDetailView = Application.CreateDetailView(objectSpace, parameters);
        confirmationDetailView.Caption = "Custom Confirmation Window";
        Application.ShowViewStrategy.ShowViewInPopupWindow(confirmationDetailView, OkDelegate, CancelDelegate);
    }
    public void OkDelegate() {
            Application.ShowViewStrategy.ShowMessage("The message is accepted!");
    }
    public void CancelDelegate() {
            Application.ShowViewStrategy.ShowMessage("The message is canceled!");
    }
}
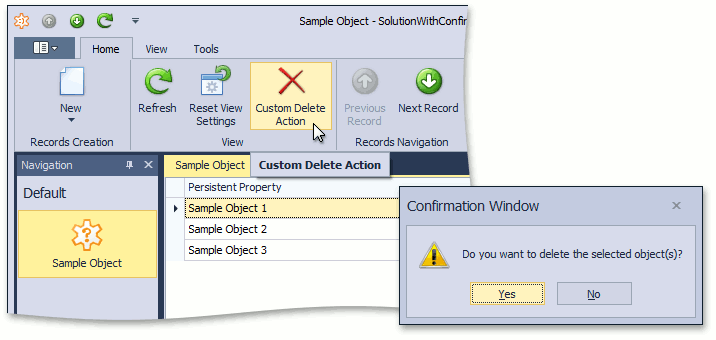
Using the Messaging Class’ Methods
Use the Messaging class’s methods to display a confirmation message with standard dialog buttons (see MessageBoxButtons) in WinForms applications. The following Controller demonstrates how to use this class to show a confirmation window:
public class MessagingController : ViewController {
    public MessagingController() {
        SimpleAction showMessagingConfirmationForm = new SimpleAction(this, "CustomDeleteAction", DevExpress.Persistent.Base.PredefinedCategory.View);
        showMessagingConfirmationForm.ImageName = "Action_Delete";
        showMessagingConfirmationForm.Execute += showMessagingConfirmationForm_Execute;
    }
    void showMessagingConfirmationForm_Execute(object sender, SimpleActionExecuteEventArgs e) {
        if (WinApplication.Messaging.GetUserChoice("Do you want to delete the selected object(s)?",
"Confirmation Window", MessageBoxButtons.YesNo) == DialogResult.Yes)
            View.ObjectSpace.Delete(e.SelectedObjects);
        View.ObjectSpace.CommitChanges();
    }
}
The image below demonstrates this implementation result.