Set a Many-to-Many Relationship (EF 6)
- 3 minutes to read
In this lesson, you will learn how to set relationships between business objects. For this purpose, the Task business class will be implemented and a Many-to-Many relationship will be set between the Contact and Task objects. You will also learn the basics of automatic user interface construction for the referenced objects.
Note
Before proceeding, take a moment to review the Inherit from the Business Class Library Class (EF 6) lesson.
To add the Task business class to the application, you can use the Task class from the Business Class Library. Since you need to set a relationship between the Contact and Task objects, you need to customize the Task class implementation. Inherit from this class and add the Contacts collection property, as shown in the following code.
using System.Collections.Generic; using DevExpress.ExpressApp.Model; using DevExpress.Persistent.Base; using DevExpress.Persistent.BaseImpl.EF; namespace MySolution.Module.BusinessObjects { [DefaultClassOptions] [ModelDefault("Caption", "Task")] public class DemoTask : Task { public DemoTask() : base() { TrackedBy = new List<Contact>(); } public virtual IList<Contact> TrackedBy { get; set; } } }Note that the TrackedBy collection of Contact objects is declared as a virtual property and is initialized in the constructor.
Note
The ModelDefaultAttribute attribute, which is applied to the DemoTask class, specifies the “Task” value for the Caption property of the Application Model’s BOModel | DemoTask node. Generally, you can specify any property of the Application Model’s BOModel | <Class> node or BOModel | <Class> | OwnMembers | <Member> node by applying the ModelDefault attribute to a business class or its member.
Register the DemoTask type in the DbContext. Edit the BusinessObjects\MySolutionDbContext.cs file as shown below.
Modify the Contact class implementation: add the Tasks property as the second part of the relationship. The following code demonstrates the required changes in the Contact class implementation. Note that the Tasks collection of Contact objects is declared as a virtual property and is initialized in the constructor.
using System.Collections.Generic; //... public class Contact : Person { public Contact() { Tasks = new List<DemoTask>(); } //... public virtual IList<DemoTask> Tasks { get; set; } }The code above will automatically generate the required intermediate tables and relationships.
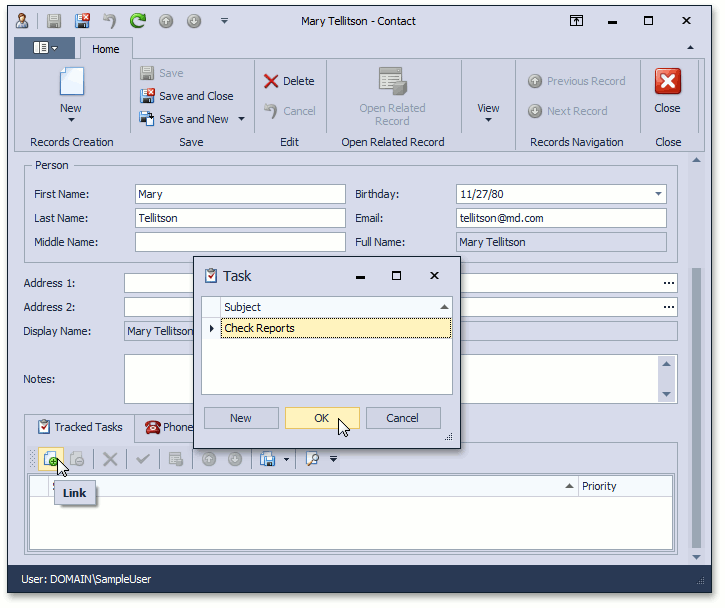
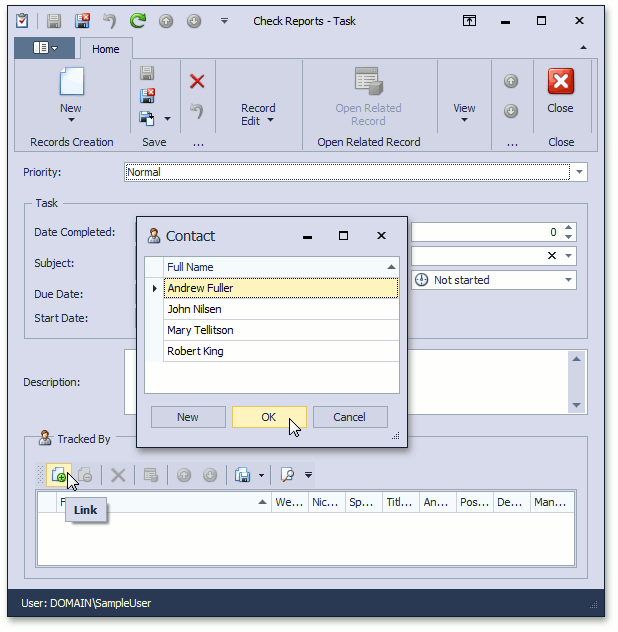
Run the WinForms or ASP.NET Web Forms application. Invoke the Contact Detail View or Task Detail View. Add tasks to a Contact object’s Tracked Tasks collection, or contacts to a Task object’s Tracked By collection. To apply the assignment, use the Link button that accompanies these collections.
You can see the code demonstrated in this lesson in the MySolution.Module | Data | Contact.cs (Contact.vb) and DemoTask.cs (DemoTask.vb) files of the EF Demo (Code First) installed with XAF. By default, the EF Demo (Code First) application is installed in %PUBLIC%\Documents\DevExpress Demos 21.2\Components\eXpressApp Framework\EFDemoCodeFirst.
Next Lesson: Set a One-to-Many Relationship (EF 6)