Implement Custom Business Classes and Reference Properties (EF 6)
- 3 minutes to read
In this lesson, you will learn how to implement business classes from scratch. For this purpose, the Position business class will be implemented. This class will be used in the Contact class, implemented previously. You will also learn the basics of automatic user interface construction for referenced objects.
Note
Before proceeding, take a moment to review the Inherit from the Business Class Library Class (EF 6) lesson.
Add the Position class as shown in the Inherit from the Business Class Library Class (EF 6) lesson. Replace the auto-generated code with the following.
using System; using System.Collections.Generic; using System.ComponentModel; using DevExpress.Persistent.Base; namespace MySolution.Module.BusinessObjects { [DefaultClassOptions] [DefaultProperty(nameof(Title))] public class Position { public Position() { Contacts = new List<Contact>(); } [Browsable(false)] public Int32 ID { get; protected set; } public String Title { get; set; } public virtual IList<Contact> Contacts { get; set; } } }Note that the Contact collection property is declared as virtual.
Note
The DefaultProperty attribute is used in the code above. This attribute is used to specify the default property of the class. You can specify the most descriptive property of your class in the DefaultProperty attribute, and its values will be displayed in the following.
- Detail form captions
- The leftmost column of a List View
- The Lookup List Views (These Views will be explained in the last step of this lesson.)
Refer to the Data Annotations in Data Model topic for additional information.
Important
You can use the XAF Business Object | EF 6 Business Object project item template from the Template Gallery to add an entity that supports IXafEntityObject, IObjectSpaceLink and INotifyPropertyChanged interfaces, which may be useful in many scenarios.
Register the new class in DbContext. Edit the BusinessObjects\MySolutionDbContext.cs file as shown below.
Add the Position property to the Contact class. The following code demonstrates this.
The Contact class now exposes the Position reference property. Note that this property is declared as virtual.
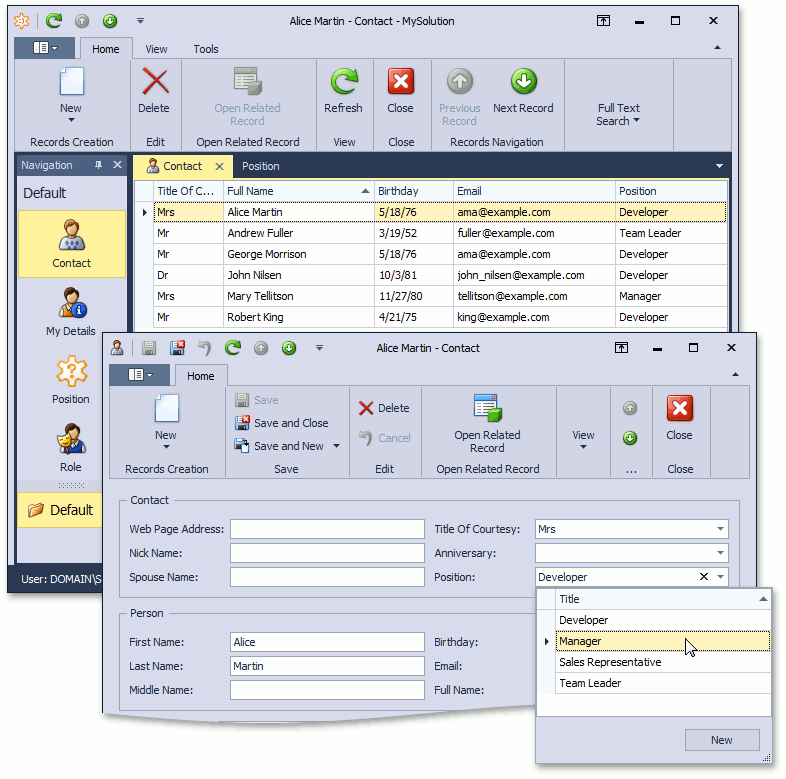
Run the WinForms or ASP.NET Web Forms application. You will see how the user interface is automatically generated using the specified data structures. The navigation control will contain a new Position item, which will allow you to access Position objects. Note that in the Contact Detail View, a lookup editor has been created for Position. In this editor, a special type of View, Lookup List View, is used. Typically, this View has a single column corresponding to the class’ default property. Using the lookup editor, you can select the Position for the current Contact, and add new Position objects using the New button. In addition, you will also be able to edit the existing Position object by holding down SHIFT+CTRL and clicking the selected object.
You can see the code demonstrated in this lesson in the EFDemo.Module | Data | Contact.cs (Contact.vb) and Position.cs (Position.vb) files of the EF Demo (Code First) installed with XAF. By default, the EF Demo (Code First) application is installed in %PUBLIC%\Documents\DevExpress Demos 21.2\Components\eXpressApp Framework\EFDemoCodeFirst.
Next Lesson: Add a Class from the Business Class Library (EF)