This topic demonstrates how to create a simple XAF application with a business model in a DbContext context.
Note
This topic demonstrates the code that can be generated automatically by the Solution Wizard. Proceed, if you want to implement the demonstrated functionality in the existing XAF solution. If you are creating a new XAF solution, use the wizard instead.
- A more complex example is provided in the EFDemoCodeFirst application that is shipped with XAF.
1. Create an XAF Application
Create a new XAF solution called MySolution using the DevExpress v19.2 XAF Solution Wizard. Select Entity Framework Code First at the Choose ORM step and click Finish.
2. Add the Entity Data Model and Context
In this topic, we will not describe entities and context implementation in detail, as it is already described in MSDN (see Code First to a New Database). Here, we assume that you are already familiar with creating an EF data model in code.
In the module project, implement the following Employee and Task classes.
using System;
using System.Collections.Generic;
using System.ComponentModel;
using System.Runtime.CompilerServices;
using DevExpress.Persistent.Base;
// ...
[DefaultClassOptions, ImageName("BO_Employee")]
public class Employee : INotifyPropertyChanged
{
    private int id;
    [Browsable(false)]
    public int Id {
        get { return id; }
        protected set {
            if (id != value) {
                id = value;
                OnPropertyChanged();
            }
        }
    }
    private string firstName;
    public string FirstName {
        get { return firstName; }
        set {
            if (firstName != value) {
                firstName = value;
                OnPropertyChanged();
            }
        }
    }
    private string lastName;
    public string LastName {
        get { return lastName; }
        set {
            if (lastName != value) {
                lastName = value;
                OnPropertyChanged();
            }
        }
    }
    private DateTime? birthday;
    public DateTime? Birthday {
        get { return birthday; }
        set {
            if (birthday != value) {
                birthday = value;
                OnPropertyChanged();
            }
        }
    }
    private List<Task> tasks;
    public virtual List<Task> Tasks {
        get { return tasks; }
        set {
            if (tasks != value) {
                tasks = value;
                OnPropertyChanged();
            }
        }
    }
    #region INotifyPropertyChanged members
    public event PropertyChangedEventHandler PropertyChanged;
    protected void OnPropertyChanged([CallerMemberName] string propertyName = null) {
        PropertyChanged?.Invoke(this, new PropertyChangedEventArgs(propertyName));
    }
    #endregion
}
Imports System
Imports System.Collections.Generic
Imports System.ComponentModel
Imports System.Runtime.CompilerServices
Imports DevExpress.Persistent.Base
' ...
<DefaultClassOptions, ImageName("BO_Employee")>
Public Class Employee
    Implements INotifyPropertyChanged
    Private _id As Integer
    <Browsable(False)>
    Public Property Id() As Integer
        Get
            Return _id
        End Get
        Protected Set(ByVal value As Integer)
            If _id <> value Then
                _id = value
                OnPropertyChanged()
            End If
        End Set
    End Property
    Private _firstName As String
    Public Property FirstName() As String
        Get
            Return _firstName
        End Get
        Set(ByVal value As String)
            If _firstName <> value Then
                _firstName = value
                OnPropertyChanged()
            End If
        End Set
    End Property
    Private _lastName As String
    Public Property LastName() As String
        Get
            Return _lastName
        End Get
        Set(ByVal value As String)
            If _lastName <> value Then
                _lastName = value
                OnPropertyChanged()
            End If
        End Set
    End Property
    Private _birthday? As Date
    Public Property Birthday() As Date?
        Get
            Return _birthday
        End Get
        Set(ByVal value? As Date)
            If Not _birthday.Equals(value) Then
                _birthday = value
                OnPropertyChanged()
            End If
        End Set
    End Property
    Private _tasks As List(Of Task)
    Public Overridable Property Tasks() As List(Of Task)
        Get
            Return _tasks
        End Get
        Set(ByVal value As List(Of Task))
            If _tasks IsNot value Then
                _tasks = value
                OnPropertyChanged()
            End If
        End Set
    End Property
    #Region "INotifyPropertyChanged members"
    Public Event PropertyChanged As PropertyChangedEventHandler _
    Implements INotifyPropertyChanged.PropertyChanged
    Protected Sub OnPropertyChanged( _
        <CallerMemberName> Optional propertyName As String = Nothing)
        Dim args As New PropertyChangedEventArgs(propertyName)
        RaiseEvent PropertyChanged(Me, args)
    End Sub
    #End Region
End Class
using System.ComponentModel;
using System.Runtime.CompilerServices;
using DevExpress.Persistent.Base;
using DevExpress.ExpressApp.DC;
// ...
[DefaultClassOptions, ImageName("BO_Task")]
public class Task : INotifyPropertyChanged
{
    private int id;
    [Browsable(false)]
    public int Id {
        get { return id; }
        protected set {
            if (id != value) {
                id = value;
                OnPropertyChanged();
            }
        }
    }
    private string subject;
    public string Subject {
        get { return subject; }
        set {
            if (subject != value) {
                subject = value;
                OnPropertyChanged();
            }
        }
    }
    private string description;
    [FieldSize(FieldSizeAttribute.Unlimited)]
    public string Description {
        get { return description; }
        set {
            if (description != value) {
                description = value;
                OnPropertyChanged();
            }
        }
    }
    private Employee assignedTo;
    public virtual Employee AssignedTo {
        get { return assignedTo; }
        set {
            if (assignedTo != value) {
                assignedTo = value;
                OnPropertyChanged();
            }
        }
    }
    #region INotifyPropertyChanged members
    public event PropertyChangedEventHandler PropertyChanged;
    protected void OnPropertyChanged([CallerMemberName] string propertyName = null) {
        PropertyChanged?.Invoke(this, new PropertyChangedEventArgs(propertyName));
    }
    #endregion
}
Imports System.ComponentModel
Imports System.Runtime.CompilerServices
Imports DevExpress.Persistent.Base
Imports DevExpress.ExpressApp.DC
' ...
<DefaultClassOptions, ImageName("BO_Task")>
Public Class Task
    Implements INotifyPropertyChanged
    Private _id As Integer
    <Browsable(False)>
    Public Property Id() As Integer
        Get
            Return _id
        End Get
        Protected Set(ByVal value As Integer)
            If _id <> value Then
                _id = value
                OnPropertyChanged()
            End If
        End Set
    End Property
    Private _subject As String
    Public Property Subject() As String
        Get
            Return _subject
        End Get
        Set(ByVal value As String)
            If _subject <> value Then
                _subject = value
                OnPropertyChanged()
            End If
        End Set
    End Property
    Private _description As String
    <FieldSize(FieldSizeAttribute.Unlimited)>
    Public Property Description() As String
        Get
            Return _description
        End Get
        Set(ByVal value As String)
            If _description <> value Then
                _description = value
                OnPropertyChanged()
            End If
        End Set
    End Property
    Private _assignedTo As Employee
    Public Overridable Property AssignedTo() As Employee
        Get
            Return _assignedTo
        End Get
        Set(ByVal value As Employee)
            If _assignedTo IsNot value Then
                _assignedTo = value
                OnPropertyChanged()
            End If
        End Set
    End Property
    #Region "INotifyPropertyChanged members"
    Public Event PropertyChanged As PropertyChangedEventHandler _
    Implements INotifyPropertyChanged.PropertyChanged
    Protected Sub OnPropertyChanged( _
        <CallerMemberName> Optional propertyName As String = Nothing)
        Dim args As New PropertyChangedEventArgs(propertyName)
        RaiseEvent PropertyChanged(Me, args)
    End Sub
    #End Region
End Class
The INotifyPropertyChanged interface allows you to receive notifications from business classes when their property values are changed.
In this code, you see the use of Data Annotations that influences UI generation - DefaultClassOptionsAttribute, ImageNameAttribute and FieldSizeAttribute, as well as the standard .NET Browsable attribute. As a result, the Employee and Task navigation items will be created, icons from the built-in image library will be used, the multiline editor will be displayed for the Task.Description property, and the service Id properties will be invisible in UI.
Note
You can use EF Power Tools to reverse engineer an existing database instead of writing code manually.
Implement the following DbContext descendant.
using System.Data.Entity;
// ...
public class MyDbContext : DbContext {
    public MyDbContext(string connectionString) : base(connectionString) { }
    public DbSet<Employee> Employees { get; set; }
    public DbSet<Task> Tasks { get; set; }
}
Imports System.Data.Entity
// ...
Public Class MyDbContext
    Inherits DbContext
    Public Sub New(ByVal connectionString As String)
        MyBase.New(connectionString)
    End Sub
    Private privateEmployees As DbSet(Of Employee)
    Public Property Employees() As DbSet(Of Employee)
        Get
            Return privateEmployees
        End Get
        Set(ByVal value As DbSet(Of Employee))
            privateEmployees = value
        End Set
    End Property
    Private privateTasks As DbSet(Of Task)
    Public Property Tasks() As DbSet(Of Task)
        Get
            Return privateTasks
        End Get
        Set(ByVal value As DbSet(Of Task))
            privateTasks = value
        End Set
    End Property
End Class
Note that the MyDBContext class should implement a constructor that takes the connectionString string parameter. This constructor will be called by the EFObjectSpaceProvider Object Space Provider internally.
3. Use the Entity Framework Object Space Provider
To use the EFObjectSpace instances to access data in your application, modify the default implementation of the CreateDefaultObjectSpaceProvider method located in WinApplication.cs (WinApplication.vb) and WebApplication.cs (WebApplication.vb) files. For details on this code, refer to the Use the Entity Framework Data Model topic.
using DevExpress.ExpressApp.DC;
using DevExpress.ExpressApp.EF;
// ...
protected override void CreateDefaultObjectSpaceProvider(CreateCustomObjectSpaceProviderEventArgs args) {
    args.ObjectSpaceProvider = new EFObjectSpaceProvider(typeof(MyDbContext), args.ConnectionString);
}
Imports DevExpress.ExpressApp.DC
Imports DevExpress.ExpressApp.EF
' ...
Protected Overrides Sub CreateDefaultObjectSpaceProvider( _
ByVal args As CreateCustomObjectSpaceProviderEventArgs)
    args.ObjectSpaceProvider = New EFObjectSpaceProvider(GetType(MyDbContext), args.ConnectionString)
End Sub
4. Specify the Connection String to the Database
To connect the database that was generated for your data model, specify the XafApplication.ConnectionString property in code or use the corresponding option in the App.config and Web.config files located in the WinForms and ASP.NET application projects. Refer to the Connect an XAF Application to a Database Provider topic for details.
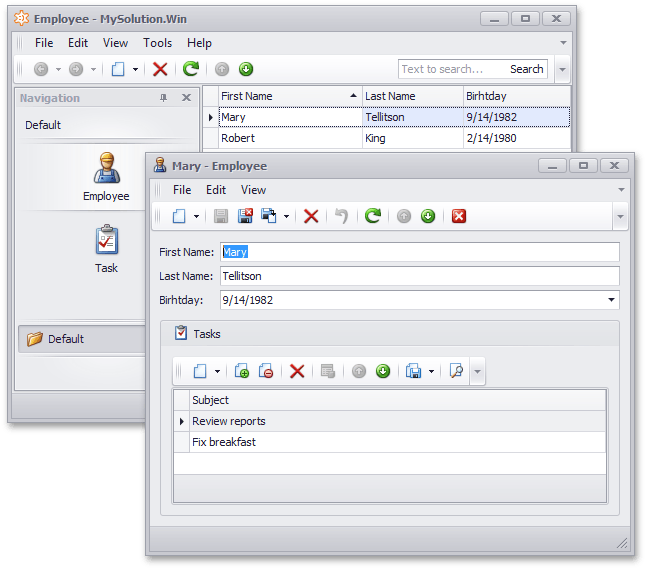
5. Run the Application
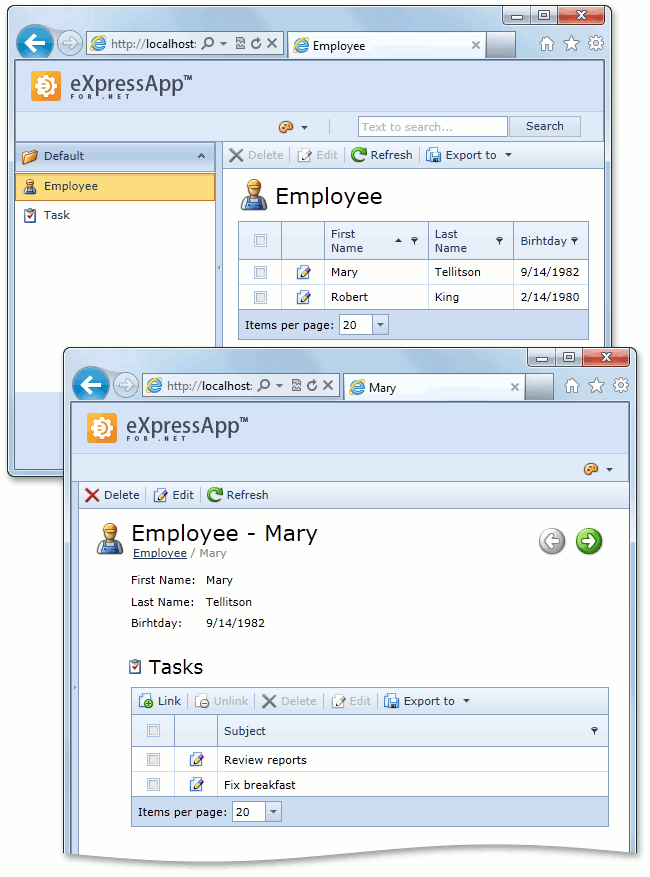
Now you can run both the Windows Forms and ASP.NET applications. You will see that a UI is automatically generated for your data model.
ASP.NET:
See Also