How to: Customize the Conditional Appearance Module Behavior
- 10 minutes to read
The Conditional Appearance module allows you to apply different appearances to UI elements depending on specified conditions. So, you can make visible/invisible or enabled/disabled Actions depending on the currently viewed object state. In addition, this module makes it possible for you to apply a conditional appearance to Property Editors in Detail Views, properties in List Views, as well as layout items, group and tabs. You can set the font color, style, and back color for editors and layout item captions. To define a required conditional appearance for a target UI element, declare a conditional appearance rule in code or in the Application Model. However, in some scenarios, the conditional appearance provided by the rules is not enough. In this instance, use the events exposed by the AppearanceController. In this topic, you will find several examples on how to handle these events to accomplish your tasks.
The Conditional Appearance module supplies the AppearanceController. This Controller exposes the following events.
-
Allows you to make changes after the conditional appearance is applied to a specified UI element.
-
Allows you to override the default process of applying customizations, or cancel the process of applying a conditional appearance for a target UI element(s).
-
Allows you to add conditional appearance rules dynamically.
Note
The approach described in this topic is not supported by the Mobile platform.
Tip
A complete sample project is available in the DevExpress Code Examples database at https://supportcenter.devexpress.com/ticket/details/e3595/how-to-apply-conditional-appearance.
Handle the AppearanceApplied Event
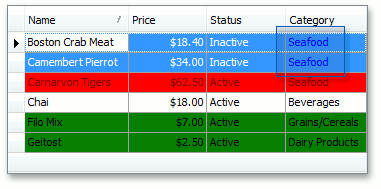
In the example below, we’ll reset the conditional appearance applied to the Product class’ Category property. According to the conditional appearance rule applied to the Product class, its Category property is shown using the Blue color when set to “Seafood” in a List View. However, when an object, to which this appearance is applied, is selected, the property’s value is close to invisible. See the following image.
using DevExpress.ExpressApp.ConditionalAppearance;
using DevExpress.ExpressApp.Editors;
//...
[DefaultClassOptions]
[Appearance("CategoryColoredInListView", AppearanceItemType = "ViewItem", TargetItems = "Category",
    Criteria = "Category = 'Seafood'", Context = "ListView", FontColor = "Blue", Priority = 1)]
public class Product : BaseObject {
    public Product(Session session) : base(session) {}
    private Category category;
    public Category Category {
        get {
            return category;
        }
        set {
            SetPropertyValue(nameof(Category), ref category, value);
        }
    }
}
So, we should reset the conditional appearance for the Category property in a List View if the context object is currently selected. To do this, we use the AppearanceController.AppearanceApplied event. In the code below, to reset the font color of the item to which a conditional appearance is currently applied, this item is cast to the IAppearanceFormat interface. In your tasks, you can also use the IAppearanceEnabled and IAppearanceVisibility interfaces to access conditional appearance properties.
using DevExpress.ExpressApp.ConditionalAppearance;
using ConditionalAppearanceExample.Module.BusinessObjects;
using DevExpress.ExpressApp.Editors;
//...
public partial class ConditionalAppearanceController : ViewController {
    public ConditionalAppearanceController() {
        InitializeComponent();
        TargetObjectType = typeof(Product);
    }
    private AppearanceController appearanceController;
    protected override void OnActivated() {
        base.OnActivated();
        appearanceController = Frame.GetController<AppearanceController>();
        if (appearanceController != null) {
            appearanceController.AppearanceApplied +=
                new EventHandler<ApplyAppearanceEventArgs>(
                    appearanceController_AppearanceApplied);
        }
    }
    void appearanceController_AppearanceApplied(
        object sender, ApplyAppearanceEventArgs e) {
        if ((View is ListView) && (e.ItemType == AppearanceItemType.ViewItem.ToString()) &&
                 (e.ItemName == "Category") && (e.ContextObjects.Length > 0)) {
            if (View.SelectedObjects.Contains(e.ContextObjects[0])) {
                IAppearanceFormat formattedItem = e.Item as IAppearanceFormat;
                if (formattedItem != null) {
                    formattedItem.ResetFontColor();
                }
            }
        }
    }
    protected override void OnDeactivated() {
        if (appearanceController != null) {
            appearanceController.AppearanceApplied -=
                 new EventHandler<ApplyAppearanceEventArgs>(
                     appearanceController_AppearanceApplied);
        }
        base.OnDeactivated();
    }
}
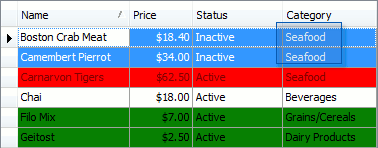
With this code, the Category property becomes easier to read.
Handle the CustomApplyAppearance Event
In the next example, we will customize the appearance of the Property Editors that are disabled by a conditional appearance rule. For demonstration, we’ve added the DisabledProperty to the Product business class and applied a conditional appearance rule to it. This rule makes this property always disabled.
using DevExpress.ExpressApp.ConditionalAppearance;
using DevExpress.ExpressApp.Editors;
//...
[DefaultClassOptions]
[Appearance("CategoryColoredInListView", AppearanceItemType = "ViewItem", _
TargetItems = "Category", Criteria = "Category = 'Seafood'", Context = "ListView", _
FontColor = "Blue", Priority = 1)]
public class Product : BaseObject {
    public Product(Session session) : base(session) {}
    private string disabledProperty;
    [Appearance("DisableProperty", Criteria = "1=1", Enabled = false)]
    public string DisabledProperty {
        get {
            return disabledProperty;
        }
        set {
            SetPropertyValue(nameof(DisabledProperty), ref disabledProperty, value);
        }
    }
}
To change the appearance of disabled Property Editors, we use the AppearanceController.CustomApplyAppearance event. In the code below, the border style of the item to which a conditional appearance has been just applied by the AppearanceController is changed. This item cannot be cast to the IAppearanceFormat interface, since it doesn’t allow you to change the border style. So, we cast it to the DXPropertyEditor or WebPropertyEditor class (because we know that it’s a base class for all built-in Property Editors in Windows Form and ASP.NET applications respectively). See the AppearanceController.CustomApplyAppearance event description to learn which item types can be passed as the item parameter in the AppearanceApplied and CustomApplyAppearance event handlers.
To cancel other possible conditional appearance changes and apply only the rule that disables the item, we’ll set the event handler’s Handled parameter to true.
Since we need to access platform-dependent classes here, we have to implement a Windows Forms and ASP.NET Controllers in the corresponding modules of the application solution.
//The base platform-independent Controller
using DevExpress.ExpressApp.ConditionalAppearance;
using ConditionalAppearanceExample.Module.BusinessObjects;
using DevExpress.ExpressApp.Editors;
//...
public partial class ConditionalAppearanceController : ViewController {
    public ConditionalAppearanceController() {
        InitializeComponent();
        TargetObjectType = typeof(Product);
    }
    private AppearanceController appearanceController;
    protected override void OnActivated() {
        base.OnActivated();
        appearanceController = Frame.GetController<AppearanceController>();
        if (appearanceController != null) {
            appearanceController.CustomApplyAppearance +=
                new EventHandler<ApplyAppearanceEventArgs>(
                    appearanceController_CustomApplyAppearance);
        }
    }
    void appearanceController_CustomApplyAppearance(
        object sender, ApplyAppearanceEventArgs e) {
        if (e.AppearanceObject.Enabled == false) {
            CustomizeDisabledEditorsAppearance(e);
            // e.Handled = true;
        }
    }
    protected virtual void CustomizeDisabledEditorsAppearance(ApplyAppearanceEventArgs e) { }
    protected override void OnDeactivated() {
        if (appearanceController != null) {
            appearanceController.CustomApplyAppearance -=
                 new EventHandler<ApplyAppearanceEventArgs>(
                     appearanceController_CustomApplyAppearance);
        }
        base.OnDeactivated();
    }
}
Note
You can set the e.Handled parameter to true to cancel other possible appearance changes. However, you will need to manually disable editing the current control value in this instance.
//Controller implemented in a Windows Forms module
using DevExpress.ExpressApp.ConditionalAppearance;
using ConditionalAppearanceExample.Module.Controllers;
using DevExpress.ExpressApp.Win.Editors;
using DevExpress.XtraEditors.Controls;
using System.Drawing;
//...
public partial class WinConditionalAppearanceController : ConditionalAppearanceController {
    protected override void CustomizeDisabledEditorsAppearance(
        ApplyAppearanceEventArgs e) {
        base.CustomizeDisabledEditorsAppearance(e);
        DXPropertyEditor dxEditor = e.Item as DXPropertyEditor;
        if (dxEditor != null && dxEditor.Control != null) {
            dxEditor.Control.Properties.BorderStyle = BorderStyles.Simple;
            dxEditor.Control.Properties.Appearance.BackColor = Color.RosyBrown;
        }
    }
}
//Controller implemented in an ASP.NET module
using ConditionalAppearanceExample.Module.Controllers;
using DevExpress.ExpressApp.ConditionalAppearance;
using DevExpress.ExpressApp.Web.Editors;
using DevExpress.ExpressApp.Web.Editors.ASPx;
using System.Web.UI.WebControls;
using System.Drawing;
//...
public partial class WebConditionalAppearanceController : ConditionalAppearanceController {
    protected override void CustomizeDisabledEditorsAppearance(
        ApplyAppearanceEventArgs e) {
        base.CustomizeDisabledEditorsAppearance(e);
        WebPropertyEditor dxEditor = e.Item as WebPropertyEditor;
        if (dxEditor != null && dxEditor.Editor != null) {
            dxEditor.Editor.BorderStyle = BorderStyle.Dashed;
            dxEditor.Editor.BackColor = Color.RosyBrown;
        }
    }
}
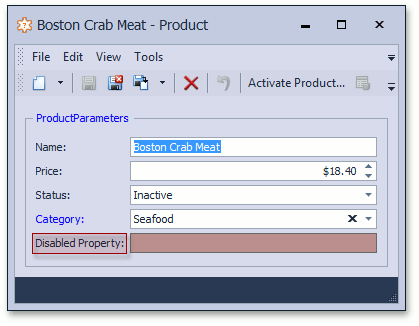
The following image demonstrates the result:
Note
Instead of directly accessing the editor’s control, you can customize the appearance object. Iterate through the ApplyAppearanceEventArgs.AppearanceItems list to select the required item.
Handle the CollectAppearanceRules Event
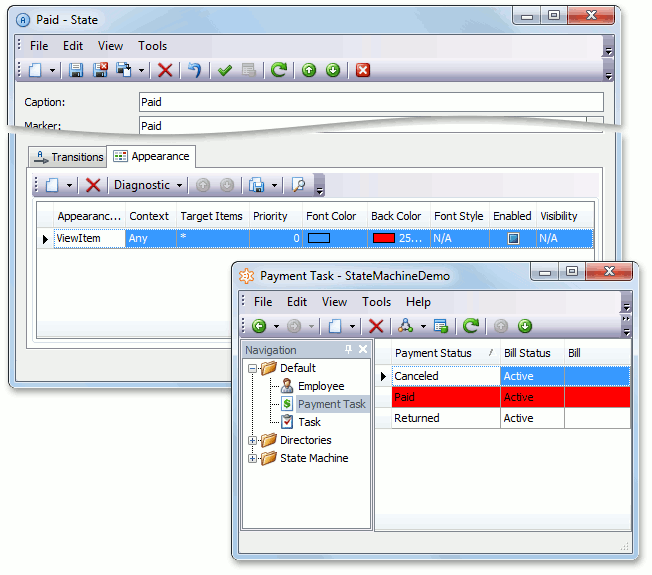
Using the AppearanceController.CollectAppearanceRules event, you can add conditional appearance rules dynamically. For instance, the State Machine Module handles this event to add appearance rules declared at runtime as a collection of State objects. These appearance rules are persistent objects implementing the IAppearanceRuleProperties interface.
public class StateMachineAppearanceController : StateMachineControllerBase<ObjectView> {
//...
    private void appearanceController_CollectAppearanceRules(
        object sender, CollectAppearanceRulesEventArgs e) {
        IList<IStateMachine> stateMachines = GetStateMachines();
        foreach(IStateMachine stateMachine in stateMachines) {
            foreach(IState state in stateMachine.States) {
                if(state is IStateAppearancesProvider) {
                    e.AppearanceRules.AddRange(((IStateAppearancesProvider)state).Appearances);
                }
            }
        }
    }
}
Note
After collecting rules for a specified UI element, the Appearance Controller caches them so that the next time the conditional appearance is refreshed for this UI element, the rules are not collected again. Since the AppearanceController.CollectAppearanceRules event is raised once the rules are collected for a UI element, it might be too late to subscribe to it because the rules are already cached. We recommend that you call the AppearanceController.ResetRulesCache method, then subscribe to the AppearanceController.CollectAppearanceRules event and finally, call the AppearanceController.Refresh method.
The Conditional Appearance module is demonstrated in the Feature Center Demo, installed with XAF. To see the module in action, refer to the Feature Center demo online.