How to: Design Workflow
- 7 minutes to read
This topic demonstrates how to create and execute workflow. You will define Task and Issue business classes, and design workflow to create tasks for active issues. For general information on the Workflow Module and related concepts, refer to the Workflow Module help topic.
Note
Mobile applications do not support the Workflow Module, so the approach described in this topic cannot be implemented in the Mobile platform.
Tip
A complete sample project is available in the DevExpress Code Examples database at https://supportcenter.devexpress.com/ticket/details/e4523/how-to-use-the-workflow-module.
This example is XPO-based. The complete example for the Entity Framework data model is located at How to use the Workflow Module with the Entity Framework data model. An extended example for XPO is provided in the WorkflowDemo installed to the %PUBLIC%\Documents\DevExpress Demos 19.2\Components\eXpressApp Framework folder by default.
Prepare the Solution
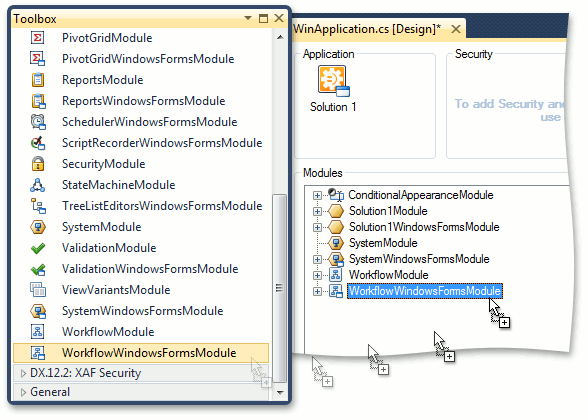
Invoke the Application Designer and drag the WorkflowWindowsFormsModule from the Toolbox to the Modules panel. Rebuild the solution.
After adding the module, run the application once to create service workflow tables in the database. This is an essential step as the workflow server service cannot function properly unless these tables exist.
Since the workflow is going to create tasks for active issues, first declare corresponding business classes - Issue and Task. The Issue business class will have a string Subject property and a Boolean Active property. The Task business class will have a string Subject property and a reference Issue property specifying the issue for which the task was created.
[DefaultClassOptions]
public class Issue : BaseObject {
    public Issue(Session session) : base(session) { }
    public string Subject {
        get { return GetPropertyValue<string>(nameof(Subject)); }
        set { SetPropertyValue<string>(nameof(Subject), value); }
    }
    public bool Active {
        get { return GetPropertyValue<bool>(nameof(Active)); }
        set { SetPropertyValue<bool>(nameof(Active), value); }
    }
}
[DefaultClassOptions]
public class Task : BaseObject {
    public Task(Session session) : base(session) { }
    public string Subject {
        get { return GetPropertyValue<string>(nameof(Subject)); }
        set { SetPropertyValue<string>(nameof(Subject), value); }
    }
    public Issue Issue {
        get { return GetPropertyValue<Issue>(nameof(Issue)); }
        set { SetPropertyValue<Issue>(nameof(Issue), value); }
    }
}
Now you are ready to configure and deploy the service that will execute actual workflow instances. To learn how to do this, refer to the Workflow Server Service help topic.
Design the Workflow
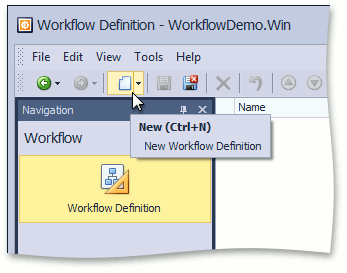
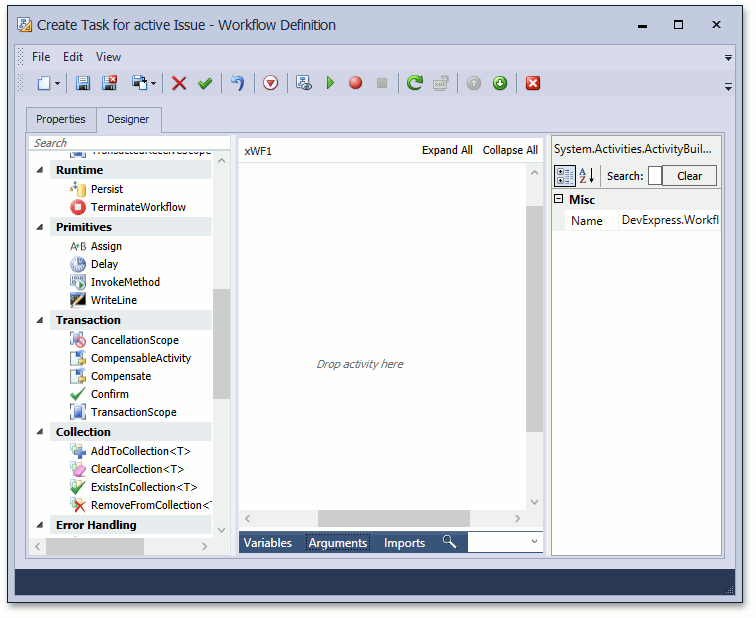
After deploying the workflow server service, run the application. Click the Workflow Definition navigation item, and create a new workflow definition by using the New Action.
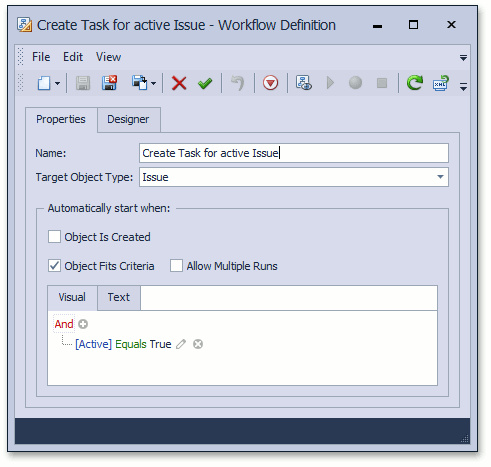
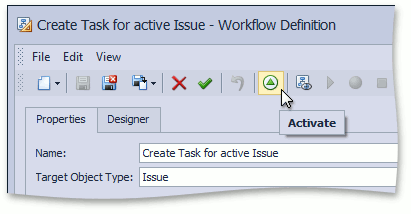
Specify Create Task for active Issue as a name for workflow definition. Since the workflow is going to track Issue objects, specify Issue as the workflow definition target object type to create tasks for them. The workflow instances should be executed only for issues that are active, so tick the Object Fits Criteria check box and specify [Active] = True as the corresponding criteria.
Note
If the AllowMultipleRuns property is not checked, the workflow runs once for each target object that fits the criteria. Check this option if you want to repeat the workflow multiple times while the object fits the criteria.
Click the Designer tab to invoke the re-hosted workflow designer and start creating workflow logic.
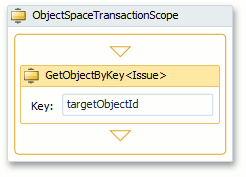
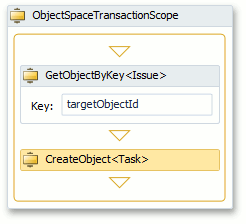
The workflow will manipulate business objects, which are not serializable by nature. A workflow server can try to unload a workflow instance to the database, and in the process, persist all variables including those that reference business objects. Since these objects are not serializable, an exception will occur. So, you must ensure that the workflow instances cannot be unloaded to the database. For this purpose, drag the ObjectSpaceTransactionScope activity from the Toolbox and drop the activity onto the design surface. This activity prevents its workflow instance from being unloaded to the database, and is designed specifically to encapsulate business object manipulations. The activity creates and maintains an Object Space, and can commit it when going out of scope.

Next, you need to obtain a reference to the Issue object for which a workflow instance has been executed. This object is needed to specify the Issue property value of a Task object you will create. So, drag the GetObjectByKey<T> activity from the Toolbox and drop it inside the ObjectSpaceTransactionScope. Note that GetObjectByKey<T> is a generic activity. So, when dropping it, a dialog window will be displayed asking you to specify the value of the generic type parameter. Click the displayed combo box and choose Browse for Types …. Locate the Issue type you declared previously and select it. Now the activity knows that it must retrieve an Issue object, but it does not know which. So, click the activity’s Key field and enter targetObjectId. This is an input argument available in all workflow definitions created by the Workflow module. The argument specifies the identifier of a persistent object for which a workflow instance has been executed.
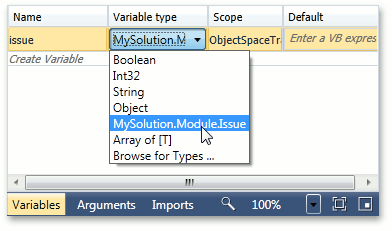
Now the activity is properly configured to retrieve the required object. Still, the retrieved object has to be stored somewhere for later use. For this purpose, invoke the Variables page by clicking the corresponding page name at the status bar located below the design surface. Select the ObjectSpaceTransactionScope to specify that you are going to create a variable that will exist throughout the entire life span of a workflow instance. Click Create Variable, and specify issue as its name and Issue as its type.
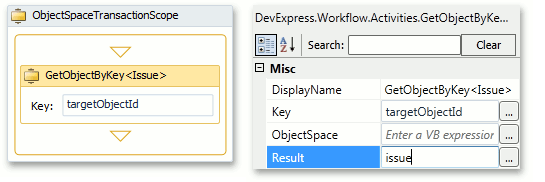
Now select the GetObjectByKey<Issue> activity and specify issue as the Result property value on the activity’s property grid. This specifies that the retrieved Issue object must be stored into a local issue variable.
After you have obtained a reference to the Issue object, which became active, you need to create a corresponding Task object. Drag the CreateObject<T> activity from the toolbox and drop it onto the GetObjectByKey<Issue> activity’s connection point represented by an orange triangle. When asked for a generic type parameter value, specify Task.
To store the created Task object, declare a task variable just like you did with the issue variable. The only difference between these variables should be their type. The task variable will be of type Task.
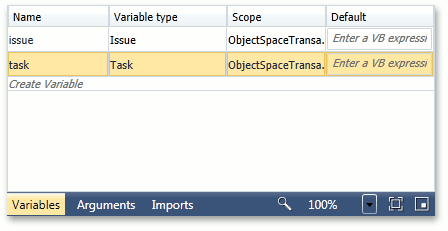
Select the CreateObject<Task> activity and enter task as its Result property value.

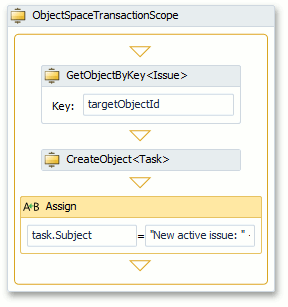
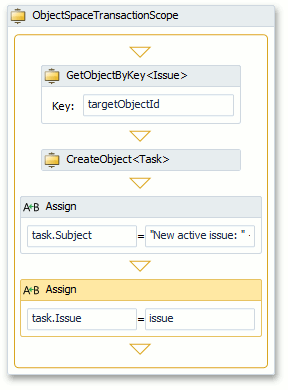
Now you need to fill the property values of the created Task object. For this purpose, drag the Assign activity from the toolbox and drop it onto the CreateObject<Task> activity’s connection point. Set the activity’s To property to task.Subject and the Value property to “New active issue: “ + issue.Subject.
Drag one more Assign activity from the toolbox and drop it onto the existing Assign activity’s connection point. Set the new Assign activity’s To property to task.Issue and the Value property to issue.
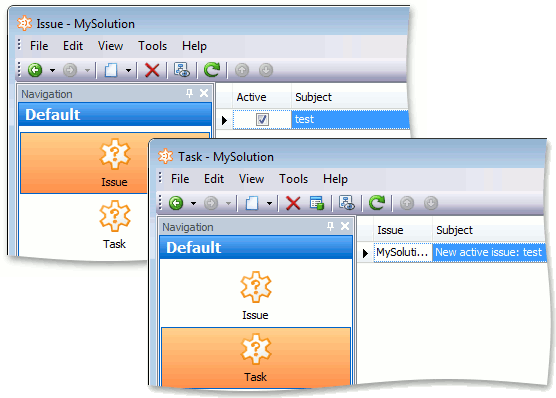
Save the finished workflow. Note that newly created workflow definitions are inactive and will not be executed by the workflow server service. So, you will need to use the Activate Action.
After the workflow definition has been activated, you can test it. Create an issue with the Active check box clicked, and switch to the Task List View. You may need to wait a moment and refresh the List View, since workflow instances are executed by a server every 15 seconds by default. If you have properly configured and deployed the workflow server service, you will see that a new Task has been created.