How to: Test Conditional Appearance Rules
- 9 minutes to read
Conditional Appearance rules potentially can be very complex. It is often possible to make a mistake, for instance, with a typo that will change the behavior of a rule. To ensure that your Conditional Appearance rules behave as expected, it is recommended that you implement automatic testing. You can test Conditional Appearance rules in XAF via functional and unit tests. This topic demonstrates how to implement such tests, using EasyTest functional testing and NUnit unit testing frameworks.
Note
Mobile applications do not support the EasyTest functional testing.
Tip
A complete sample project is available in the DevExpress Code Examples database at https://supportcenter.devexpress.com/ticket/details/e3250/how-to-test-conditional-appearance-rules.
To see beginner’s step-by-step testing instructions, refer to the How to: Test an Action topic.
Functional Tests
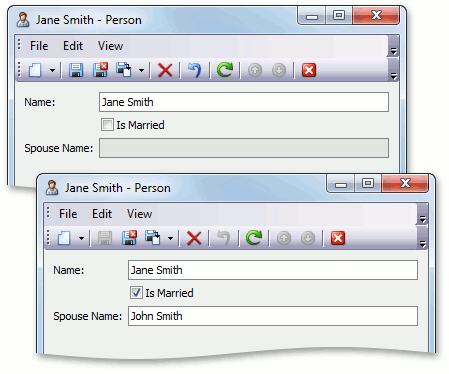
Suppose you have the MyPerson persistent object that exposes the Name, IsMarried and SpouseName properties. The requirement is that the SpouseName property’s editor is disabled when IsMarried is false. This can be achieved by applying the AppearanceAttribute to the SpouseName property. The following code snippet and image illustrate this.
using DevExpress.ExpressApp.Model;
using DevExpress.ExpressApp.ConditionalAppearance;
// ...
[DefaultClassOptions, ImageName("BO_Person"), ModelDefault("Caption", "Person")]
public class MyPerson : BaseObject {
    public MyPerson(Session session) : base(session) { }
    private string name;
    public string Name {
        get { return name; }
        set { SetPropertyValue(nameof(Name), ref name, value); }
    }
    private bool isMarried;
    [ImmediatePostData]
    public bool IsMarried {
        get { return isMarried; }
        set {
            SetPropertyValue(nameof(IsMarried), ref isMarried, value);
            if (!String.IsNullOrEmpty(SpouseName) && !value) SpouseName = String.Empty;
        }
    }
    private string spouseName;
    [Appearance("DisableSpouseName", Criteria="!IsMarried", Enabled=false)]
    public string SpouseName {
        get { return spouseName; }
        set { SetPropertyValue(nameof(SpouseName), ref spouseName, value); }
    }
}
Note
This Conditional Appearance rule is very simple and of course there is no need to test such rules in real applications. We will test it here, however, for learning purposes. It is recommended to test rules that have complex criteria or interfere with each other (see AppearanceAttribute.Priority).
To test the MyPerson object’s Conditional Appearance rule, you can use the following EasyTest script.
#Application TestConditionalAppearanceRulesWin
#Application TestConditionalAppearanceRulesWeb

;Create a new Person:
*Action New(Person)

;Set IsMarried to true
*FillForm
 Name = Jane Smith
 Is Married = true

;Test that the SpouseName field is editable
*FillForm
 Spouse Name = John Smith

;Set IsMarried to false
*FillForm
 Is Married = false

;Test that the SpouseName field is not editable
!FillForm
 Spouse Name = John Smith
You can accidentally configure a Conditional Appearance rule to always disable an editor, instead of disabling it only when necessary. Thus, always test the behavior of a rule for different cases when its criteria is valid and invalid.
Note
Currently, you can only test visibility and an enabled/disabled state with EasyTest. To learn how to test font color or style, proceed to the Unit Tests section.
Unit Tests
Check to See if the Appearance Target is Enabled or Disabled
Let us test the DisableSpouseName rule that is defined in the first section of this topic with NUnit. To implement such a test, we must be clear about how Conditional Appearance rules are collected and applied. Rules defined in code are collected by the AppearanceRulesModelNodesGenerator Node Generator. This Generator creates child nodes of BOModel | <Class> | AppearanceRules nodes in the application model. The AppearanceController View Controller defined in the Conditional Appearance module collects appearance rules from the application model and provides the RefreshItemAppearance method, which can refresh the appearance of objects that support it. This Controller can affect the appearance of objects that support one or more of the following interfaces.
The following code illustrates the implementation of the fake object that can be in an enabled or disabled state, and can be reset to the default state. We will use this object in a test.
using DevExpress.ExpressApp.Editors;
// ...
public class FakeAppearanceTarget : IAppearanceEnabled {
    #region IAppearanceEnabled Members
    private bool enabled;
    public bool Enabled {
        get { return enabled; }
        set { enabled = value; }
    }
    public void ResetEnabled() {
            Enabled = true;
    }
    #endregion
}
In the test, the XafApplication instance will be required. Since this class is abstract, we cannot instantiate it directly. Therefore, let us implement the following simple descendant.
using DevExpress.ExpressApp;
using DevExpress.ExpressApp.Layout;
// ...
class TestApplication : XafApplication {
    protected override LayoutManager CreateLayoutManagerCore(bool simple) {
        return null;
    }
}
Now we can implement the test in the following manner.
using NUnit.Framework;
using DevExpress.ExpressApp;
using DevExpress.ExpressApp.Xpo;
using DevExpress.ExpressApp.ConditionalAppearance;
// ...
[TestFixture]
public class PersonConditionalAppearanceTests {
    private MyPerson person;
    private FakeAppearanceTarget target;
    private AppearanceController controller;
    private DetailView detailView;
    [SetUp]
    public void SetUp() {
        XPObjectSpaceProvider objectSpaceProvider =
            new XPObjectSpaceProvider(new MemoryDataStoreProvider());
        TestApplication application = new TestApplication();
        ModuleBase testModule = new ModuleBase();
        testModule.AdditionalExportedTypes.Add(typeof(MyPerson));
        application.Modules.Add(testModule);
        application.Modules.Add(new ConditionalAppearanceModule());
        application.Setup("TestApplication", objectSpaceProvider);
        IObjectSpace objectSpace = objectSpaceProvider.CreateObjectSpace();
        person = objectSpace.CreateObject<MyPerson>();
        target = new FakeAppearanceTarget();
        controller = new AppearanceController();
        detailView = application.CreateDetailView(objectSpace, person);
        controller.SetView(detailView);
    }
    [Test]
    public void TestSpouseNameVisibility() {
        person.IsMarried = true;
        controller.RefreshItemAppearance(detailView, "ViewItem", "SpouseName", target, person);
        Assert.IsTrue(target.Enabled);
        person.IsMarried = false;
        controller.RefreshItemAppearance(detailView, "ViewItem", "SpouseName", target, person);
        Assert.IsFalse(target.Enabled);
    }
}
Here, the TestConditionalAppearanceRulesModule is a module that contains the MyPerson object.
Note
If the Detail View, created via the XafApplication.CreateDetailView method, contains a nested List View, or you want to use the XafApplication.CreateListView method in your test, then the TestApplication class should implement the CreateListEditorCore method. Otherwise, the “Cannot create ListEditor for view: ListViewId“ exception will be thrown when testing. Refer to the How to: Test an Action topic to see the example.
Check the Font Color
Let us add the following Appearance Rule to the MyPerson class.
[Appearance("NameFontIsRed", Criteria="IsMarried", FontColor="Red")]
[Appearance("NameFontIsGreen", Criteria="!IsMarried", FontColor = "Green")]
public string Name {
    // ...
}
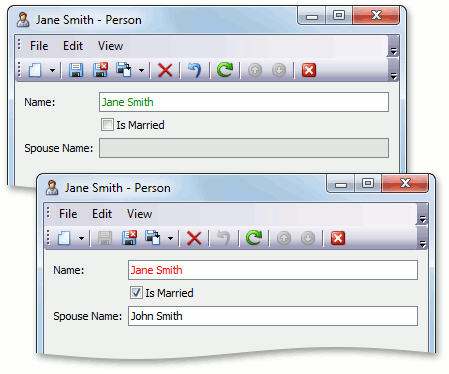
The NameFontIsRed and NameFontIsGreen rules change the Name property’s font color depending on criteria.
Note
It should be noted once again that used criteria is very simple and there is no need to test it in a real application. We will test it here, however, just to demonstrate this concept.
To test font color, the FakeAppearanceTarget class must be extended. Make sure to support the IAppearanceFormat interface in it.
public class FakeAppearanceTarget :
    IAppearanceFormat, IAppearanceEnabled {
    #region IAppearanceFormat Members
    private Color backColor;
    public Color BackColor {
        get { return backColor; }
        set { backColor = value; }
    }
    private Color fontColor;
    public Color FontColor {
        get { return fontColor; }
        set { fontColor = value; }
    }
    private FontStyle fontstyle;
    public FontStyle FontStyle {
        get { return FontStyle; }
        set { fontstyle = value; }
    }
    public void ResetFontStyle() {
        FontStyle = FontStyle.Regular;
    }
    public void ResetFontColor() {
        FontColor = new Color();
    }
    public void ResetBackColor() {
        FontColor = new Color();
    }
    #endregion
    // ...
}
Now, the NameFontIsRed and NameFontIsGreen rules can be tested in the following manner.
using System.Drawing;
// ...
[TestFixture]
public class PersonConditionalAppearanceTests {
    // ...
    [Test]
    public void TestNameFontColor() {
        person.IsMarried = true;
        controller.RefreshItemAppearance(detailView, "ViewItem", "Name", target, person);
        Assert.AreEqual(Color.Red, target.FontColor);
        person.IsMarried = false;
        controller.RefreshItemAppearance(detailView, "ViewItem", "Name", target, person);
        Assert.AreEqual(Color.Green, target.FontColor);
    }
}
Check the Appearance Target Visibility
To check a rule that affects item visibility, use the same approach as was used above to test an enabled/disabled state. The differences are that you should support the IAppearanceVisibility interface in the FakeAppearanceItem class, set the FakeAppearanceItem.Visibility property to ViewItemVisibility.Show in the FakeAppearanceItem.ResetVisibility method and test the FakeAppearanceItem.Visibility value.