How to: Implement a Custom Messaging Class
- 4 minutes to read
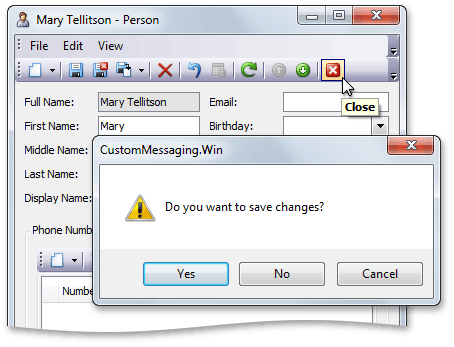
Message boxes that contain text and several buttons are be displayed in Windows Forms XAF applications in many situations. For instance, a message box is shown when an end-user closes a Detail View with modified data or cancels changes via the ModificationsController.CancelAction Action. These message boxes are provided by the Messaging class.

This class utilizes the XtraMessageBox functionality. In certain scenarios it can be required to customize the Messaging class. In this instance you should inherit this class. This topic details a way of implementing such a descendant.
Tip
A complete sample project is available in the DevExpress Code Examples database at https://supportcenter.devexpress.com/ticket/details/e1527/how-to-implement-a-custom-messaging-class.
Note
You can handle the Messaging.ConfirmationDialogClosed event instead of implementing a custom Messaging class, if executing a custom code after upon the closing of a message box is required.
Change the Default Focused Button
The Messaging class exposes the Messaging.Show virtual method, which displays a message box via the XtraMessageBox.Show method. The XtraMessageBox.Show overload that takes owner, text, caption, buttons and icon parameters is used by default. This overload displays a message box with the first (“OK”) button initially focused. In this example, we will override the Messaging.Show method and use another XtraMessageBox.Show method’s overload that takes the defaultButton extra parameter. Thus, it will be possible to specify which button to focus.
Add a new CustomXtraMessageBoxMessaging class to your Windows Forms module project. This class should inherit the Messaging class. Add the default public constructor and override the ShowCore method as it is shown in the snippet below.
using System.Windows.Forms;
using DevExpress.ExpressApp;
using DevExpress.XtraEditors;
using DevExpress.ExpressApp.Win.Core;
// ...
public class CustomXtraMessageBoxMessaging : Messaging {
    public CustomXtraMessageBoxMessaging(XafApplication application)
        : base(application) { }
    protected override DialogResult ShowCore(
        string message, string caption, MessageBoxButtons buttons, MessageBoxIcon icon) {
        return XtraMessageBox.Show(
           message, caption, buttons, icon, MessageBoxDefaultButton.Button2);
    }
}
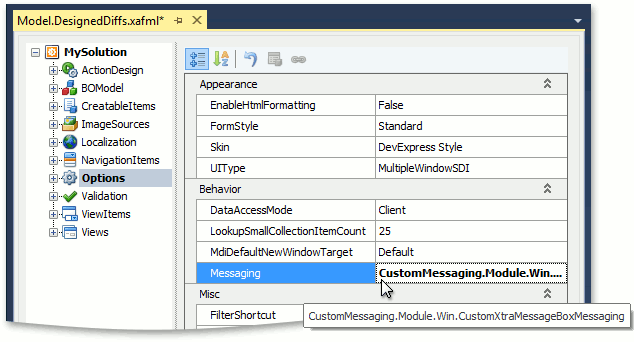
Invoke the Model Editor for the Windows forms module project and navigate to the Options node. The IModelOptionsWin.Messaging property specifies the type of messaging used in Windows Forms application. Set this property value to the fully qualified name of your custom class (e.g. “CustomMessaging.Module.Win.CustomXtraMessageBoxMessaging”).
Run the Windows Forms application. Open any persistent object’s Detail View and make some changes. Click Close. The message box with “No” button focused will be displayed.
Use a custom Message Box instead of XtraMessageBox
You can use a fully custom message box in your Messaging implementation. In the snippet below, a use of System.Windows.Forms.MessageBox class is demonstrated.
using System.Windows.Forms;
using DevExpress.ExpressApp;
using DevExpress.ExpressApp.Win.Core;
// ...
public class CustomWinFormsMessageBoxMessaging : Messaging {
    public CustomWinFormsMessageBoxMessaging(XafApplication application)
        : base(application) { }
    protected override DialogResult ShowCore(
        string message, string caption, MessageBoxButtons buttons, MessageBoxIcon icon) {
        return MessageBox.Show(message, caption, buttons, icon);
    }
}
Invoke the Model Editor for the Windows forms module project. Navigate to the Options node. Set the IModelOptionsWin.Messaging property to the fully qualified name of your custom class (e.g. “CustomMessaging.Module.Win.CustomWinFormsMessageBoxMessaging”).
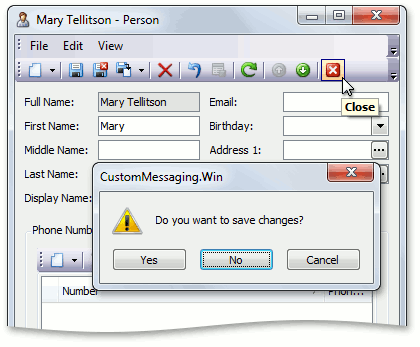
Run the Windows Forms application. Open any persistent object’s Detail View and make some changes. Click Close. The following message box will be displayed.