How to: Test Validation Rules
- 8 minutes to read
The eXpressApp Framework supplies about a dozen various validation rule types. These validation rules have different properties, and it is often possible to make a mistake, for instance, by a typo that will change the behavior of a rule. To ensure that your validation rules behave as expected, it is recommended that you implement automatic testing. You can test validation rules in XAF via unit and functional tests. This topic demonstrates how to implement such tests, using the NUnit unit testing and EasyTest functional testing frameworks.
Note
Mobile applications do not support the EasyTest functional testing.
Tip
A complete sample project is available in the DevExpress Code Examples database at https://supportcenter.devexpress.com/ticket/details/e2473/how-to-test-validation-rules.
To see beginner’s step-by-step testing instructions, refer to the How to: Test an Action topic.
Unit Tests
Suppose you have an IEmployee Domain Component, which declares the Name and Age properties. Each IEmployee object is required to have a non-empty Name. This can be achieved by applying the RuleRequiredFieldAttribute attribute to the Name property. The Age value is required to be 18 or elder. So, the Age property is decorated by the RuleValueComparisonAttribute attribute. The following code snippet illustrates this. Note that it is recommended that you specify a rule identifier via an additional string constant. This eliminates the possibility of typing the identifier incorrectly in test.
using DevExpress.ExpressApp.DC;
using DevExpress.Persistent.Base;
//...
[DomainComponent, DefaultClassOptions, ImageName("BO_Employee")]
public interface IEmployee {
    [RuleRequiredField(EmployeeValidationRules.EmployeeNameIsRequired, DefaultContexts.Save)]
    string Name { get; set; }
    [RuleValueComparison(EmployeeValidationRules.EmployeeIsAdult, DefaultContexts.Save,
        ValueComparisonType.GreaterThanOrEqual, 18)]
    int Age { get; set;}
}
public class EmployeeValidationRules {
    public const string EmployeeNameIsRequired = "EmployeeNameIsRequired";
    public const string EmployeeIsAdult = "EmployeeIsAdult";
}
The following code snippet illustrates a unit test for the implemented EmployeeNameIsRequired and EmployeeIsAdult rules. Since we are testing a Domain Component and not a regular business class, we will need to perform additional initialization. In the SetUp method, which will be invoked by NUnit prior to running the test, register the IEmployee interface via the ITypesInfo.RegisterEntity method, and invoke the ITypesInfo.GenerateEntities method. This is not required for a regular business class.
using NUnit.Framework;
using DevExpress.ExpressApp;
using DevExpress.ExpressApp.Xpo;
using DevExpress.Persistent.Validation;
//...
[TestFixture]
public class EmployeeValidationTests {
    private IObjectSpace objectSpace;
    [SetUp]
    public virtual void SetUp() {
        objectSpace = new XPObjectSpaceProvider(new MemoryDataStoreProvider()).CreateObjectSpace();
        XafTypesInfo.Instance.RegisterEntity("Employee", typeof(IEmployee));
        XafTypesInfo.Instance.GenerateEntities();
    }
    [Test]
    public void EmployeeIsValid() {
        IEmployee employee = objectSpace.CreateObject<IEmployee>();
        RuleSet ruleSet = new RuleSet();
        RuleSetValidationResult result;

        result = ruleSet.ValidateTarget(objectSpace, employee, DefaultContexts.Save);
        Assert.AreEqual(ValidationState.Invalid,
            result.GetResultItem(EmployeeValidationRules.EmployeeNameIsRequired).State);

        employee.Name = "Mary Tellitson";
        result = ruleSet.ValidateTarget(objectSpace, employee, DefaultContexts.Save);
        Assert.AreEqual(ValidationState.Valid,
            result.GetResultItem(EmployeeValidationRules.EmployeeNameIsRequired).State);

        employee.Age = 17;
        result = ruleSet.ValidateTarget(objectSpace, employee, DefaultContexts.Save);
        Assert.AreEqual(ValidationState.Invalid,
            result.GetResultItem(EmployeeValidationRules.EmployeeIsAdult).State);

        employee.Age = 18;
        result = ruleSet.ValidateTarget(objectSpace, employee, DefaultContexts.Save);
        Assert.AreEqual(ValidationState.Valid,
            result.GetResultItem(EmployeeValidationRules.EmployeeIsAdult).State);
    }
}
There are several important points to note when testing validation rules.
- You can accidentally configure a rule that will always fail, instead of failing only when it is necessary. So, always test the behavior of a validation rule for a case when it is valid and invalid.
- You can involuntarily create tests that will influence each other. To ensure that this will not happen, always use a new RuleSet for each test.
- Code rules implemented via the CodeRuleAttribute are not collected automatically. So to test such a rule, you need to instantiate it manually, and add the instance to the RuleSet.RegisteredRules object.
Functional Tests
CheckValidationResult Command
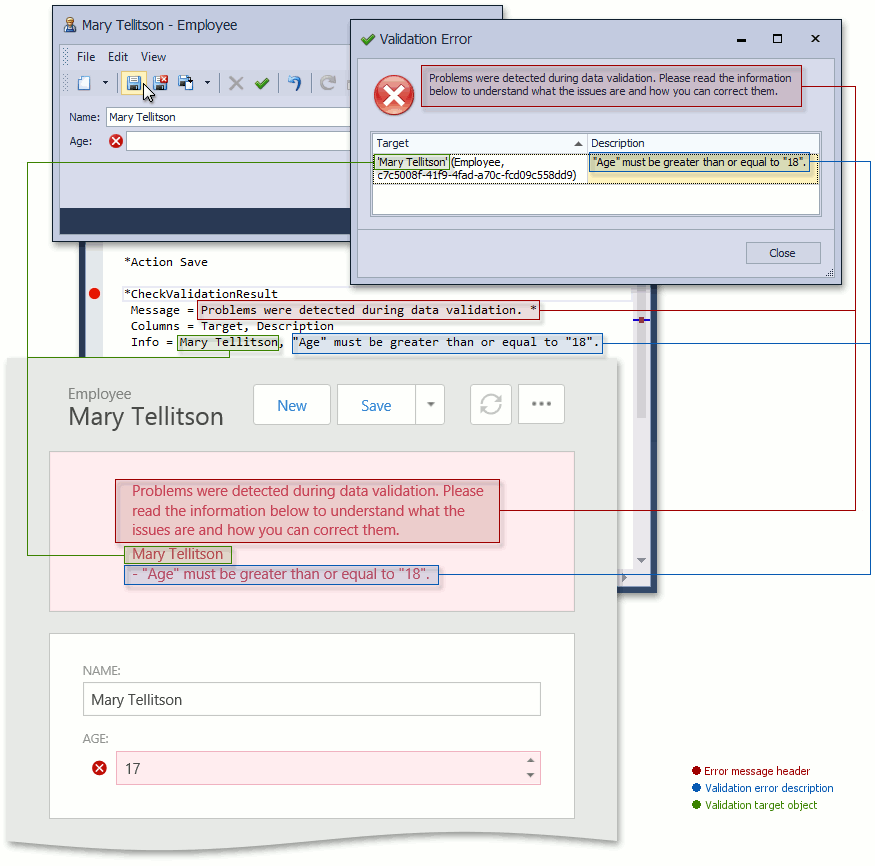
Let us test the Employee object’s validation rules via the EasyTest functional testing framework. In Windows Forms application, the popup window is displayed when a validation error occurs. In an ASP.NET application, the validation results are displayed on the current page using the ErrorInfoControl (see the Error Messages on the Current Page (ErrorInfoControl) section of the Error Handling in ASP.NET and Mobile Applications topic). To test both platforms in a single test script, you can use the CheckValidationResult EasyTest command. The image below illustrates the meaning of the command’s parameters in both platforms.
To test the Employee object’s validation rules, you can use the following EasyTest script.
#Application TestValidationWin
#Application TestValidationWeb

;Create a new Employee:
*Action New(Employee)

;Save it with initial property values (empty Name and zero Age):
*Action Save

;Test the validation result that is displayed when saving:
*CheckValidationResult
 Message = Problems were detected during data validation. *
 Info = "Name" must not be empty.
 Info = "Age" must be greater than or equal to "18".

;Close the error message:
*OptionalAction Close

;Specify a valid Name and invalid Age:
*FillForm
 Name = Mary Tellitson
 Age = 17

;Save an Employee with invalid Age:
*Action Save

;Test the validation result that is displayed when saving:
*CheckValidationResult
 Message = Problems were detected during data validation. *
 Info = "Age" must be greater than or equal to "18".

;Close the error message:
*OptionalAction Close

;Specify a valid Age:
*FillForm
 Age = 18

;Save a valid Employee:
*Action Save

;Check that an error is not displayed:
!CheckValidationResult
 Message = ?*
Note the use of the OptionalAction command. It closes a validation result window in the Windows Forms application. This activity is optional as an ASP.NET application displays an error on the current page and there are no “Close” button.
HandleDialog Command
It is important to remember that the CheckValidationResult command can be used for testing Windows Forms applications only when the ValidationWindowsFormsModule module is included. If you remove this module for any reason, then the validation errors are displayed like any other errors, in a message box.
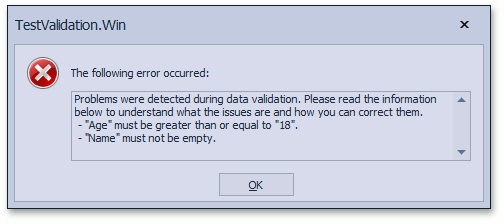
In this instance, you should use the HandleDialog EasyTest command instead of CheckValidationResult. So, the script above should be rewritten in the following manner.
#Application TestValidationWinNoWindowsFormsValidationModule
#Application TestValidationWeb

;Create a new Employee:
*Action New(Employee)

;Save it with initial property values (empty Name and zero Age):
*Action Save

;Test the error message that is displayed when saving:
*HandleDialog
 Message[0] = Problems were detected during data validation. *
 Message[1] = - "Age" must be greater than or equal to "18".
 Message[2] = - "Name" must not be empty.

;Close the error message:
*OptionalAction OK

;Specify a valid Name and invalid Age:
*FillForm
 Name = Mary Tellitson
 Age = 17

;Save an Employee with invalid Age:
*Action Save

;Test the error message that is displayed when saving:
*HandleDialog
 Message[0] = Problems were detected during data validation. *
 Message[1] = Mary Tellitson
 Message[2] = - "Age" must be greater than or equal to "18".

;Close the error message:
*OptionalAction OK

;Specify a valid Age:
*FillForm
 Age = 18

;Save a valid Employee:
*Action Save

;Check that an error is not displayed:
!HandleDialog
 Message = ?*
Note the use of the OptionalAction command. It closes an error message in the Windows Forms application. This activity is optional, as an ASP.NET application displays an error on the current page and there are no “OK” button.
You may want to use the HandleDialog command to test validation, but not to disable the ValidationWindowsFormsModule module in Debug or Release configuration. The solution is to add the following code to the Main method of your Windows Forms application after instantiating the WinApplication descendant.
static void Main() {
    // ...
    TestValidationWindowsFormsApplication winApplication =
        new TestValidationWindowsFormsApplication();
#if EASYTEST
            winApplication.Modules.Remove(
                winApplication.Modules.FindModule(typeof(
                DevExpress.ExpressApp.Validation.Win.ValidationWindowsFormsModule)));
#endif
    // ...
}
With this code, the ValidationWindowsFormsModule will be disabled when running EasyTest.
Note
You can use a command of your choice (CheckValidationResult or HandleDialog) when your test is intended for an ASP.NET application only. In this instance, we recommend to use the HandleDialog command as its syntax is simpler.