How to: Customize a Window Caption
- 4 minutes to read
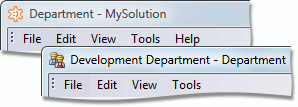
A caption of a typical Windows Forms XAF application Window consists of two parts split by a dash sign. In the main Window, the first part is the active object caption, and the second part is the application name. In a Detail View window, the first part of a caption is specified by the Detail View node’s ObjectCaptionFormat property, and the second part is a current class caption.
The same is true of an ASP.NET XAF application. However, the difference is that a browser can modify a caption. For instance, the Microsoft Internet Explorer appends its own name to a caption.

An ASP.NET XAF application does not modify a browser window caption directly and sets a web page title. You can view the HTML source of any ASP.NET application’s page. You will notice that the application caption is inserted between <title> and </title> tags.
Default captions can be changed. This topic describes how to customize captions.
Note
Blazor applications do not support customization of a window caption.
Set a Custom Text as a Caption
The WindowTemplateController is activated in all Windows, and updates a current Window status and caption. The WindowTemplateController exposes the WindowTemplateController.CustomizeWindowCaption event. This event occurs before a Window caption is updated, and allows you to change that caption. A Window caption is represented by the SplitString class in XAF.
To modify a Window caption, create a custom Window Controller, subscribe to the CustomizeWindowCaption event and handle it. Assign a custom value to the WindowCaption.Text property in the CustomizeWindowCaption event handler. To activate the custom Window Controller in the main Window only, set the TargetWindowType to Main in the Controller constructor. Refer to the WindowController.TargetWindowType and Window.IsMain topics for details.
using DevExpress.ExpressApp;
using DevExpress.ExpressApp.SystemModule;
// ...
public class CustomizeWindowController : WindowController {
    public CustomizeWindowController() {
        TargetWindowType = WindowType.Main;
    }
    protected override void OnActivated() {
        base.OnActivated();
        WindowTemplateController controller = Frame.GetController<WindowTemplateController>();
        controller.CustomizeWindowCaption += Controller_CustomizeWindowCaption;
    }
    private void Controller_CustomizeWindowCaption(object sender, CustomizeWindowCaptionEventArgs e) {
        e.WindowCaption.Text = "My Custom Caption";
    }
    protected override void OnDeactivated() {
        base.OnDeactivated();
        WindowTemplateController controller = Frame.GetController<WindowTemplateController>();
        controller.CustomizeWindowCaption -= Controller_CustomizeWindowCaption;
    }
}
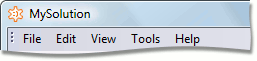
The following image illustrates a custom caption in a Windows Forms application.

The following image illustrates a custom caption in an ASP.NET application.

Modify a Part of a Caption
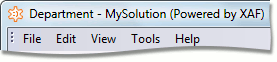
To change the second part of a caption, modify the WindowCaption.SecondPart property in the CustomizeWindowCaption event handler.
private void Controller_CustomizeWindowCaption(object sender, CustomizeWindowCaptionEventArgs e) {
    e.WindowCaption.SecondPart += " (Powered by XAF)";
}
The following images illustrate a customized caption with the second part modified.

Modify a Caption Separator
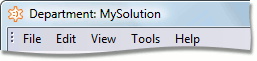
To change a caption separator, assign a custom value to the WindowCaption.Separator property in the CustomizeWindowCaption event handler.
private void Controller_CustomizeWindowCaption(object sender, CustomizeWindowCaptionEventArgs e) {
    e.WindowCaption.Separator = ": ";
}
The following images illustrate a caption with a customized separator.

Swap Parts of a Caption
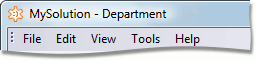
To change the order of caption parts, swap the values of WindowCaption.FirstPart and WindowCaption.SecondPart properties in the CustomizeWindowCaption event handler.
private void Controller_CustomizeWindowCaption(object sender, CustomizeWindowCaptionEventArgs e) {
    string TmpString = e.WindowCaption.FirstPart;
    e.WindowCaption.FirstPart = e.WindowCaption.SecondPart;
    e.WindowCaption.SecondPart = TmpString;
}
The following images illustrate a customized caption with the left and right parts swapped.

Display Only One Part of a Caption
To display only the second part of a caption, set the WindowCaption.FirstPart to null (Nothing in VB).
private void Controller_CustomizeWindowCaption(object sender, CustomizeWindowCaptionEventArgs e) {
    e.WindowCaption.FirstPart = null;
}
Note
You do not have to set the WindowCaption.Separator property to null (Nothing in VB) to disable the separator display when one of the caption parts is an empty string or null (Nothing in VB). The separator will be omitted automatically. Refer to the SplitString topic for details.
The following images illustrate a customized caption.

You can use the WindowTemplateController.UpdateWindowCaption method to refresh a window caption.